|
|
The QuickBooks audit trail feature has all the records about the changes that you have done to your QuickBooks company data file. Using an audit trail you can have a permanent record about who is performing changes in QuickBooks. For this, you have to follow the steps to turn on the QuickBooks audit trail feature.
Dancing Numbers helps small businesses, entrepreneurs, and CPAs to do smart transferring of data to and from QuickBooks Desktop. Utilize import, export, and delete services of Dancing Numbers software.
What is an Audit Trail in QuickBooks?
This function allows you to retain a history of how many changes have been done to the QuickBooks data file. If we want to use the feature in QuickBooks we must ensure to turn on this function which allow multiple users to do the changes to the QuickBooks data file. Further, we can treat it as a savior when it comes to retain a record of lots of transactions. If you have ever got stuck in the same situation, use a substantial function of QuickBooks i.e. ‘Audit Trail’ by turning it on. In this module we will assist you to understand some advantages of the audit trail and the steps of turn it on.
What is the Importance of an Audit Trail in the QuickBooks Desktop?
QuickBooks is a advantageous method to command over the tasks like looking at the bills, make any changes in the bills or invoices, and managing vendor accounts. All these activities can be performed by using the audit trail in QuickBooks Desktop. QuickBooks is solely designed which helps multiple users to access the data file by using the function of an audit trail in QuickBooks. Multiple times we face the trouble of losing a transaction, and we are unqualified to locate it.
What is the Need of an Audit Trail in QuickBooks?
To know about the advantages of it, we need to go through the below mentioned points and help us to understand better about it.
- This function helps you in locating past account names that have been united with the latest accounts.
- One can track user login details and activities with the help of audit trail QuickBooks.
- We can easily find the Deleted or lost transactions with the audit trail feature.
- We can have information about the task performed and supervise who is working on the books.
In the later stage, we will learn about the functions to turn on the QuickBooks audit trail. We have also listed the steps to use this feature also.
Where to Find an Audit Trail Report in QuickBooks?
If you are working with the QuickBooks Desktop version, then you need to access the audit log report by following these three steps:
- Firstly, select the Reports option.
- Now, click on Accountant and Taxes.
- And lastly, select Audit Trail.
How to Turn On / Run QuickBooks Audit Trail Report?
As we have initiated, this function gives access to more than a single user to do the modifications to the QuickBooks data file. Here are a few steps mentioned that help us to understand how to turn on an audit trail:
- In the first step, Choose the Edit menu and then click on preferences.
- Later, a dialogue box ‘Preferences’ appears on the screen.
- Here, one can make all the necessary changes under the Accounting Preference section.
- Now select the icon bar and choose the Accounting set of preferences.
- Later, Select the Company Preferences tab and select QuickBooks to use the Audit feature.
- Verify Audit Trail and select Yes.
- In the last step, QuickBooks will naturally start keeping a record of the users that want to change the QuickBooks data file.
How to Customize QuickBooks Audit Trail Reports?
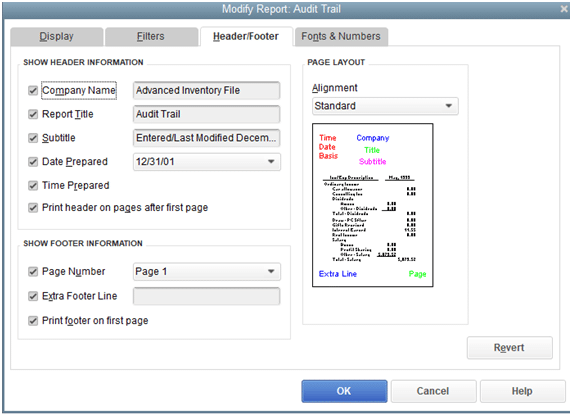
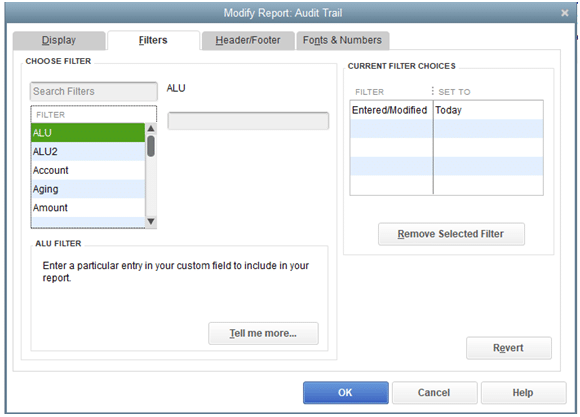
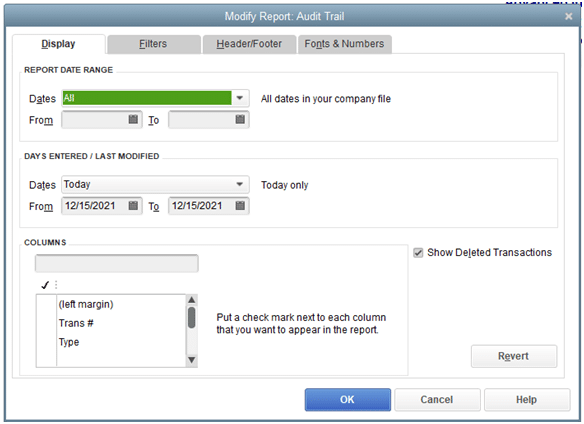
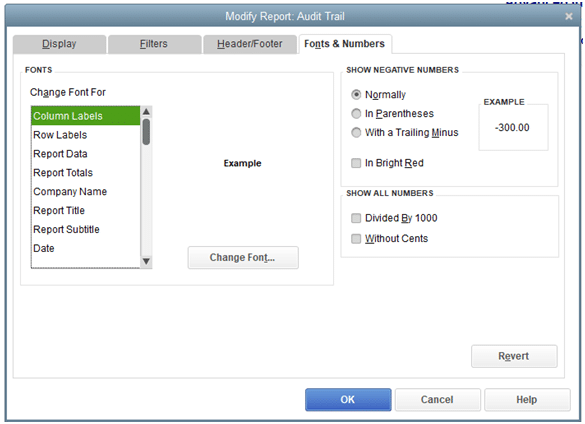
If we want to make the QuickBooks Audit Trail report as per our choice for that, we are required to go to the top of the left corner and click on the report. We will find the modify Report in the Audit Trail window now. Screen opens up to multiple tabs like Display, Filters, Header/Footer, and Fonts & numbers. These multiple tabs will offer you multiple features.
1. Header/Footer:

Here in this screen, we can rectify or edit what appears on the header and the footer of the report. This is very uncomplicated, so we are not going into the lengthy process. In case of any query you can always reach out to the experts.
2. Filters:

In this tab, we can change the look of the report. If one do not want to modify the report, then follow the steps mentioned below:
- Firstly, Go to the Edit and select Preferences.
- Then, Select Reports and Graphs > company preferences.
- Here, we are required to select the Format.
- And lastly, Choose the ‘Default Report Settings‘.
3. Display:

Here, we are able to get choices of modification of the QuickBooks audit trail report. For ex. the Date Range for Report is one of the choice. Second choice will be the last modified filter which shows when the user has modified the report. Here we are free to choose the columns that are displayed in the report.
4. Font & Numbers:

In this tab, you can modify the look of the report. If one is are not interested to modify the report, then follow the steps written below:
- First, Go the Edit and select Preferences.
- Later, Choose Reports and Graphs > company preferences.
- In this step, We need to select the Format.
- Finally select the ‘default report settings.
Clearing Audit Trail in QuickBooks
Why do You Need to Clear Audit Trail in QuickBooks?
QuickBooks company files can become quite big because of the huge number of closed transactions. It may grow to be quite large also due to the unused list elements that develop during the course of the business.
Hence, when company files are condensed, the audit trail related to closed transactions is removed.
How to Clear Audit Trail in QuickBooks Desktop?
Since the Audit Trail function in QuickBooks helps you in tracking all the transactions, modifications, and deletions in your file, it is also responsible for the growth in the size of the QuickBooks files which in turn, slows down the QuickBooks software altogether.
Nevertheless, you can clear the Audit Trail in QuickBooks to increase the file performance. Perform the following steps to clear the Audit Trail:
- Open the QuickBooks software.
- From the upper left-hand corner of the window, select the File command.
- A drop-down menu will appear. Select the Utilities option from this menu.
- If you are using QuickBooks 2021 or earlier versions, select Condense Data, and you are done. Select Clean up Company Data for versions of QuickBooks after 2021.
- You can either choose the date ranges for which you want to clear the audit trail or delete all the transactions.
- When prompted, check all the boxes in the next two screens using your mouse to clear up the audit trails from all the transactions and accounts.
- Complete the task by clicking on Begin Cleanup.
How to View Audit Trail in QuickBooks?
To see an audit trail in QuickBooks the knowledge of Audit History can help you to know better. You can view the trail immediately and use it after that thanks to this history. You can first choose Recurring Transactions to access this history. Next, you have to select a transaction, and then click on more. By pressing this button, the Audit History will become visible, and you can then you can access the trail feature.
- You have to click on Recurring Transactions. You have the option to change, add, or edit any recurring transactions here. In Audit History, you can view the records for a particular date.
Note: In Audit history, the following items can be monitored:
- First, You have to add the person’s name that made the edit.
- When the changes have been made.
- Kind of edit that takes place.
- For viewing Audit History make sure that you have the right.
- To view a transaction, Go to that transaction.
- After that, You have to click on more and click on Audit History.
- On your screen Audit Trail will appear. To view more information you have to select Show All.
- Click on the option to Compare.
You can access the QuickBooks Audit Trail and other information after tapping on this button if it’s available.
How to View Transaction Changes in the Audit History
The Audit History can serve as a record of all the modifications that might be made on a specific QuickBooks file or transaction. It provides you with the following information:
- The user who has made the changes or modifications to your files.
- The date or the time when the user made the modification.
- The content and type of the modifications made by the user to your file.
To view the transaction changes in the Audit History, follow the steps given below:
- Open the transaction you want to view.
- Click on the More tab.
- Select Audit History to open the Audit Trail
- Select Show All for an expanded view.
- Select the Compare tab to get a side-by-side comparison.
Restore Deleted Transactions on QuickBooks using the Audit Trails Feature
You can restore a transaction that you might have deleted intentionally or accidentally using the QuickBooks Audit Trail feature by simply re-entering the data.
However, if the transaction is lost due to loss of data or some technical glitch, it cannot be restored through the Audit Trail feature. In such a case, it can only be restored by using a backup file.
Follow the steps given below to restore a deleted transaction using the Audit Trail feature in QuickBooks:
- From the Menu bar, Click on the Reports button.
- Scroll down to find the Accountants and Taxes option and click on it. A menu will appear on the side.
- Select the Audit Trails tab.
- Specify a date range within which the transaction might have been deleted by clicking on the From and To tabs and selecting the date by the week or month of deletion.
- Click on Refresh to view all the Audit Trails within the specified date range.
- A list of transactions will appear. Scroll through the list and double-tap on the deleted transaction. Note down the details of the deleted transaction.
- Finally, the details of the deleted transaction can now be re-entered and the deleted transaction will thus, be restored by using Audit Trail.
This above-written article entails all the necessary information that you need to know about an audit trail in QuickBooks. As per the government guidelines, one must have an audit trail in the accounting software after the invention of GST e-invoicing for businesses.

Looking for a professional expert to get the right assistance for your problems? Here, we have a team of professional and experienced team members to fix your technical, functional, data transfer, installation, update, upgrade, or data migrations errors. We are here at Dancing Numbers available to assist you with all your queries. To fix these queries you can get in touch with us via a toll-free number
+1-800-596-0806 or chat with experts.
Frequently Asked Questions (Faqs)
What are the Steps to Access an Audit Log in QuickBooks Online?
Below are a few steps mentioned which will help us to learn to run an audit trail report in QuickBooks Online.
 Firstly, go to the Settings option and Select Audit Log.
 Once it’s done then, click on Filter.
 Now, Select the Filter panel and use the fields to select the User, Date, or Events filter.
 And lastly, click on Apply.
What do we need to do to Turn off an Audit Trail in QuickBooks?
Below are the steps to turn off an audit trail:
 The primary step is to access QuickBooks Desktop.
 Then, find the Utility option and Choose the Options.
 Here, go to the Range of Date and mark all the boxes.
 And lastly, start the Cleanup.
How one Can Remove an Audit Trail?
At the time of difficulty, these quick questions will ensure to keep your issues at bay. You can follow the given steps in order to erase the audit trail in QuickBooks.
 First of all, you need to choose the File Menu
 Take your cursor and hover over the utility tab.
 Click on Condense Data Condense.
 After that, you can also choose to keep all the required transactions except the audit trail from the Condense your company file window.
 And lastly, select Next and follow ongoing prompts.
What do Companies do to Maintain an Audit Trail?
We all know, an audit trail contains a record that keeps the compulsory documentation. Few investors or lenders might need an audited financial statement. We can rush the process and diminish the cost of an audit by maintaining clear records of all transactions.
How to Build an Audit Trail?
If you are looking forward to starting an audit trail and need some ideas, you are at the right place. An audit trail can be started with the invoice receipt. We can follow up on the transactions via accounts payable and the electronic payment or check made for the amount settlement.


 +1-800-596-0806