Any business posses a numerous stuff with long-lasting value, and we or the accounting clerks have to maintain the record of items. This can be done by using the feature of setting up the Fixed Asset list in QuickBooks. Learn how to set up a fixed asset list in QuickBooks.
Save Time, Reduce Errors, and Improve Accuracy
Dancing Numbers helps small businesses, entrepreneurs, and CPAs to do smart transferring of data to and from QuickBooks Desktop. Utilize import, export, and delete services of Dancing Numbers software.
Adding Items to the Fixed Asset List
Suppose we need to add an item like furniture, some bit of machinery or equipment, or another item which is durable value to the Fixed Asset list, we need to follow the below mentioned steps:
1. Select the List Option → Now move on to the Fixed Asset Item List to show the Fixed Asset List
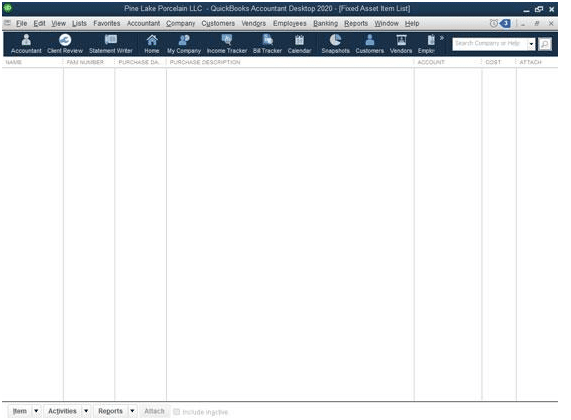
QuickBooks shows the Fixed Asset Item List window. At the first instance, because one haven’t yet added any assets, the list shows no assets.
Do you have assets which you have already purchased? You can edit the primary purchase transaction and add the fixed asset to the list during editing.
 The Fixed Asset Item List window
2. Recognize QuickBooks that You want to Sum an Item to the Fixed Asset List
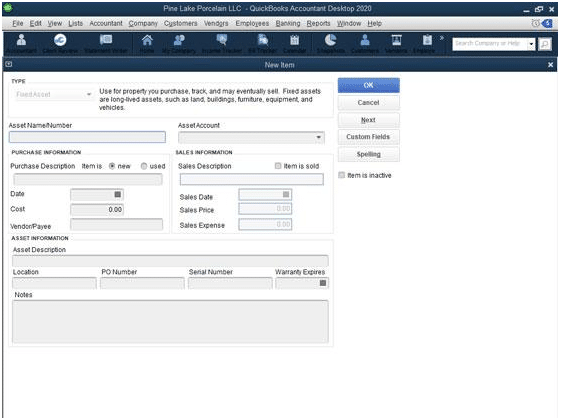
Click on the Item tab which is available in the left lower part of the screen and later select the new from the menu that QuickBooks shows. QuickBooks shows the latest Item window.
 The New Item window
3. Name of the Asset
The unique name is required to give to the asset. We can understand this with the help of an example like we can give the name to the various items like term piece of furniture can be refer as like Leather sofa, computer can be refer as HP Pavilion, vehicle can be refer as truck.
4. Select the Appropriate Fixed Asset Account
In the asset head list drop down, we need to choose the FA account in which the asset you are explaining can be placed. A sofa might be used in the lobby area, for example, this can be used in placed in a furniture and equipment fixed asset account. A truck which might be used for delivery can be placed in a vehicles fixed asset account.
QuickBooks, supplies a bunch of accounts automatically, However, we might not see the account we need or want in the Asset list below. We can add a new asset account on the fly by entering a new account name and we need to press Enter. While QuickBooks make out that the fixed asset account is not set up yet, it give rise to you to set up the new fixed asset account.
5. Describe the Purchase Terms
Use the Purchase statistics area to describe the item that we have purchased & the purchase terms. For example, we want to indicate whether the item is latest or used by choosing either the latest or Used radio button. We can also provide the description of purchases, date of purchase, cost of purchase, & even identify the trader by using the other, user friendly boxes in the Purchase Information area.
6. Describe the Asset in Additionally Detail (Optional)
The Asset Information area at the end of the New Item window provides further text boxes that we can use to describe the asset. The area provides a enormous field in which to place a extended asset description, for example. We also have fields we can use to identify the asset location, the primary purchase order (PO) number, the asset’s serial number, & the warranty expiration date.
If these fields are not adequate, heck, QuickBooks even supplies a Notes area that we can use to write a small ode to your asset or record some other bit of relevant asset information.
7. Save the Asset Item Description
Click OK to save the advanced asset item description & close the New Item window all together. There is one more option like select the Next option to save the new asset item description however, leave the New Item window showed.
Adding Fixed Asset Items on the Fly
We can add items to the Fixed Asset list, as mentioned in the above paragraphs. On the other hand, we can add an item to the Fixed Asset list whenever we record the bill that records the seller invoice for the asset or when we record the check that pays the vendor invoice for the asset.
Let’s understand that how it works: If we have been told QuickBooks that we need to maintain a Fixed Asset list, then you need not to worry about it. Being the most advanced platform, QuickBooks has the function to make an addition to a fixed asset item that is already categorized. It can be a debit transaction or a fixed asset account while entering a bill or recording a check.
To assemble the information which is necessary to set up the fixed asset item, QuickBooks reflect the same New Item window. There are following steps which are required to fill in the New Item window also work while adding fixed asset items on the fly.
Editing Items on the Fixed Asset List
To edit a fixed asset item it’s like we have made a mistake go in for some bit of information – we need to adhere these steps:
1. Select Lists → Fixed Asset Item List
QuickBooks Reflects the FA Item List window.
2. Click the Item Twice that we Want to Edit.
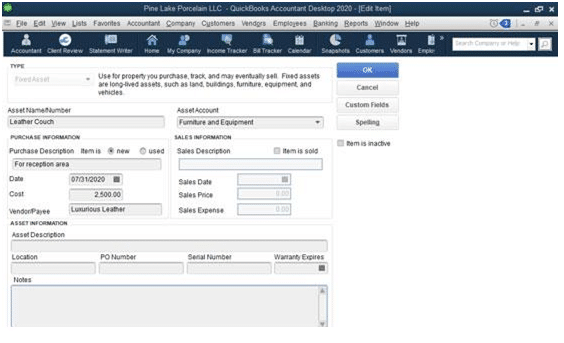
QuickBooks shows the Edit Item window.
 The Edit Item window
3. Renovate the Asset Description
As needed, streamline the information showing in the Purchase Information & the Asset Information areas. Kindly note, that if we want to record the scrapping of an asset, we have to select the Item Is Sold check box. Then QuickBooks permits the Sales Information area’s text boxes. We can use these to identify the sales date, price, & amount of selling expenses.
We hope that in this article, we have tried to include all the necessary information about how to Set Up a Fixed Asset List in QuickBooks.
Accounting Professionals, CPA, Enterprises, Owners
Looking for a professional expert to get the right assistance for your problems? Here, we have a team of professional and experienced team members to fix your technical, functional, data transfer, installation, update, upgrade, or data migrations errors. We are here at Dancing Numbers available to assist you with all your queries. To fix these queries you can get in touch with us via a toll-free number
+1-800-596-0806 or chat with experts.

