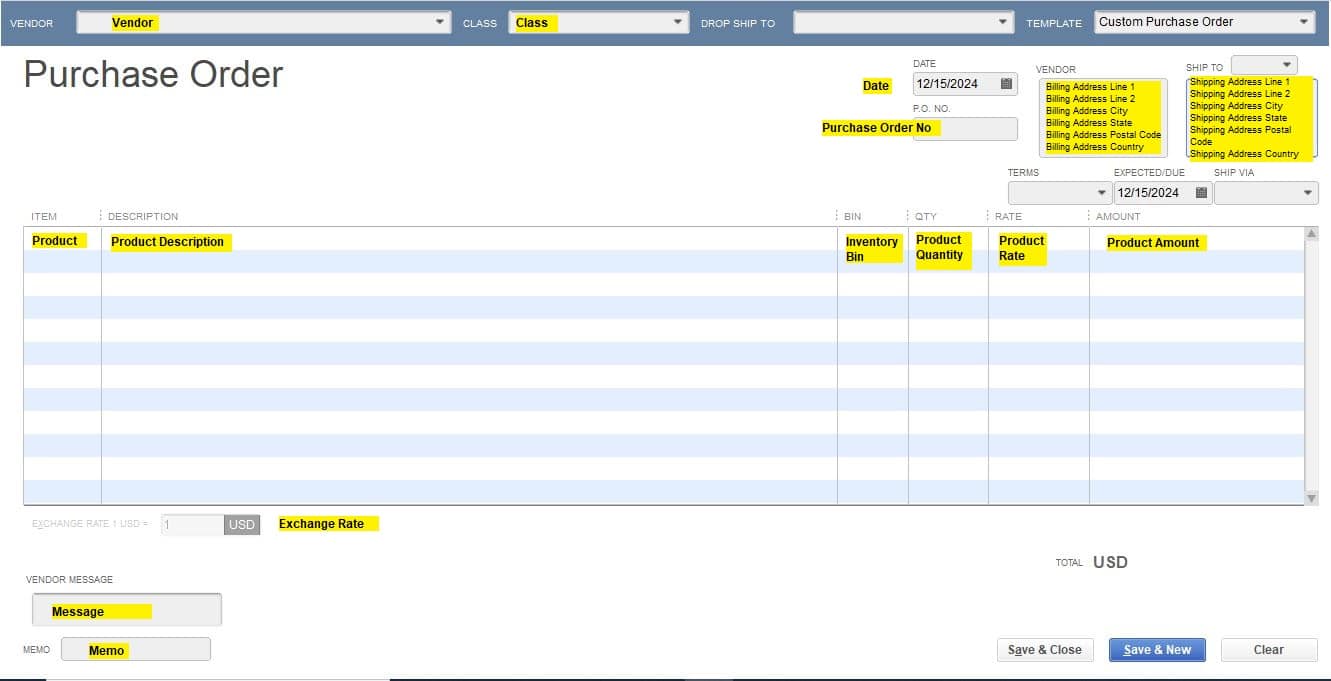
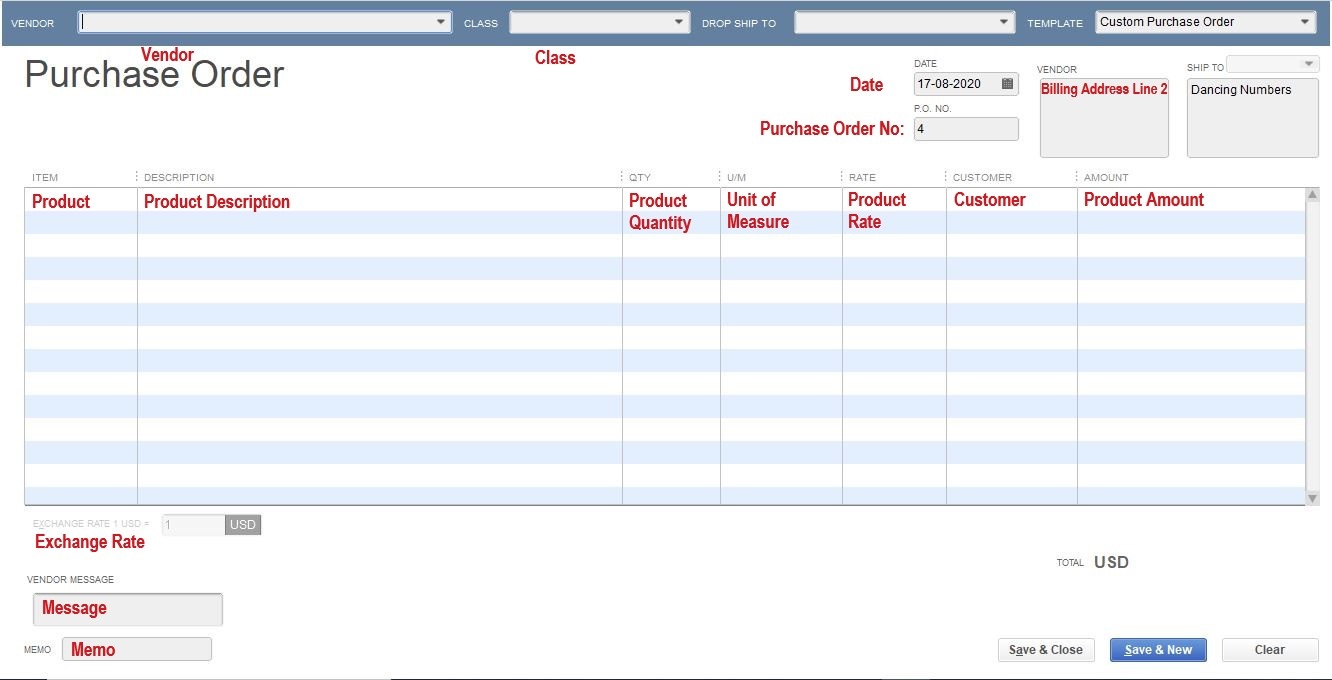
Importing was never so easy but Dancing Numbers made it simple and quick.
Import Purchase Orders automatically. The filters attribute gives you more accurate data to import as you want.
Dancing Numbers helps small businesses, entrepreneurs, and CPAs to do smart transferring of data to and from QuickBooks Desktop. Utilize import, export, and delete services of Dancing Numbers software.
You can easily Import Purchase Orders from Excel to your QuickBooks Desktop directly through Dancing Numbers (Desktop).
This tool is built exclusively for QuickBooks Desktop.
Supported Version: QuickBooks Desktop Premier, Pro, Accountant, and Enterprise Editions.
You can download a free trial of the software easily from the Dancing Numbers Website. Follow the below-mentioned steps to get step by a step installation procedure.
Steps to Import Purchase Orders into QuickBooks Desktop
Now, it’s easier to import with Dancing Numbers with the powerful and simplified wizard. To start the bulk import of your files data to QuickBooks follows the mentioned steps.
First of all click Import (Start) button available on the home screen.
Step 1 – File Selection: For the selection of a file click “Select Your File”, you can also click “Browse File” to browse and choose the desired file from the local computer, alternatively you can click the “View Sample File” to go to the Dancing Numbers sample file.
Step 2 – Mapping: Now in the second step set up the mapping of the file column related to QuickBooks fields. Dancing Numbers template file do this step automatically, to use it download the Dancing Numbers template file.
Step 3 – Review and Import: To review your file data on the preview screen, just click on “next” which shows your file data before Importing to QuickBooks.
For more detailed instructions on the steps go through this article.

Mapping QuickBooks Fields
|
Field Name | Format |
Description |
|
Vendor | Text |
Vendor/ Service Provider Name |
|
Template | Text |
Format/Category of the transaction |
|
Date | MM/DD/YYYY |
The Date on which transactions occurs |
|
Purchase Order Number | Numerical |
A Unique number assigned to the transaction |
|
Due Date | MM/DD/YYYY |
Date till when payment must be done |
|
Total Amount | Numerical |
The Total amount which needs to be paid |
|
Memo | Alphanumeric |
Additional Notes used for business |
|
Vendor Message | Alphanumerical |
Message or any instructions from Vendors |
|
Is Tax Included | Y/N |
Shows if the tax is included or not |
|
Vendor Address Line 1 | Text |
The First line of Vendor’s Address |
|
Vendor Address Line 2 | Alphanumeric |
Second Line of Vendor’ Address |
|
Vendor Address Line 3 | Text |
Third Line of Vendor’s Address |
|
Vendor Address Line 4 | Text |
Fourth Line of Vendor’s Address |
|
Vendor Address Line 5 | Text |
Fifth Line of Vendor’s Address |
|
Vendor City | Text |
City of the Vendor’s address |
|
Vendor State | Text |
State of the Vendor’s address |
|
Vendor Postal Code | Numerical |
Zip Code of the Vendor’s Address |
|
Vendor Country | Text |
Country of the Vendor’s Address |
|
Vendor Note | Alphanumerical |
Any additional or extra notes from the Vendor |
|
Ship Address Line 1 | Text |
Shipping Address first line |
|
Ship Address Line 2 | Alphanumeric |
Second Line of Shipping Address |
|
Ship Address Line 3 | Text |
Third Line of Shipping Address |
|
Ship Address Line 4 | Text |
Fourth Line of Shipping Address |
|
Ship Address Line 5 | Text |
Fifth Line of Shipping Address |
|
Ship City | Text |
City of the Shipping Address |
|
Ship State | Text |
State of the Shipping Address |
|
Ship Postal Code | Numerical |
Zip Code of the Shipping Address |
|
Ship Country | Text |
Country of the shipping address |
|
Ship Note | Alphanumerical |
Any notes or comments related to Shipping |
|
Item | Alphanumeric |
Name of the item or product |
|
Description | Alphanumeric |
Description of the product or item |
|
Quantity | Numerical |
Number of the products |
|
U/M | Numeric |
Unit of Measure |
|
Rate | Numerical |
Price of the product per Quantity |
|
Manufacturer Part Number | Alphanumeric |
A Unique number assigned by the manufacturer |
|
Customer | Text |
Name of the customer |
|
Amount | Numerical |
Due amount |
|
Unique ID | Internal QuickBooks ID |
Unique Number assigned by QuickBooks |
Import Settings
To make your file more customizable, the set of tools is available with Import Settings at the top right-hand side corner.
Importing Purchase Orders into QuickBooks Desktop: Video Tutorials
Manual Methods to Import Purchase Orders into QuickBooks Desktop
Purchase orders are the orders for services or products that are submitted to a vendor in QuickBooks Desktop. Users can easily import purchase orders into QuickBooks Desktop from excel spreadsheets or text files using two methods. They can also import by running the QuickBooks Web Connector if they’re using online version. In this article, you will learn two different ways to import purchase orders.
However, the purchase order can be imported into QuickBooks as bills which are provided the following two conditions are fulfilled:
- An invoice data has been entered in the purchase order, and
- The total of the purchase order is greater than 0.
It is recommended that you should import the vendors before you import the purchase orders. It means that if any new vendors can be matched to the existing vendors in QuickBooks accurately.
Check out the quickest ways to import your purchase orders one after one but it is only a suggestion that you must follow every step in the given sequence order.

Methods 1: Import all Orders at the Same Time
This method helps you can import your all orders at one time with these easy steps:
- Initially, choose Accounts from the left navigation and then click on QuickBooks
- Next, hit the option named “Import Vendors” in order to update or import new vendors (if any)
- Now, click on the “Import Purchase Orders“
- At last, you’ll receive a notification once all the orders have been successfully imported.
Method 2: Import Individually
In case, if you wish to import your purchase order individually and you want to carefully inspect the orders before you import the order. To do so, follow these steps:
- The very first, choose the Accounts and then QuickBooks from the left navigation
- Next, hit the “Import Vendors” in order to update or insert new vendors (if any)
- Now, click on the “Choose” option which is next to the “Import Purchase Orders” option
Note: The number in brackets reflects the number of pending import orders.
- Once you’re done with the above steps then you can verify the specific purchase orders that you would like to import
- Finally, click on the “Update/Import Orders” option.
To import QuickBooks transactions such as Sales and Purchases, you may first import Customers and Vendors.
If there are no contacts in QuickBooks we create a new Customer or Vendor. If the contact already exists in QuickBooks that means the name of the company contacts exactly matches. For more, you can also explore the purchase order total and its button that are discussed below.
Purchase Order Total
Below are the listed total and some fields that need to be filled in:
- Attachments: In this particular purchase order field, you can easily add/attach your file
- Message: A message to appear on your purchase order ( e.g. “looking forward to your business”) for the customer to see. Note: This is a drop-down list of messages if you are on the QuickBooks Desktop. Such messages are currently being handled within QuickBooks. If you want to change the messages, consider the Customer Message List inside QuickBooks Desktop.
- Memo: Note to yourself and the users of the system who have access to this request. The customer will not see the memo.
Purchase Order Buttons
There are few buttons, you will come across when you import purchase orders into QuickBooks Desktop.
- Delete: With the help of this button, you can delete your purchase order. This can’t be undone.
- Print: Generates a pdf purchase order file that you can print out. Make sure that you do not block the pop-ups. The pdf is generated using a template selected within the app preferences.
- Save: With this button, you can easily save your purchase order.
- Clear & New: You can clear the unwanted current purchase order so that it makes more space to create a new order.
- Save & New: With this, you can save your purchase order and then clear the form to enter a new purchase order.
So, the above are mentioned two ways to import purchase orders either all at once or choose which one to import. You can import with either way whichever is comfortable and convenient for you.

Looking for a professional expert to get the right assistance for your problems? Here, we have a team of professional and experienced team members to fix your technical, functional, data transfer, installation, update, upgrade, or data migrations errors. We are here at Dancing Numbers available to assist you with all your queries. To fix these queries you can get in touch with us via a toll-free number
+1-800-596-0806 or chat with experts.
Frequently Asked Questions
Many users would have some questions while moving data to your QuickBooks Desktop. Some of the questions are mentioned below:
I want to Import Purchase Order with Purchase order Numbers from the File. Will it be Supported?
Yes. It will be Supported.
Will Your Application Support Multi-Line Transactions?
Yes. However, the same Purchase Order Number is required to be mentioned in multiple lines to group the lines and the Total is supposed to Match.
I made Some Mistakes in the Import Process and my QuickBooks Reports have been Corrupted. Can I undo or Revert my Import?
It is possible to undo the import partially/ completely with the Delete feature available.
Does Your App Support Taxes?
Yes. It Supports.
I Don’t want to Create Products Automatically for my Invoices; Also I am Unable to Create Products Before Each Upload. Will it be Supported?
Yes. It is. You can do auto-create unavailable products/ services or you can also skip it during the Import process.
My File has Some Specific Date Format. I don’t want to Change the File. Will your Product Support all Date Formats?
No. It needs to specify the specific date format as MM/DD/YYYY
Do You have Any Sample Templates?
Yes. We do have. Sample Template.
File Types Supported by Your Application?
XLS, XLSX, etc are Supported File Formats


 +1-800-596-0806