This blog will teach you how to create estimates in QuickBooks Online. To provide quotes and bids to customers for proposed jobs estimates can be used. This will help you to know about the Estimates, Like How to Create, Update and Delete within the easy steps. You will get all the important points regarding Estimates, Bids, Quotes, or Proposals for prospective customers mentioned in this article. You can do is to create your estimates in QuickBooks, Email it to the customers and then Convert them into Invoices after finishing the work.
Dancing Numbers helps small businesses, entrepreneurs, and CPAs to do smart transferring of data to and from QuickBooks Desktop. Utilize import, export, and delete services of Dancing Numbers software.
What is QuickBooks Estimate?
An estimate is a price quote you give a customer for products or services. If the customer chooses to accept your quote, The estimate can be converted into a sales order or invoice once it has been saved in QuickBooks. Estimates don’t post and aren’t included against Income Type.
How to Create Estimates in QuickBooks Desktop?
1. Navigate to Estimates
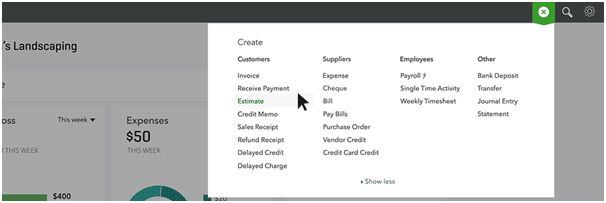
- Select Estimate from the Customers column of the Plus Menu by clicking it on the home screen.

2. Enter Estimate Details
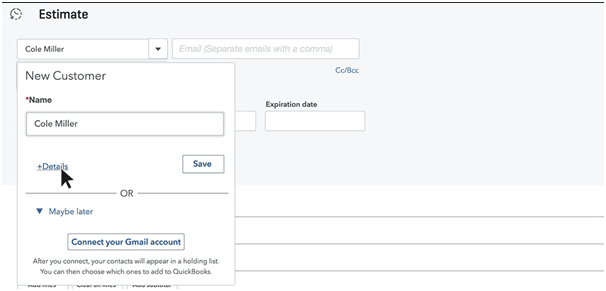
- In the Choose a customer box, type the potential customer’s name. Select a customer name from the drop-down menu options, or, If you haven’t added this customer to QuickBooks yet, Click the + Add new button at the top of the drop-down menu.

- After entering your prospective customer’s name you have click on + Details.

- Enter your prospective customer’s contact information in the detail window. Add your email address so that you can send them the estimate. After finishing you have to click the Save option that is in the bottom right corner.

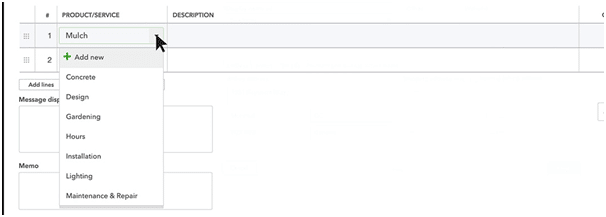
- Enter the names of the Products and Services you intend to offer next. If you haven’t yet added this new product or service to QuickBooks, Click + Add new at the top of the drop-down menu.

- Provide details about the product or service you plan to provide and designate an income account for it. Select an account name in the textbox labeled Income Account; keep in mind that this is a bookkeeping account that increases each time you sell this product rather than a bank account. When you’re done, click Save and Close.

- For the product or service enter the Quantity, Rate, and Amount.

- When your estimate has everything you need, Click Save and Send to email the estimate to your prospective customer.
3. Custom Form Style Estimates
- If you want to change the wording on the form your consumers view, you can call estimates bids, quotations, or proposals. From the Home Screen, Select the gear menu, then select Custom Form Styles from the Setting column.

- Click New Style in the upper right corner of the Customs Form Styles home page to start. You have to choose Estimate as you wish to customize.

- Then pick one from the available styles on the left. Replace Estimate with whatever you want customers to see in the Header area, such as Bid. When you’re finished, click Save. Name your customized form style, then hit Save.

- Now, you may select Bid as a custom form style when creating an estimate.

4. Update Estimate Status
- You must update the estimate status after receiving a “Yes” response from a customer. To do this, you must locate the estimate. Select the All Sales tab by clicking the Invoicing link in the left menu on the Home Screen.

- Select Estimates from the QuickBooks money bar on the sales screen. Choose the estimate from the list below that you want to accept, then click Pending in the Status column to customize it.

- To change the estimate’s status from Pending to Accepted, click the button in the top right corner.
- If you have finished then click on Save and then close that is in the bottom right.
5. Convert an Estimate into an Invoice
- Make sure your account is properly set up before Converting an Estimate into An Invoice. Select Account and Settings by clicking the gear menu. Make sure the option to Copy estimates to invoices is turned on under the Automation section by selecting Advanced from the left navigation bar. To change your settings if it isn’t, just click anywhere on the Automation section or the pencil icon.
- By selecting Start invoice on the estimates page, you can turn the estimate into an invoice once you have finished your work for this customer.

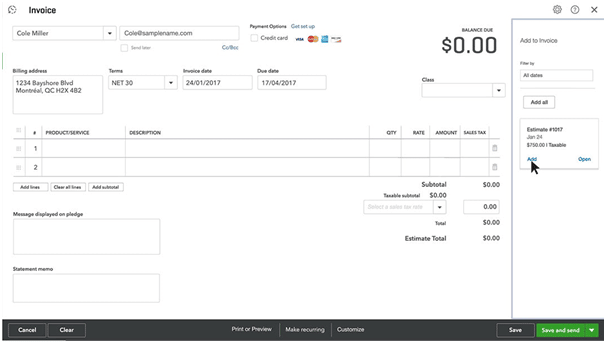
- QuickBooks will find any open estimates you have for this customer if you started an invoice directly and allow you to add them to the invoice. From the Home Screen, select the + Menu, and under Customers choose Invoice to convert an estimate in this way.

- Select the customer’s name from the list of customers on the invoice screen. To add the estimate balance to the invoice, click Add in the column on the far right.

How to Create an Estimates in QuickBooks Online?
When you want to provide your customer with a price, bid, or proposal for work you plan to complete, create an estimate. Although it looks similar to an invoice, the form has a different function-it helps you start discussing details with your customer.
To avoid entering the information twice, you can convert the estimate to an invoice after the work is finished and you’re prepared to invoice your customer. Here’s how to make a new estimate, convert an existing estimate, or add an estimate to an existing invoice.
Step 1: Create an Estimate
- First, you have to start by choosing + New and then Selecting Estimate.
- From the Customer dropdown, choose a customer.
- In the event that the work has already begun, choose a status from the Pending menu. This is not required.
- Then set the Estimated and Expiration dates.
- Add the products and services you plan to sell.
- Please enter any further information you require.
- Select Save and close when you are finished.
Step 2: Update an Estimate’s Status
Update the estimate’s status whenever your customer accepts the work or decides they do not want to continue. This will keep your accounts accurate and up to date:
● Start by going to sales and then select All Sales.
● Then find the estimate.
● Update status should be chosen from the dropdown in the Action column.
● Choose Accepted or another status and then select OK.
Remember: Estimates will not be considered transactions on your books till they are accepted.
Step 3: Convert an Estimate to an Invoice
To Bill Your Customer You have to Convert the Estimate to an Invoice:
- Firstly, go to Sales and then select All Sales.
- Then search the estimate.
- Choose to Create Invoice in the Action Column.
- Then make any changes to the invoice and then select Save and Close.
Add an Estimate to an Existing Invoice
You can also add estimates to existing invoice rather than converting them:
- You have to start by selecting + New and then choose Invoice.
- From the Customer dropdown, choose the customer. The Add to Invoice window is then displayed.
- To include the estimate on the invoice, select Add.
- If you want to add multiple estimates at once, choose Add all. A message is given with the option to copy all the estimate item lines or to create a new displayed if you want to independently add multiple estimates.
- Choose either Create a New Invoice or Copy the lines.
- Lastly, after completing you have to save the invoice.
Note: You can have more than one open estimates for a particular customer at once. Your customer might, however, prefer separate invoices for each one.
Review Open Estimates
- By going to Sales and then you have to select All Sales.
- Choose Filter from the drop down menu.
- Select Estimates from the dropdown menu for Type.
- Select Apply after adding additional filters you think are necessary.
To get more details you can also run a report:
- Visit Reports.
- Look and open the report titled Estimates by Customer.
- Choose Run report after selecting your date range.
You will see the name of the customer, the estimate number, the status, and, if it has been converted, the invoice number.
How to Delete an Estimate in QuickBooks
It’s preferable to change the estimate’s status to Rejected rather than remove it if your customer decides they do not want you to complete the work. (See Step 2: Update the status of an estimate.) For accurate bookkeeping, this keeps a record of the estimate on your accounts.
You may easily delete an estimate if you mistakenly created one:
- Select All Sales under Sales.
- Find the estimate, then open it.
- Choose More.
- Choose Delete, then click Yes to confirm your changes.
With the above article, you can solve your confusion regarding Estimates in QuickBooks. You can know about how to create, update and delete estimates in QuickBooks. By reading this article your confusion will be solved out regarding this. In case you still face any issue related to this then you can connect with Dancing Numbers experts via LIVE CHAT are available round the clock for the users.

Looking for a professional expert to get the right assistance for your problems? Here, we have a team of professional and experienced team members to fix your technical, functional, data transfer, installation, update, upgrade, or data migrations errors. We are here at Dancing Numbers available to assist you with all your queries. To fix these queries you can get in touch with us via a toll-free number
+1-800-596-0806 or chat with experts.
Frequently Asked Questions
Can You Create an Estimate in QuickBooks?
- Select Estimates / Create Estimates from the Customers menu or the QuickBooks Home page.
- Choose a customer or customer job from the Customer: Job drop-down menu.
- Choose Add New if the customer or job isn’t already on the list.
- The date and the estimate number should be filled in at the top of the form.
Where are Estimates in QuickBooks Online?
- Select Customer Center from the Customers menu.
- Click Estimates under the Transactions tab.
- All of your estimates will by default be displayed in the list. To see which are open, filter the drop-down list.
What is the Benefit of Estimation?
Project execution is smoother as a result of more accurate estimations. As a result, you avoid last-minute expenses, unplanned costs, and blocked working capital. Less expensive projects are the result of this. Correct estimation ensures smooth, continuous project execution.
How to Delete an Estimate in QuickBooks?
- First you have to go to the sales and then go to the Estimates page.
- Look for the estimate that you wish to delete and then click the arrow button to the right of that estimate.
- From the dropdown menu select Delete.
- After that you will be asked to confirm the deletion of this estimate.
What are the Types of Estimate?
- Detailed Estimate
- Preliminary Estimate
- Bid Estimate
- Quantity Estimate


 +1-800-596-0806