Importing timesheet entries manually into QuickBooks Desktop (QBDT) is a time-consuming task for accounting departments. While QuickBooks offers a native way to handle this via IIF (Intuit Interchange Format) files, the process is rigid and prone to formatting errors that can corrupt your company data.
Can You Import Timesheets into QuickBooks Desktop?
Yes, you can import timesheets into QuickBooks Desktop, though the software offers different pathways depending on your technical comfort level. Natively, QuickBooks supports the IIF (Intuit Interchange Format), a tab-delimited file system that requires strict adherence to specific headers. However, most modern businesses prefer using third-party conversion tools to bypass the limitations of manual entry.
Prerequisites for Importing TimeSheet Entries to QBDT
Before you begin the import process, ensure your system and software are configured correctly to prevent common Error Codes:
- You must be in Single-User Mode to modify the database during an import. Go to File > Switch to Single-User Mode.
- Ensure you are logged in as the QuickBooks Administrator.
- Navigate to Edit > Preferences > Time & Expenses > Company Preferences and ensure “Do you track time?” is set to Yes.
- Always create a manual backup (File > Back Up Company) before performing a bulk import.
Import Timesheet Entries Manually in QuickBooks Desktop
- Open QuickBooks
- To start the importing process, you have to locate the Manage Employees option
- Choose Import Timesheets located on the payroll dashboard
- Search the drop-down button and select the timesheets source
- Click QuickBooks Custom file Upload to import created timesheet; it is a time import function which permits the timesheet importing from CSV files.
- The format of the timesheet is not fixed. Here are the requirements:
- The file should be in CSV or TSV format
- There might be only single timesheet entry per line
- Must contain Starting date, Ending date /Time and Units
- Employee
- Choose the file you need to upload
- Once uploaded, you are permitted to set the date format of the preferred file
- After this, you need to configure the data type for every column
- You can view the highlights of the initial lines of columns to get a reference for the column matching
- Map the file columns corresponding to each QuickBooks fields
- Once done the column mapping, start the Import
- At last, check whether the timesheets need any standard approval workflow or whether they are automatic gets approved
- Select Import to start the process
- If there arise any interruption in the process then you can re-upload, reconfigure to solve the issue
- On successful completion of importing, you can save the file for the future use
- Discover and select the link named Save the format and give a name
- Hit on Save timesheet format
Import Timesheet Entries into QuickBooks Desktop using Dancing Numbers
Follow these steps to move your data from Excel to QuickBooks in minutes.
Step 1: Prepare Your Data
Ensure your Excel sheet contains the mandatory fields: Employee/Vendor Name, Date, Duration (HH:MM), and Payroll Item.
Note: If you are importing time for a new employee who isn’t in QuickBooks yet, you must Import your Employee List first to avoid “Entity Name Not Found” errors.
Step 2: Connect Dancing Numbers
Launch Dancing Numbers and select the Import option. Choose “Timesheet Entries” from the QuickBooks drop-down menu.
Step 3: Map Your Fields
Match your Excel columns to the QuickBooks fields.
- Customer:Job: Optional, but required if you bill time to clients.
- Service Item: Ensure this matches your Service List verbatim.
Step 4: Review and Complete
Preview your data within the tool to catch formatting issues. Once verified, click “Import.“
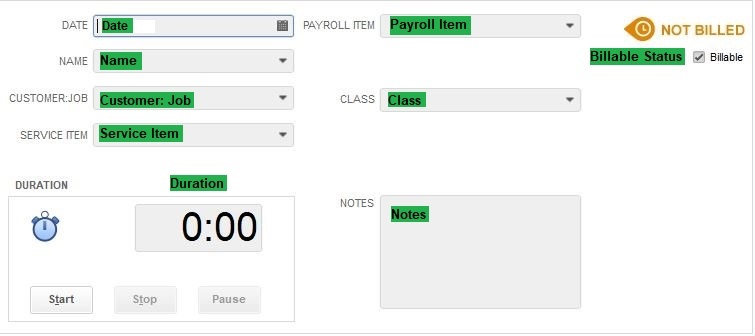
Mapping QuickBooks Fields
|
Field Name
| Format | Description |
|
Date
| MM/DD/YYYY |
The Date on which transactions has been done
|
|
Name
| Text |
Employee or Vendor name
|
|
Customer
| Text |
Customer Name
|
|
Service Item
| Text |
Reference to the item or service
|
|
Payroll Item
| Text |
Employee Payroll Wage Item
|
|
Notes
| Text |
Additional notes
|
|
Duration
| Numerical |
Time/Hours Worked for
|
| Billable | NonBillable, HasbeenBilled, |
Billed status. Nonbillable, Hasbeenbilled
|
Comparison – Manual Method vs. Dancing Numbers
Understanding the difference between the standard QuickBooks method and using an automated tool is key to data integrity.
| Feature | Manual Method | Dancing Numbers |
| File Format | IIF Files | Excel, CSV, TXT |
| Error Handling | Fails silently or corrupts data | Validates data before importing |
| User Friendliness | Requires technical coding knowledge | Simple “Drag and Drop” mapping |
| Data Safety | High risk of “Name Not Found” errors | Automated name matching/validation |
Common Import Errors and How to Fix Them
While your import your employee entries, you are likely to face the following errors:
1. Fixing “Employee Name Not Found” Errors
QuickBooks requires an exact character match. If your Excel says “John A. Doe” but QuickBooks says “John Doe,” the import will fail.
- Solution: Export a “Timer List” from QuickBooks (File > Utilities > Export) to verify the exact spelling of names before your next import.
2. Troubleshooting Error 3140
This usually occurs when a “Service Item” or “Payroll Item” referenced in your sheet does not exist in your QuickBooks Company file.
- Solution: Ensure all items are created in QuickBooks before starting the import.
Read More: QuickBooks Error Code 3140
Conclusion
Importing timesheets into QuickBooks Desktop significantly reduces manual entry errors and accelerates your payroll cycle. Whether you choose the technical native IIF method or a streamlined automation tool like Dancing Numbers, ensuring your data is correctly formatted is of utmost importance.
So, I hope the above Guidance helps you to import the Timesheet Entries into the QuickBooks Desktop. Stay updated with this website to read more informative blogs regarding Import and Export data in QuickBooks.
Accounting Professionals, CPA, Enterprises, Owners
Looking for a professional expert to get the right assistance for your problems? Here, we have a team of professional and experienced team members to fix your technical, functional, data transfer, installation, update, upgrade, or data migrations errors. We are here at Dancing Numbers available to assist you with all your queries. To fix these queries you can get in touch with us via a toll-free number
+1-800-596-0806 or chat with experts.
Frequently Asked Questions
I made some Mistakes in the Import Process and my QuickBooks Reports have been Corrupted. Can I undo or Revert my Import?
It is possible to undo the import partially/ completely with the Delete feature available.
Does Your App Support Taxes?
My File has Some Specific Date Format. I don’t Want to Change the File. Will Your Product Support all Date Formats?
No, It needs to specify the specific date format as MM/DD/YYYY
Do You have Any Sample Templates?
Yes, We do have. Sample Template.
File Types Supported by Your Application?
XLS, XLSX, etc are Supported File Formats
Where to Contact if I am Stuck?
Feel free to drop an email to support@dancingnumbers.com or visit our dedicated Support Center at https://www.dancingnumbers.com/support/ for a quick answer.
I don’t want to Create Products, Vendors or Customers Automatically for my Time Entry; also I am Unable to Create Products Before Each Upload. Will it be Supported?
Yes, It is. You can do auto-create unavailable products vendors, or customers or you can also skip it during the Import process.

