In this article, when we record a sales in cash or a payment received by customer on the invoice, QuickBooks makes an addition of the cash to its list of funds which are not yet deposited which is also known as Undeposited Funds or if you receive/accept the currency and coins or even credit card payments, these can also be converted as undeposited funds. Know how to make bank deposits in QuickBooks.
Dancing Numbers helps small businesses, entrepreneurs, and CPAs to do smart transferring of data to and from QuickBooks Desktop. Utilize import, export, and delete services of Dancing Numbers software.
We will try to make the process pretty simple and our team is always there to help you out in case of any query and if you need any assistance.
You might also get the option of showing that a particular sales receipt or payment which is deposited directly into a particular account. To get the choice into QuickBooks, select Edit option -> Preferences, scroll down to the Payments icon, click the Company Preferences tab, and then unselect the use undeposited funds as a Default Deposit to Account option.
Once the necessary amendment is done, QuickBooks accounting software add-on the keys & a display box to the lower-left corner of the Enter Sales Receipts & Receive Payments windows so that we can designate the bank account in which the money is deposited.
Steps to Make Bank Deposits in QuickBooks
In due course, you will want to take the money out from under your mattress and deposit it in the bank. To do that we need to adhere the few simple steps which are mentioned below:
Step 1: In the Initial Step, You need to Select the Banking option and then Select make Deposits.
On the other hand Choose Record Deposits in the Banking Section on the Home Screen.
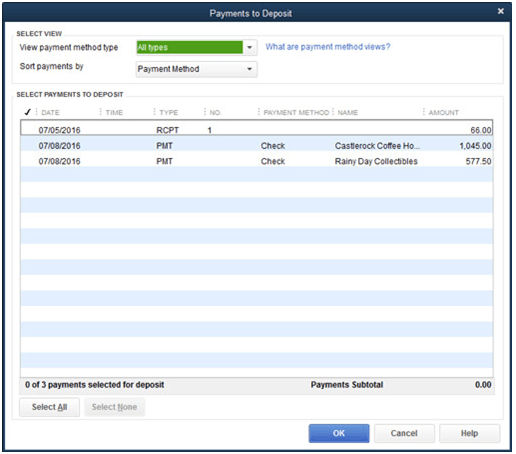
The Payments to Deposit dialog box shows. Regardless of the payment method, this dialog box originally lists all the payment. Although we can, Use the view Payment Method Type drop-down list to indicate that you want to see payments only of a particular type, such as Credit Card Payments. This is very simple function as it lets you batch all the credit card entries at one place.

The above screenshot is payments to deposit dialog box.
Step 2: We need to choose the payments that we want to deposit in bank.
We need to click on a payment or Cash Receipt to place a check mark in front of it, marking it for deposit. If one wants to unselect a payment, Click it again. To unselect all the payments, click the choose None button.
If you want to make the selection of all the payments, you are required to choose the select all option. If you have payments to look through, you can also filter the list by selecting the view Payment Method Type at the top and see only the Cash or Credit Cards to select among. Also, If you are recording the payments made by the option of credit card, you are not required to sort through the check payments. They are not gone, they just do not seem until you choose that type of payment or All.
Step 3: You are required to click OK. Once you specify which payments we are required to deposit, Choose OK. Then, Make Deposits window will appear in the QuickBooks.

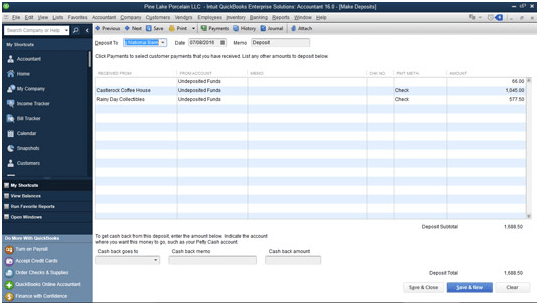
The Make Deposits window. If you are required to redisplay the Payments to Deposit dialog box -> maybe you made an error or mistake, and at this step if you need to go back and fix it -> you need to click the Payments option at the top of the screen which is also known as Make Deposits screen. Kindly note that though, that QuickBooks will not show the Payments to Deposit dialog box until unless the undeposited funds list still has payments which are not deposited yet.
Step 4: Tell QuickBooks into which bank account you want to deposit the money. Do the activation of the Deposit to drop-down list and select the bank account in which you want to place the capital.
Step 5: In fifth step, define the deposit date. You need to tab to move the cursor to the Date text box, & then type the correct date in MM/DD/YYYY format. You can always utilize the secret date editing codes if you are required to make the changes in the date. If you don’t know the codes you can get these codes from the online QuickBooks Cheat Sheet.
Step 6: In the next (sixth) step which is Optional if you want to you can also add a memo description.
Step 7: Later in seventh step, Specify the cash-back amount. If you need the cash back from the deposits, no problem, just activate the Cash Back goes to drop-down list and choose a cash account, such as Petty Cash. After that, you are required to enter a memo under the Cash Back Memo text box & the amount of cash back you are pulling in the Cash Back Amount text box.
Step 8: In Eighth Step, Record the Deposit by selecting the Save & Close button or the Save & New button.
If you click Save & New, QuickBooks shows a new blank Make Deposits window.
Sometimes if we take the liquid funds from the register or from the day collections to spend on business requirements like supplies, for collect on delivery payments, and even for the draws of the business owner, we are required to enter the cash payment transaction as another transaction line in the Make Deposits screen. Let us understand this with the help of an example, if you use an amount of 100 USD from the cash register to pay for office petty expenses the particular XYZ office department, you are required to enter another line into the Make Deposits screen.
The above-mentioned process is quick and easy to understand and follow. However, if you have any question related to the process mentioned you can always connect to our experts without any hesitation.

Looking for a professional expert to get the right assistance for your problems? Here, we have a team of professional and experienced team members to fix your technical, functional, data transfer, installation, update, upgrade, or data migrations errors. We are here at Dancing Numbers available to assist you with all your queries. To fix these queries you can get in touch with us via a toll-free number
+1-800-596-0806 or chat with experts.


 +1-800-596-0806