QuickBooks enables users to set up and configure email services in QuickBooks Desktop for their convenience. On the QuickBooks Desktop, users can configure email service. You can use it to send invoices to clients, send and receive reports, and complete other transactions from your QuickBooks Desktop through your webmail id or outlook only when you have already set up its email service. The benefit of using QuickBooks accounting software for small and mid-sized business owners is increased by its new feature.
This article is for you if you have yet to use this QuickBooks feature or if you are having trouble setting up the QuickBooks email service. This article explains how to set up an email service and resolve some typical email service issues efficiently and hassle-free. By reading this article, you can set up the email services in QuickBooks desktop.
Dancing Numbers helps small businesses, entrepreneurs, and CPAs to do smart transferring of data to and from QuickBooks Desktop. Utilize import, export, and delete services of Dancing Numbers software.
What are the Email Services in QuickBooks all about?
When you email from QuickBooks directly, it saves time and effort and is treated as one of the most crucial features of QuickBooks.
Often QuickBooks users experience problems in setting up email in QuickBooks. This is why today we will provide complete details regarding the setup process for an email in the QuickBooks Desktop.
Note: In order to set up email in QuickBooks, the information provided below is significant:
- Username and Password
- Outgoing and Incoming email addresses
- Incoming email server type
What are the Primary Email options Available in QuickBooks?
Often, users are unable to find the options for their specific email in the QuickBooks Desktop setup because of a few reasons. Add to it, that users can have alternate versions instead of the ones mentioned below.
Here are the three options to have a look at:
- QuickBooks Email – This particular option is not usually preferred and liked by all the users.
- Webmail – This particular feature bridges with Yahoo, Gmail, and other user email platforms.
- Outlook – Those who have Microsoft Outlook running in their system can get Outlook support. It is the most preferred email support preferred by clients since it is more effective and easy to use.
Why do You Need to Configure Email Services in QuickBooks?
It goes without saying that QuickBooks is one of the best accounting software of all time and the email feature offers added benefits.
Here is why you need to configure email services in QuickBooks:
- The email feature sets payment reminders to all the clients via emails
- The user is empowered to import data from particular spreadsheets and add attachments not more than 2MB
- Send the estimates to the clients and direct email invoices with the QuickBooks email setup
- With this email feature, users can get details from the vendors and customers
- This feature allows users to share reports within departments and offices conveniently
Follow Step-by-Step Guide to Set up Email Service in QuickBooks Desktop
Before starting, you will be required to prepare and set up your Microsoft Outlook profile. To set up your QuickBooks email service you can use your existing Outlook profile or on other hand create a new one.
You will need the following details mentioned below,
- Password
- Outlook username
- Outgoing mail server address
- Incoming mail server address
- Incoming email server type
If you are not having the above-mentioned details then you can contact your Internet Service Provider.
Know the Procedure to Set up QuickBooks Email Invoices in Outlook and Webmail
If you want to continue this process you will require to create an outlook profile. To create outlook profile steps are mentioned below-
- Firstly, you need to set up Outlook in QuickBooks Desktop.
- Then fill your Username
- After that enter your Password
- And afterward Incoming mail server address
- Now enter your Outgoing mail server address
- Lastly, enter your Incoming email server type

QuickBooks Desktop Won’t Accept Your Webmail Password
In case you are signed in to your QuickBooks desktop and attempting to send an email, then you might receive a message that your password is invalid and that you need to set up your password for your webmail account.
Note: In case of QuickBooks Desktop doesn’t have outlook:
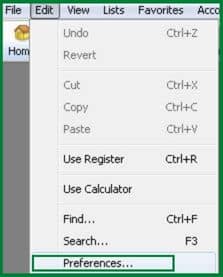
- In starting go to the QuickBooks Edit menu
- Then click on Preference and select Forms
- Lastly, choose Outlook and click on OK
Read About: QuickBooks Unable to Send Emails to Outlook
Important Note: In case you want to add Secure Webmail to your QuickBooks company file then for that you have to set up a strong password for your file.
What are The Steps to Set Up an Email Service in Webmail?
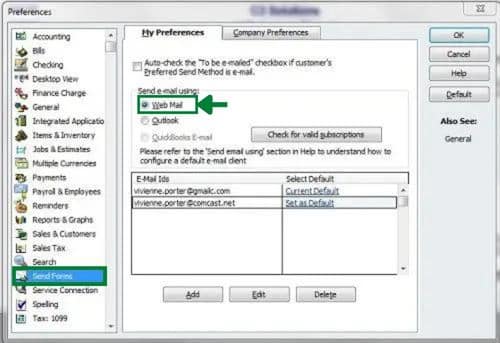
- Begin with connecting with Secure Webmail
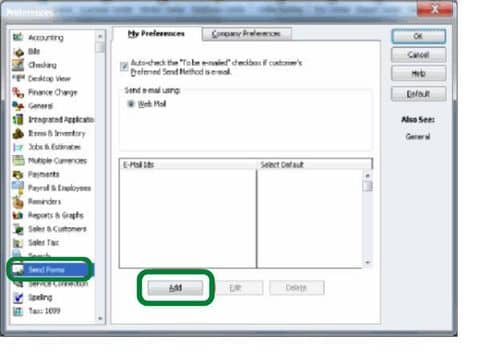
- Then go to the QuickBooks Edit menu and then select preferences after that send forms
- Select Webmail and click on Add
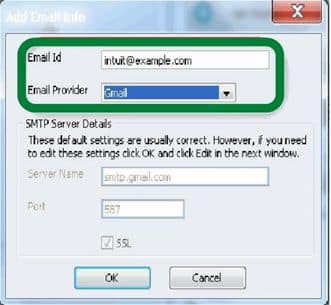
- Type your email address and after that click on enhance the security check box and click on OK
- After the Login page displays, do sign in and allow Intuit access
Important: In facilitated conditions like the right network, you might need to sign into your webmail account to send email through QuickBooks software.
The Webmail servers and port settings are decided by your internet service provider. For typical providers like Gmail, Yahoo, and others, QuickBooks can automatically supply information. If you use different emails, you can customize your email service provider. However, before configuring webmail in QuickBooks Desktop, make sure you confirm this with your ISP.
- Then go to the QuickBooks Edit menu and then select Preferences and then send forms

- After that select Webmail and then click on Add

- After that provide your Login credentials

- To save the changes click on Ok
Important: When you use ordinary webmail to send an email for the first time, QuickBooks Desktop asks for your password, in contrast to Secure Webmail. Please be aware that webmail providers (such as Gmail, Yahoo, and others) practice two-step verification and ask customers to verify their account settings if QuickBooks Desktop is still not accepting your password.
If you use Cox: Cox’s standard SMTP setting is not to send emails using SSL or login credentials. You should enter your login details since QuickBooks Desktop prefers SSL connections. Therefore, SMTP over port 25 without an SSL connection is incompatible with QuickBooks Desktop. Using SSL with port 587 or 465 is a different trick.
In case you are a CableOne user: Use the following information since CableOne uses Google servers.
- Email Provider: Gmail
- Email Address: Your Email ID
- SSL: Yes
- Port: 587 or 465
Internet Service Provider (ISP) and Port Information
A table with information about different internet service providers and ports is mentioned below. To look out for exact codes and information, users can check out the below table.
| SP (Internet Service Provider) | SMTP Server | SMPT Port |
|---|---|---|
| 1AND1.com | smtp.1and1.com | 587 (SSL enabled, with password) |
| ADELPHIA | mail.adelphia.net | 110 |
| AOL | smtp.aol.com | 465 or 587 (see Note) (SSL enabled for incoming and outgoing mail server) |
| BELL SOUTH | mail.bellsouth.net | 110 |
| COMCAST | smtp.comcast.net | 587 |
| COMPUSERV | smtp.compuserve.comsmtp.aol.com | 110 or 587 |
| COX Business | smarthost.coxmail.com | 25 |
| COX CENTRAL | smtp.central.cox.net | 25 |
| COX EAST | smtp.east.cox.net | 25 |
| COX WEST | smtp.west.cox.net | 25 |
| EARTHLINK | smtpauth.earthlink.net | 25 (with password) |
| GODADDY | smtpauth.earthlink.net | 80, 25, or 3535 |
| GODADDY with Office 365 | smtp.office365.com | 587 (SSL enabled) |
| LYCOS | smtp.mail.lycos.com | 25 |
| MICROSOFT OUTLOOK 365 | outlook.office365.com | 587 (SSL enabled) |
| NETSCAPE | smtp.isp.netscape.com | 25 (SSL enabled) |
| PRODIGY | smtp.prodigy.net | 25 (SSL enabled) |
| ROADRUNNER | smtp-server.sc.rr.com | 587 |
| SPRINT PCS | smtp.sprintpcs.com | 25 |
| VERIZON | outgoing.verizon.net | 465 |
| VERIZON YAHOO | outgoing.yahoo.verizon.net | 465 |
Conclusion
Hope this article was able to solve all your queries and hopefully you are able to Set up Email Service In QuickBooks Desktop. Still, if you face any issue then for the further query you can call at help desk as they are available for you round the clock to provide you helping hand. QuickBooks online professional team is there for you to assist you with the best.

Looking for a professional expert to get the right assistance for your problems? Here, we have a team of professional and experienced team members to fix your technical, functional, data transfer, installation, update, upgrade, or data migrations errors. We are here at Dancing Numbers available to assist you with all your queries. To fix these queries you can get in touch with us via a toll-free number
+1-800-596-0806 or chat with experts.
Frequently Asked Questions (Faqs)
Does QuickBooks Prompt You to use the Webmail Password the First Time an Email is Sent using the Webmail?
Unlike Secure Webmail, QuickBooks prompts you to type in the webmail password the very first time a user sends an email using the webmail.
Can the Email Feature in QuickBooks Send Payment Reminders to the Customers?
Yes. The email feature can send payment reminders to all of your customers.
The QuickBooks Email Feature Allows Attachments up to How much?
The email feature in QuickBooks allows importing data from spreadsheets and adding attachments that are no more than 2 MB.
What are the Requirements of the QuickBooks Email Setup?
Here are the requirements for QuickBooks email setup:
 Email address
 Username and Password
  Details of the server along with Incoming and Outgoing email settings
How to set up Office 365 email in QuickBooks?
 In the starting, first, you have to go to QuickBooks and then select Preferences
 Select the icon of Email
 Then to send emails using, you have to select Custom
 On your screen, a list of Email Accounts will appear. This list will only be full if you have entered any email accounts and in case you haven’t then the list will be empty
 To add a new account select the + icon
 Then add an account name, then from your email provider add the settings
 If you want to add any other account then repeat the same steps for any other accounts too.
Can QuickBooks desktop automatically email reports?
QuickBooks Desktop is having a feature that is Scheduled Reports. This feature helps users to email reports on a daily and recurring scheduled time.
How to fix QuickBooks email?
 Press Window+R keys simultaneously
 The run command will open on your screen.
 Type control panel there
 When the control panel will open, then go to Programs and Features
 From there choose QuickBooks and click on Uninstall/Change
 Click on continue and then on Next
 Then select Repair and then click Next
 After finishing click on ok


 +1-800-596-0806