
 |
The critical task of entering business expenses helps to keep the account data accurate and bring a significant reduction in tax liability. Recording or entering business expenses in the QuickBooks program is no rocket science and can be done with ease by following the Enter Expenses in QuickBooks steps well-explained in this article.
Dancing Numbers helps small businesses, entrepreneurs, and CPAs to do smart transferring of data to and from QuickBooks Desktop. Utilize import, export, and delete services of Dancing Numbers software.
What is Entering Expenses in QuickBooks?
Speaking in the language of QuickBooks, expenses are determined from any kind of transaction that has taken place via debit card, credit card, bank transfer, net banking or online payment and must be recorded.
Checking on how your expenses of the business are being spent and how sufficiently you would be able to manage future costs, explains as the primary reasons for recording expenses on QuickBooks. Adding to the beneficial aspects, entering expenses on QuickBooks also simplifies the procedure of tax filing thereby bringing profits against cost and offsetting revenue.
How to Record Expenses on QuickBooks?
The foremost step to get started with entering expenses on QuickBooks is to have an expense account. For creating an expense account on QuickBooks you need to set it up in the allocated chart of accounts.
The procedure begins with the application’s “Enter Bills” feature and designating the various business categories under which the respective transactions have been made.
This article would guide you effectively to understand the various steps involved in recording expenses on QuickBooks.
Steps to Enter Expenses in QuickBooks
The first step is to have an expenses account, for which you need to follow the steps below:
Creating an Expense Account:
- Open QuickBooks home page and find Chart of Accounts
- Next press on the account and select New which will open up a New Account window
- Select Expense by clicking the account type
- Type the name of the account under the Account Name Field
After you have created an expense account successfully, the next steps below would help you to enter expenses on QuickBooks:
Estimated Time: 31 minutes
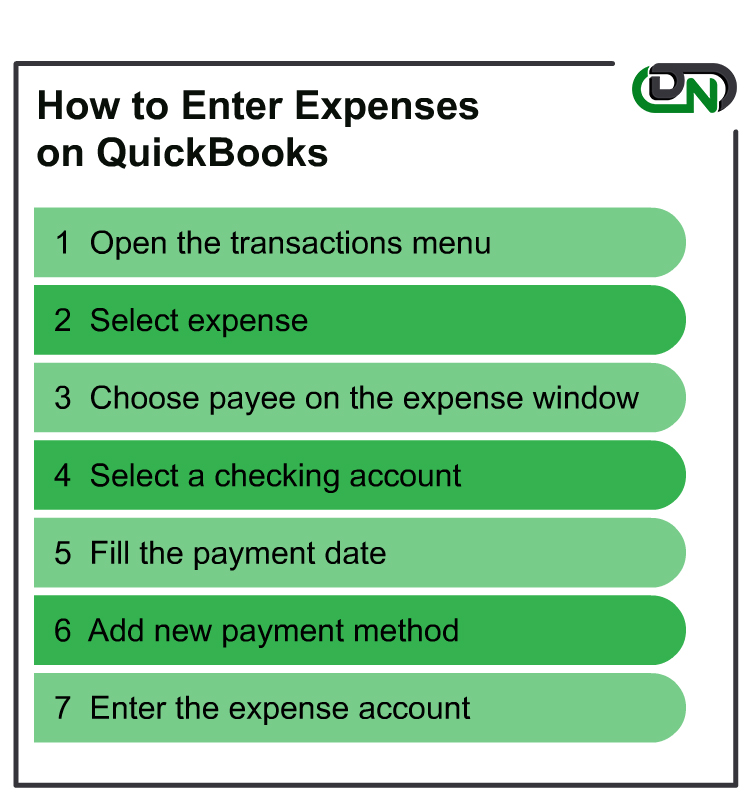
Step 1: Open the Transactions Menu
Click on the plus sign (+) icon that will open the transactions menu page.
Step 2: Choose Expense
Click Go to Vendors and choose Expense
Step 3: Select Payee on the Expense Window
Select Payee on the Expense window. If the Payee not enlisted under Expenses, you need to add the name by clicking on Add (for adding additional details about the Payee, then click on +Details or Save)
Step 4: Selecting a Checking Account
Select the account under which the purchase took place. For debit card transactions, it would be selecting a Checking Account.
Step 5: Enter the Payment Date
Enter the Payment Date that would be the date of purchase.
Step 6: Add New Payment Method
For other payment methods, you need to add them by clicking on Add New
Choose the account category from Account if added or else add a new one by clicking on Add New (for adding further information, type it out in the Description dialogue field.
If you need to attach a PDF file, or a picture, click on Attachments
Step 7: Enter the Expense Account
In the amount field, enter the expense account. After filling in all the respective information, press Save and Close.
If you need to start on with a new expense entering after saving the previous one, click Save and New.
Tracking Expenses on QuickBooks
After creating an Expense Account on QuickBooks, you can choose to track them effectively. To track your expenses, you need to be ready before you hit Save and New or Save and Close.
Tracking Expenses:
- If the billing of the expense is done to a particular customer, you need to type out the name of the customer by choosing Billable. You can find Billable Expense tracking under the Billable column.
- For checking the income vs expenses data of each customer, you need to run an Income by Customer Summary report.
- For adding information on the purchased service or product, you may use fields in Item Details.
Managing Expense in QuickBooks
Edit An Expense in QuickBooks
- Choose Expenses from the menu on the left-hand side
- Choose the expense from the Expense Transactions window that you wish to edit
- After updating the transaction, you need to click on Save and Close
Note: Editing expenses are subjected to change of data in the customer’s invoice.
Review Your Expenses
Want to see the income and expenses for each customer? QuickBooks makes it easy
- Go to Business overview then select Reports.
- Run an Income by Customer Summary report.
Delete An Expense in QuickBooks
- Choose Expenses from the menu on the left-hand side
- Choose the expense from the Expense Transactions window that you wish to edit
- Select the Expense Details window and press More to click on Delete
- Choose Yes to confirm
Hopefully, this article would have satisfactorily guided you on how to successfully enter Expenses on QuickBooks. Now enter, manage, edit or delete any expense you wish on QuickBooks and accelerate accounts of your business by 2X!

Looking for a professional expert to get the right assistance for your problems? Here, we have a team of professional and experienced team members to fix your technical, functional, data transfer, installation, update, upgrade, or data migrations errors. We are here at Dancing Numbers available to assist you with all your queries. To fix these queries you can get in touch with us via a toll-free number
+1-800-596-0806 or chat with experts.
Frequently Asked Questions (Faqs)
Why Should I use QuickBooks for Recording Business Expenses?
Designed with seamless functionalities, QuickBooks is highly regarded as one of the finest accounting software. Managing business expenses on QuickBooks is super easy and can be used at the multi-levels of an organization.
Are Bill and an Expense the Same on QuickBooks?
No, Bill and Expense are not the same on QuickBooks A expense on QuickBooks denotes a transaction for the purchase of goods or services that was paid off. While a Bill is denoted as a transaction that has been purchased but billed for later.
Can I Add online Transacted Payments as Expenses on QuickBooks?
Yes. On QuickBooks, any kind of payment including debit card, credit card, bank transfer, and online transactions can be added to Expenses.
 +1-800-596-0806