Consider adding QuickBooks Payroll to your plan if you already use QuickBooks Online and need to pay employees. Your payroll expenses can be seamlessly transferred to the appropriate General Ledger Accounts by using the same system that you use to handle your company’s books.
Save Time, Reduce Errors, and Improve Accuracy
Dancing Numbers helps small businesses, entrepreneurs, and CPAs to do smart transferring of data to and from QuickBooks Online. Utilize import, export, and delete services of Dancing Numbers software.
Additionally, by adding QuickBooks Payroll to your current QuickBooks Online subscription, your company will gain access to additional HR and pay processing features, including same and next-day Direct Payments, Employee Benefits, and Automatic Tax Preparation and Filing.
An essential task in any business is processing payroll. Due to shifting payment structures and new rules and regulations, payroll calculations can be challenging. Using accounting software such as QuickBooks in this situation might help you and make timely payroll processing simple. In this article, you will know about QuickBooks’ payroll process and how it’s implemented.
What are the Benefits of QuickBooks Desktop Payroll?
Payroll is a time-consuming task for many business owners that demands a high level of accuracy. Making your own payroll can quickly become overwhelming when it comes to keeping up with changes to tax and employment legislation and negotiating governmental laws.
Fortunately, payroll software can help you in ensuring that you pay your employees the right amount, on time. The following are the biggest advantages of using payroll applications like QuickBooks Desktop Pro:
- Payroll Tax Preparation with Full Service and Automated Tax Calculations, Filing, and Payments.
- Information about Employees such as Pay Rates and Employment Status that are Organized in one Place.
- Simple Tracking, Definition, and Management of Employee Benefits.
- Reminders for a Payday that Prevents you from Missing Payment Due Dates.
QuickBooks Desktop Pro may be the answer for you if you struggle to handle payroll on your own. Various payroll procedures are automated by QuickBooks Desktop, which also shields you from paying employees incorrectly and ensures that your company can expand without encountering IRS-related problems.
Continue reading to learn how to rapidly set up your new software and begin managing payroll like a pro if you’re interested in integrating QuickBooks Desktop into your company’s payroll process!
Before You Start Running Payroll in QuickBooks
However, for the uninitiated, setting up payroll in QuickBooks can be a little challenging. If you need help getting started, Look at our quick guide to setting up payroll in QuickBooks.
Before beginning your first pay cycle, you must complete the following two steps after setting up your business’s payroll:
- Hours Worked by the Employee.
- Create a Bank Account.
Make sure that all of your employees have recorded their time in QuickBooks before running your payroll. Additionally, you should confirm that QuickBooks has been updated to include the business bank account from which you pay employees. You are prepared to begin once you’ve finished these two stages!
How to Use QuickBooks to Process Payroll?
Once your payroll, banking, and employee time tracking have been properly set up, running QuickBooks Payroll should be simple. Follow the instructions below to process your payroll and pay your employees before your next pay cycle by navigating to the payroll center.
- Open QuickBooks and then Go to Payroll.
- Select the Payroll type to use.
- Then you have to Enter Payroll Information.
- Reviewing and Creating Paychecks.
- Now, You have to Confirm the Payroll.
Step 1: Go to Payroll in QuickBooks
- To Start, You have to click Pay Employees under Employees in the upper left corner of Your Screen.
- Then you have to choose Payroll Center.
- When you Launch QuickBooks Desktop Pro for the First Time, You ought to see a screen similar to the below one.
- To Get Started, You have to click OK, I’m ready.
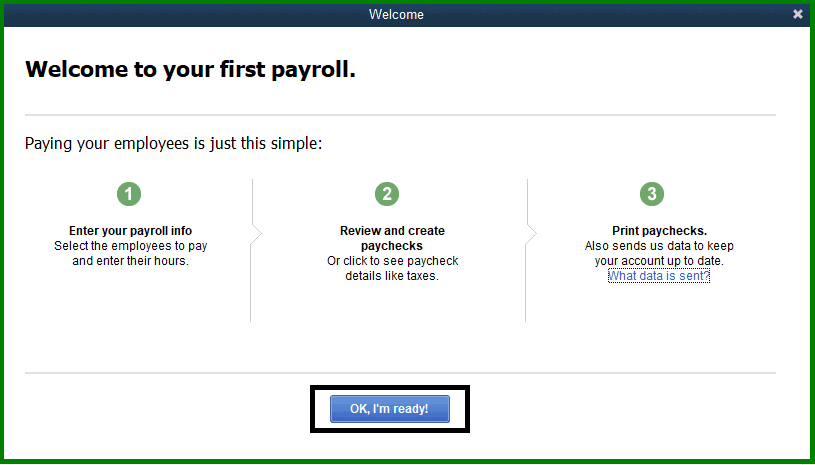 Payroll in QuickBooks
Step 2: To Run Choose the Type of Payroll
Before you begin entering your payroll information, you must choose whether to perform an unscheduled or planned payroll, as illustrated in the below picture. The screen shown under Step 3 will appear as soon as you start an unscheduled payroll. For specific guidance on handling unscheduled payments, learn how to create a one-time payroll check in QuickBooks Online.
In order to access the screen shown under Step 3, You must first attach one or more individual employees to a payroll plan before you can run a scheduled payroll.
- To do this, Select the Employees tab, Which can be seen in the Below Photo on the very left-hand side.
- To Assign an Employee to a Payroll Schedule, Select their Name, Go to their Payroll Info tab, and Select a Payroll Schedule from the Payroll Schedule Dropdown Menu.
Step 3: Enter Payroll Information
Start by entering the end date and check the date of your pay period before entering all other payroll data. Choose the bank account from which you want to pay your employees (QuickBooks will show you the existing account balance). Choose whether you want to handwrite your checks or print them using QuickBooks.
Selecting the employees you want to pay and reviewing their hours to make sure everything looks correct before moving forward is the most important step in inputting payroll information. As long as you have assigned each employee to a payroll schedule, you are free to choose whatever many you like. When ready, press Continue.
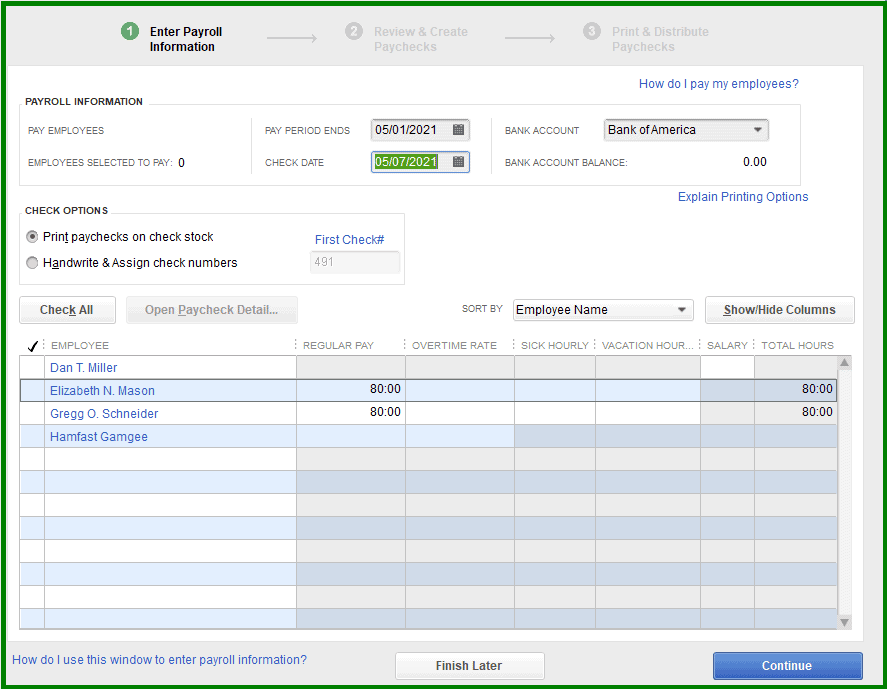 Enter Payroll Information
Step 4: Review and Create Paychecks
- After that, Check the data to make sure everything is as it should be. QuickBooks will display the Number of Paychecks to be issued under Payroll Information on the left-hand side – for reversing any direct deposit paycheck, refer to request direct deposit reversal in QuickBooks.
- Also, It will add up the Pay Period’s Gross Pay, Taxes, Deductions, Net Pay, Employer Tax Contributions, Total Hours Worked, and Direct Deposit Amounts.
- Click Create Paychecks after carefully Reviewing all the Data.
Step 5: Confirm Payroll
You can see on this screen how many correctly generated paychecks there are, how many are available for printing, and how many are available for direct deposit.
The pay stubs for your direct deposit employees can be printed from here, or you can submit your payroll to be processed for direct deposit. Check out the QuickBooks Payroll Help Centers or contact QuickBooks payroll support directly if you need assistance troubleshooting.
QuickBooks Payroll’s New Coronavirus Features: How to Use Them?
Since the COVID-19 outbreak, QuickBooks Desktop now gives employers the option of giving employees paid leave if they have been impacted. In accordance with the Family First Coronavirus Response Act, make sure your employees receive the funds they require by following the instructions below (FFCRA).
Before they can grant paid leave and sick time for the coronavirus, according to the QuickBooks website, there are a few issues that need to be resolved, depending on things like the employee benefits you offer and the hourly rates you pay. Before trying to pay their employees for paid leave and sick time for COVID-19 in QuickBooks Desktop, employers should be sure to review these instructions. Similar instructions apply for standard vacation accruals—if errors occur in calculating PTO, explore fixing QuickBooks vacation accrual error.
Step 1: Set up Paid Leave Items
- To Start, You have to go to Employees Which is at the top left of your screen in QuickBooks Desktop.
- Then you have to click it and then go to Manage Payroll Items.
- After that, you have to Choose View/Edit Payroll Item List.
Step 2: Select a Paid Leave Item
- The various National Paid Leave items in QuickBooks should show up on a screen.
- To create a paid leave item.
- Double-click on it, Give it a new name if you would like, and then click on Next.
Step 3: To unmark social security set your taxability
- When you reach the Taxable Compensation screen, Click Next.
- To indicate that your taxability is unmarked for Employer Social Security once there, Click the Default button.
- For every National Paid Leave item, you create, Repeat this procedure.
Conclusion
With the help of the above article, you can easily process payroll in QuickBooks. You can follow these easy steps and can get your account set up and your payroll processes within a few minutes. In case you still face any issues in processing payroll in QuickBooks then you can call the help desk. The help desk team is available round the clock for their users.
Accounting Professionals, CPA, Enterprises, Owners
Looking for a professional expert to get the right assistance for your problems? Here, we have a team of professional and experienced team members to fix your technical, functional, data transfer, installation, update, upgrade, or data migrations errors. We are here at Dancing Numbers available to assist you with all your queries. To fix these queries you can get in touch with us via a toll-free number
+1-800-596-0806 or chat with experts.
Frequently Asked Questions (Faqs)
How many payroll obligations be modified in online QuickBooks?
1. To modify payroll liabilities for employees you have to go to the Employees menu.
2. Payroll Taxes and Liabilities should be selected.
3. If you find an adjustment that has an impact on your report, choose Previous Adjustment.
4. Select the option labeled Accounts Affected.
5. Click on the Affect Liability and Expense Account. Finally, click OK at last.
How to use QuickBooks online to print payroll checks?
To print payroll in online QuickBooks you have to select Paycheck list under Run Payroll and then the number of paychecks you want to print.
How can payroll be activated in QuickBooks online?
1. Select your preferred plan from the Employees or Payroll menus to enable payroll in QuickBooks online.
2. Now you have to select Get Set up to Run Payroll from the Get Started menu.
3. You are now prepared to create your own payroll.

