If you are applying late fees (a late fee is also known as a fines or penalty) on your past-due bills then it means you are motivating your clients to make the payment on time. It is your wish that how much you want to charge on the due bills and when you can add it to invoices. QuickBooks online have the great feature that it allows to determine the late fees and then automatically add them as a line item to past-due invoices. Once you enable the late charge setting then QuickBooks computer and apply late fees to past-due invoices automatically.
Dancing Numbers helps small businesses, entrepreneurs, and CPAs to do smart transferring of data to and from QuickBooks Online. Utilize import, export, and delete services of Dancing Numbers software.
In earlier time, the late fees are to be added manually as a line item but now in QuickBooks online, there is no need to add manually because once you setup late Fees option then QuickBooks online will automatically add new late fee.
Late fees are an excellent tool which is very useful in getting positive payment behavior. You can easily add and set up automated late fees option in QuickBooks online. It helps in determining when you can apply the cost and its amount. There are Different fee options which are available in QuickBooks Online, which includes a flat fee, a percentage, or both.
Late Fees Types That QuickBooks Online offers
There are three distinct Fee types that QuickBooks Online offers to an invoice:
- The Percentage:
- In this, QuickBooks Online will charge a certain percentage of the total invoice amount.
- Flat Fees:
- In this, QuickBooks Online have to charge the amount which is the original amount.
- Percentage and the Flat Fees:
- It is the Combining of both the fee kinds; You can impose a percentage cost when the invoice is past due and a flat fee if it is still unpaid after a certain deadline.
Rules of Automatic Late Fees in QuickBooks Online
You can easily apply various types of late fee policies to different customers using QuickBooks Online.
- Navigate to the left menu.
- From the list of menu options, You have to select either Sales or Invoicing option.
- From the list of customers, You have to select the Customers on whom you want to impose the penalty.
- Once you are done with the above steps i.e. selecting of the customer on whom you want to impose penalty, You have to select Late Fees from the table.
- Now, You have to select one option out of two i.e. the user can waive late fees for a specific client or the user can change the default options.
Set up for the Default Late Fee Setting
You can easily Activate and configure the default late fee settings, which is very helpful in to charge late fees on past-due invoices from your customers.
Following are the steps which are to be performed for setting up the default late fees setting:
- Navigate to the settings from the top menu and select it.
- From the drop down menu of setting, select account and setting option.
- From the window of account and settings, you have to select sales option.
- Hit the edit button from the sales menu.
- Now, Enable the Default charge applied to overdue invoices option.
- Once you have gone through the above step, you have to select the fees.
- There are three type of fees out of which you have to select one option:
- Flat Rate: Flat rate is the type of fees which is applied to the specific amount.
- Percentage of Remaining Balance: This type of fees is applied to the percentage of the remaining amount of the invoice.
- Flat Rate and Percentage on the Remaining Balance: It is applied on the specific amount and then adds percentage of the pending amount of invoice.
- Now, You have to enter the amount or the percent on the fees.
- Hit the frequency tab and from the drop down menu, You have to select how much you want to charge.
- In case, You want to provide the grace period then select how many days grace time you want to provide.
- The default name is late fee but if you want to change the name then you can.
- Hit the save button, so that you are able to save all the changes which you made.
Setting up for the Personalized Late Fee
Following are the steps that how you can customize the fee setting in case you don’t want that some customers are to be subject to the preset for the late fee :
- First, you have to go to the Get Paid and Pay or Sales and Expenses option.
- Now, you have to select the customers.
- From the list of customers, choose the customer for whom, you want to apply the late fee.
- Navigate to the late fee option and be sure that you have selected customer option.
- If you wish to modify the late fee for this customer, choose Customize. Otherwise, use Default.
- Hit the save button in order to save all the changes which you have done.
Setting up Late Fee in QuickBooks Online
The step by step procedure for setting late fee in QuickBooks Online is explained below.
- Navigate to the gear icon, available on the right top of the screen.
- From the menu of gear icon select option account and settings.
- Click on the sales button and search for the late fees section.
- Click on the late fee section.
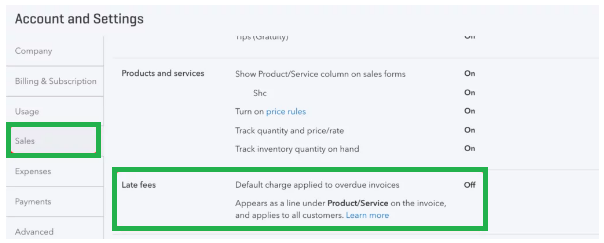
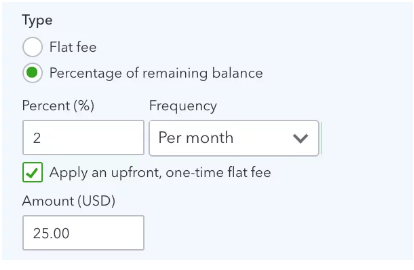
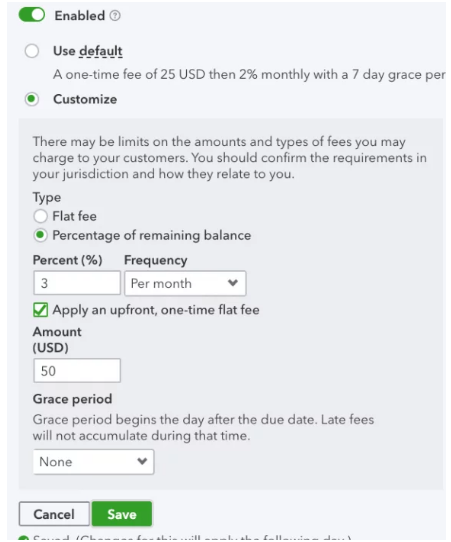
- Now, You can configure late fees in QuickBooks Online which includes the flat cost or percentage of the outstanding balance, frequency (once per invoice, once per month, or once per day), and an optional one-time fee.
- For example: In this case, if you to set up a $25 one-time cost and a monthly fee of 2%.
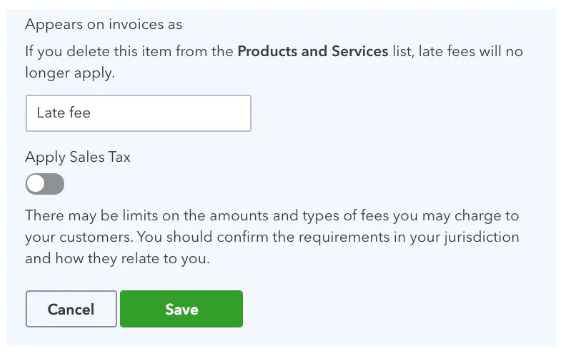
- The final step is to determine that how to label the costs of the invoices.
- You have to select whether or not to charge sales tax on the product.
- Then, we’ll click the Save button after leaving the default “Late Fee” and leaving out the sales tax:
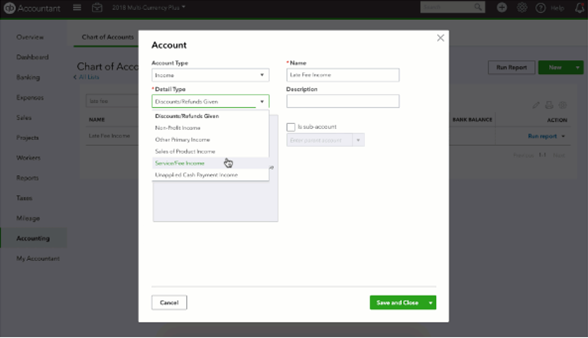
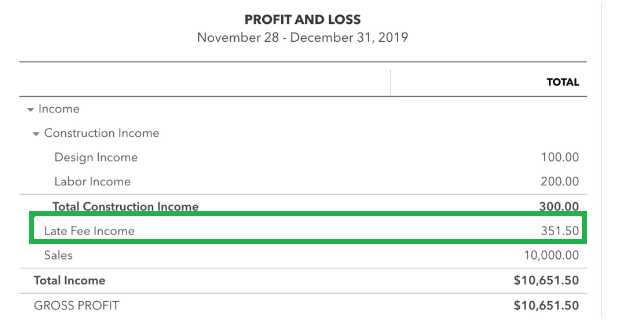
- A new account called “Late fee income” will be created by QuickBooks Online when you hit the Save button. The created account is a form of other Income.

- Now, You can edit the account if you want.
- If you want to customize the customer level then you can choose disable late fees for the customers, or override the default late fee option.
- Now select sales option on the left screen and select the customer tab from it.
- In order to get the detail of the customer, choose the customer’s name.
- Once the above steps are executed, you can customize late fees in QuickBooks.
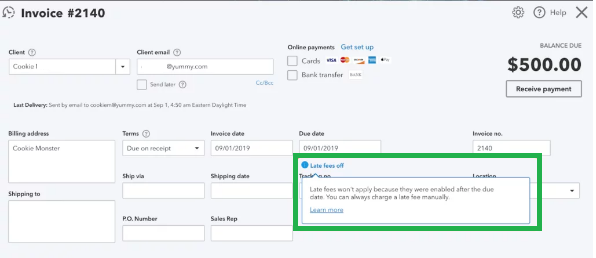
- If late fees won’t be activated for any outstanding invoices, you have to open an invoice. You can view it from there, if all the detail is available or not.
- Following is the invoice which is created after the late fees when QuickBooks online is enabled.
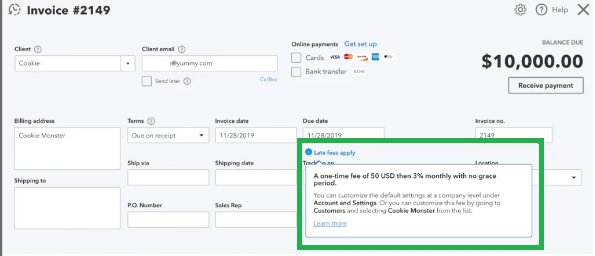
- After the above step i.e. when you enable late fees, all customers who have past-due invoices will automatically have late fees added as a line item on their invoices.

- In the profit and loss account, you will see these reports are come under late fee income.
- Once you enable the late fees in QuickBooks Online, the item is automatically create and you can find this item in product and service list.
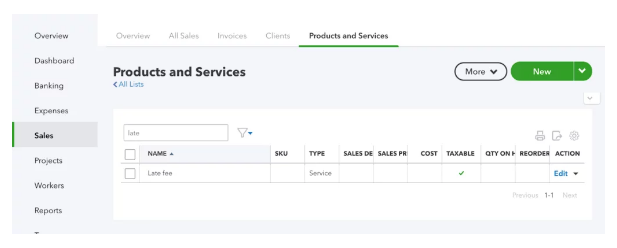
- Both the total and the description columns are left empty so that, QuickBooks Online can add the total according with the option of setup and description when the late fees are charged in QuickBooks Online.

In case if you are using QuickBooks Desktop and its late fee feature.
- You must know that it creates a NEW invoice with “FC” as the reference number to apply late fees rather than adding line items to the original invoice.
In case if you are using QuickBooks Online and its late fee feature.
- You must know that by adding the line items to the original invoice, late fees it greatly simplify the process of collecting payments.
Know the Charge Late Fees on Invoice in QuickBooks Online
By assessing late fees, you can motivate customers to develop the habit of paying invoices on time. Following shows that how to implement late fines in your business, step by step follow it:
- First you have to do the research in detail.
- Must send the notification or alert before the time completes.
- In the invoice payments terms and condition you must add the clause of late fees policy.
- Include the late fees policy in contract and get it signed by the customer.
- Be sure that the due date is always visible.
- Sending of the invoices again and again.
- Once you find the payment is late then you have to follow up it again and again.
- If there is any change in the invoice then you must send revised invoice.
- In case customer is not paying then you have the right to escalate the issue.
- The policy must have the percentage rate that how much you can charge for the late fees.
Entering Merchant Fees Per Transaction in QuickBooks Online
Following are the steps of entering the merchant fees per transaction:
- First step is to select your customer.
- Now you have to enter the payment amount.
- Select the mode of Payment.
- Edit the date.
- Enter the reference number if any.
- Additional information is to be added in desired field.
- Navigate to the record deposit.
- Hit the button transaction.
- Choose the merchant fees account for the selected transaction.
- Enter the merchant fees.
- Hit the save and close button in order to save the changes and exit from the screen.
We hope that the above article will help you in resolving your issue and helps in getting your payments on time without any delay. Automatic late fees invoice is very helpful in saving your time, credits etc. But still, if you are facing any issue then you can connect with Dancing Numbers experts via LIVE CHAT. We are here to help you in resolving your issue.

Looking for a professional expert to get the right assistance for your problems? Here, we have a team of professional and experienced team members to fix your technical, functional, data transfer, installation, update, upgrade, or data migrations errors. We are here at Dancing Numbers available to assist you with all your queries. To fix these queries you can get in touch with us via a toll-free number
+1-800-596-0806 or chat with experts.
Frequently Asked Questions (Faqs)
How can Surcharge is to be Added to an Invoice in QuickBooks?
Following are the steps of adding surcharge to an invoice in QuickBooks:
• First you have to choose Customers by clicking get paid & pay option from the menu.
• Search for the customer invoice and open it.
• Select the charge item which you have generated from the Product/Service menu.
• It is not necessary to include a statement about the fee in the column labeled “Message on invoice.“
• Hit one of either option Save and close (The changes are saved but didn’t send to the customer) or Save and send (The changes are saved but ready to send to the customer).
How can I Add Past Due Stamp Invoice in QuickBooks?
In order to add past due stamp invoice in QuickBooks, you have to follow the below steps:
• A past-due invoice should be opened.
• First, you have to select Formatting and then need to select Manage Templates.
• Once you are done with the selecting of desired invoice template, hit the OK button in order to confirm it.
• Now you have to select Print Past Due Stamp in the “Company & Transaction Information” section.
• Hit OK, so the changes are saved.
How can I Automatically Add the Interest to the Invoice in QuickBooks Online?
Follow the following procedural step in order to add interest to invoices in QuickBooks Online automatically:
• Navigate to the Gear icon and select Products and Services from there.
• Select New from the drop down menu of product and services and then Select Service from there.
• Enter the name of the item and your preferred income account in the desired field.
• Additionally, you can also enter the item’s rate.
• Once you’re done with the above steps, you have to hit save button so that you can save changes which you have made.
• At last, select close button for successful exit from the screen.
What are the Benefits of the Online Invoicing within QuickBooks Online?
Following are the key benefits which you get after online invoicing within QuickBooks Online:
• The Designing options are convenient.
• Integration of accounting.
• Instant and super fast delivery.
• Tracking is very easy.
• Payments are done fast in comparison to other.


 +1-800-596-0806