Are you looking to upload receipts to QuickBooks Desktop but thinking and looking for ways to do it? Then this article is for you and in this article, we will provide all the relevant information concerning this topic.
Dancing Numbers helps small businesses, entrepreneurs, and CPAs to do smart transferring of data to and from QuickBooks Desktop. Utilize import, export, and delete services of Dancing Numbers software.
In the true sense, QuickBooks accounting software has proved its worth in the accounting sector with its key features, creating the pathway to success for businesses of different types. In tune with its user-friendly approach, QuickBooks offers its users a plethora of facilities that include the power to upload receipts to QuickBooks Desktop and eventually work on them.
The accounting software will draw the information from the receipt and then match the particular information with a prevailing transaction and post that it will be possible to check and sanction the match.
If you wish to learn more about the process of uploading receipts to QuickBooks Desktop Plus, Pro, Premier Plus or Enterprise, keep reading this article.
Scanning Receipts into QuickBooks
So how do you use this software?
What must be done in order to upload receipts to QuickBooks desktop? You have to follow to the clear system in place and the easy directions provided.
It’s easy to use QuickBooks to keep track of your receipts, and the solutions are simply as you can see, so we can provide you a short sequence of instructions. There are two parts to the instructions. For customers using a PC, there is a first section.
You can either scan or photograph the receipt if you’re using a computer. It’s quite easy to take a picture; just choose the camera icon on your phone and snap a picture of the receipt.
All you need are the receipt images, and you can take the picture immediately or later when you arrive home.
The procedure is slightly different but still really straightforward if you are using the mobile app.
Why it is Crucial to Upload Receipts to QuickBooks Desktop Plus, Pro, Enterprise, or Premier Plus?
Scanning receipts automatically into QuickBooks with the help of optical character recognition, and Intelligent Document Processing technology can significantly help businesses to rearrange their accounting procedures, cutting down the errors, and boosting efficiency.
Here is a list of the ways how uploading of receipts to QuickBooks Desktop Plus, Pro, Enterprise or Premier Plus can help businesses:
- Save Time
- Reduce Errors
- Enhance Accuracy
- Improve Accessibility
- Increase Efficiency
How to Upload Receipts to QuickBooks Desktop Premier Plus, Pro Plus, or Enterprise?
Here are the steps to upload receipts to QuickBooks Desktop Premier Plus, Pro Plus or Enterprise:
Step 1: Include Your Receipts to QuickBooks Desktop
Note: Ensue that you do not upload any delicate information like social security numbers, credit card numbers, or health details.
Upload Receipts from QuickBooks Desktop
Here are the steps to upload the images of your receipt or receipt in PDF format in QuickBooks Desktop. Do not forget that in case you are using PDFs, It is possible to include only one receipt for one single page.
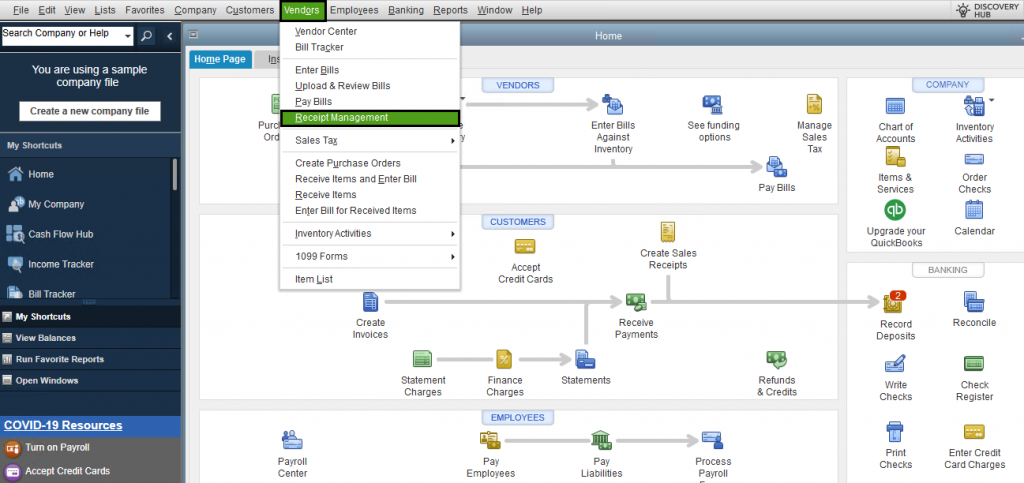
- Navigate to the Vendor menu. Now choose Receipt Management.

- Select the particular Intuit Account you access for the company file.
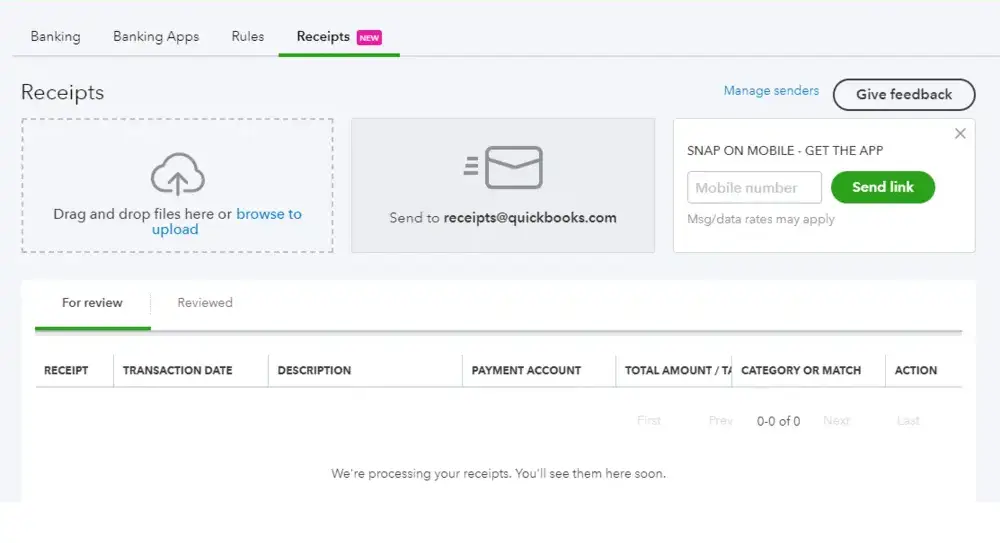
- Now drag your receipts and then drop them into QuickBooks or choose Browse to Upload. Now choose your receipts.

How to Upload Receipts from the Mobile App of QuickBooks Desktop iOS?
Note: QuickBooks Desktop backs images and PDFs in JPG, JPEG, GIF, and even PNG format. In case you use a new iPad or iPhone, you may witness HEIC format images.
Here are the steps to convert the present images to a format that is compatible:
If you haven’t already, download the QuickBooks Desktop iOS app.
- From your QuickBooks Desktop app, Log in to your Intuit Account. Now choose the company to upload your particular receipts.
- Click the company in order to upload the receipt. Now click Continue.
- Now click Capture Receipt.
- Click the Camera icon to take a snap of the receipt. Simultaneously, you can also click the Photos icon and upload your particular receipt. If you require to, you can edit the photo and rotate it too.
- Now click the option, Use this Photo.
- Enter a Name along with a Memo. Now click the option, Upload Photo. Now click OK.
- Sign in to your particular QuickBooks Desktop company file to check, edit, and then match the particular receipts to the given transactions.
How to Upload Receipts from the QuickBooks Desktop Android Mobile App?
- First, you need to open the QuickBooks Desktop Android app. Now click the option, Receipt Snap.
- Click the company to upload receipts. Now click Continue.
- Now click Capture Receipt.
- Click the icon for the Camera to take a snap of the receipt. You can also click the Photos icon which can help to upload the receipt. In case there is a need, you can edit the photo and rotate it too.
- Click Use this Photo.
- Include a Memo and a Name. Now click Upload Photo and click OK.
- Log in to your Intuit Account and choose the company to upload the particular receipts to. You can do it only one time.
- Log in to your QuickBooks Desktop Company file to check, edit, and then match the particular receipts to the relevant transactions.
How to Email Your Receipts to QuickBooks Desktop?
Here are the steps to email PDFs or images of your particular receipt to your particular QuickBooks Desktop Company File. Make sure you remember that if you are utilizing PDFs, you will only get one receipt per page.
Step 1: Prepare a Custom Email Address
- Navigate to the Vendor menu. Now choose Receipt Management.

- Select the Intuit Account you access for the company file.
- Choose Send Receipts
- Select a custom email address where you will email the receipts. It will possibly have the ending in @qbdesktopdocs.com. Now choose Create.
After the email address has been confirmed, all the users who are a part of the Intuit account will be displayed to you. You can handle the users who can email the particular receipts with the help of the toggle button.
Step 2: Email Receipt Images to QuickBooks Desktop
Note: It is possible to send several receipt images in one email but you need to ensure that the email size is below 20 MB.
- On your mobile, take a snap of your receipt. That particular image should be a JPEG, PDF, GIF, JPG, or PNG.
- Ensure every file or image comprises of one receipt.
- You need to email the particular image to your custom email address. It might take some minutes for the email to send.
QuickBooks pulls amounts, dates, vendors and your credit card’s last four digit automatically from the image.
In case you are uploading several receipts, it is possible to delete them or edit them in a batch as stated below:
- Choose the Receipts. Now choose Batch Actions.
- Choose either Delete or Edit if you want to delete the receipts.
- If you choose Edit, do your own edits to the Account, date of the transactions, Vendor Name, and Bank Details.
- Press Save.
It is also possible to use Google drive to upload receipts, with the help of the steps given below:
- Choose Upload from Google Drive
- Now log in to your Google Account.
- Choose up to 10 receipts. Every file must have not more than 1 receipt.
- This particular process may consume around 15 minutes. After it is complete, receipts are displayed in the review section.
Step 2: View, Edit, and then Match Receipts to Transactions
After the expense receipts have been uploaded in QuickBooks Desktop, they can be seen in the tab for For Review. Here, you can check, edit, match, and then include transactions to the register.
- Navigate to the Vendor menu. Now choose Receipt Management.
- From the tab for For Review, Choose Refresh icon to witness your receipts.
- From the particular receipt, Choose the Small Arrow and then choose Review.
- In case the receipt matches with the particular transaction, choose Attach. In case the match is wrong, Choose Remove Match and then make a new transaction.
- Press OK.
In today’s article, we have stated everything you should take into consideration while uploading receipts to QuickBooks Premier, Desktop Pro, Premium Plus, Pro Plus, or Enterprise.
Still, if you feel confused, you can get in touch with our talented team of Dancing Numbers professionals who have an expertise in handling such scenarios.

Looking for a professional expert to get the right assistance for your problems? Here, we have a team of professional and experienced team members to fix your technical, functional, data transfer, installation, update, upgrade, or data migrations errors. We are here at Dancing Numbers available to assist you with all your queries. To fix these queries you can get in touch with us via a toll-free number
+1-800-596-0806 or chat with experts.
Frequently Asked Questions
How to Provide Uses with Access to Receipt Management?
In case you have users you wish to provide access to make new transactions or upload receipts in order to match certain receipts, you can provide several access based on their profile. Here is the list of the permissions needed:
- Bank Registers (and all Banking Accounts)
- Credit card charges
- Checks
- Customer Center
- Vendor Center
- Credit card registers
- Chart of Accounts List
- Edit Bills
- Class List
- Pay Bills
- Navigate to the Vendor menu. Now choose Receipt Management
- Choose Manage Users. Based on the objective of the user, choose either Give only mobile access, or choose Provide Desktop and Mobile access.
- Choose Continue
- Choose Add User and then type the email address of the user.
- Make sure the role is kept as a user. Now choose Save.
What can be Done if you Fail to Upload Receipts once you Sign in to Your Intuit Account?
If you fail to upload receipts after you sign in to your Intuit account, you may witness the following error message:
“We’re unable to complete your request at this moment. Seems your Intuit account is not associated with a company file.”
You do not need to worry. You will need to perform the following steps:
- Log in to your Intuit account.
- In your QuickBooks Desktop, choose My Company. Ensure that the company name is being displayed. In case it is not, include the name details of the company.
- Review your Chart of Account. Now edit the Bank account name in case there is any special character.
- Now log in to your Intuit account and begin uploading your receipts once more.


 +1-800-596-0806