QuickBooks has gradually become one of the leading accounting applications in recent times an integral part of organizations worldwide. The company files created and stored in QuickBooks contains vital information while the backup files contain data till a particular date. Any user and business entity that uses QuickBooks to manage its finances must be aware of the steps to backup a file as it ensures that your data is secured.
Dancing Numbers helps small businesses, entrepreneurs, and CPAs to do smart transferring of data to and from QuickBooks Desktop. Utilize import, export, and delete services of Dancing Numbers software.
There are certain scenarios where after the backup of the company file is made, they have to be moved on another computer or to a different location on the same system itself. Since the data involved is extremely sensitive and important, the right steps have to be followed; else the file may get overwritten or deleted permanently.
Read this article till the end if you want to know the necessity of having a backup file, the process of creating a backup file and moving it to a location that is convenient for you.
Why do You need to Have Backup Files in QuickBooks Desktop?
There are many possible scenarios in which the user may require Backup files in QuickBooks Desktop and move them to a different location. Some of these possible situations are:
- The system running the QuickBooks product may have crashed.
- You have to undo some recent changes on your company data file.
- You have purchased a new computer and wanted to transfer your QuickBooks product to the new system.
- You have to share your company file or related data with another computer.
- You wish to ensure that the data remains safe even if it gets damaged, lost or somehow tampered.
How to Back up Your QuickBooks Desktop Company File
Are you also the one who also wants to learn how to backup your QuickBooks Desktop company file? Learn how to create a backup company file. This is one of the beneficial points for saving your accounting data. Sometimes if you get into the trap and by mistake your company file gets deleted then at that point of time you can use backup to restore your data.
Below are the mentioned points which can help in automatic backups or backing up files manually:
Create a Backup Company File
With the help of Backup company files, you can save everything currently in your company file. Your accounting data, letters, templates, images, logos, and related files are all included in this (QuickBooks Statement Writer, Business Planner, and Loan Manager, Cash Flow Projector). Your data can be backed up in two different methods. You have two options for backing up your data: manually or automatically.
Schedule Automatic Backups
To automatically back up with QuickBooks, follow the below steps:
- Firstly, go to the File menu and then select Switch to Single-user Mode in QuickBooks.
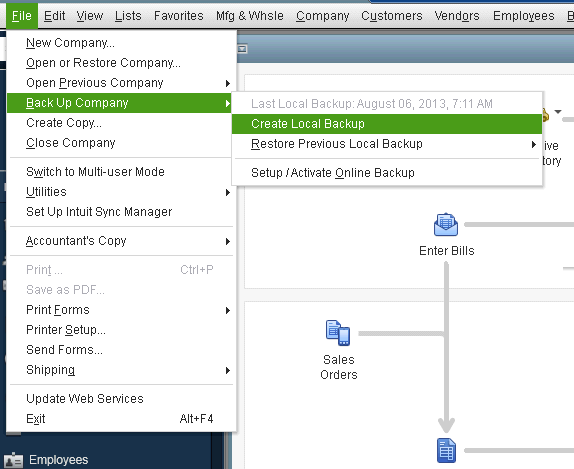
- Then again go to the File menu and then hover over Back up Company. After that, click on Create Local Backup.
- Select the Local Backup in the window and then on Next.
- Click on Browse and then select the location where you want to save your backup company file, in the Local Backup Only section.
- According to yourself, set the number of backups (this is optional).
- Select Complete Verification in the Online and Local Backup section. By doing this, it will run a test to ensure that your backup file is good or not before saving.
- After completing, click on OK.
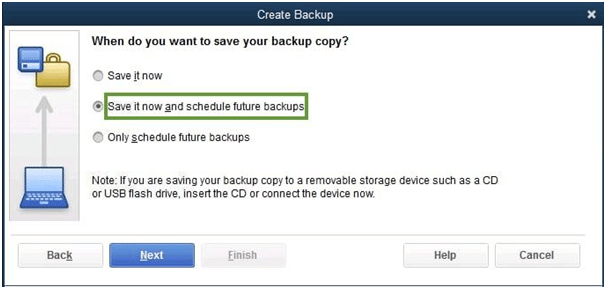
- Now, click on save it now and schedule future backups and then click on Next. In case you don’t want to save a backup now, then you can click on only schedule future backups.
- Click the option save backup copy when I close my company file checkbox and then decide the number of times to perform backups.
- Choose New to start a New schedule. To create a backup schedule, complete the fields with data. A specific hour or day of the week can be chosen.
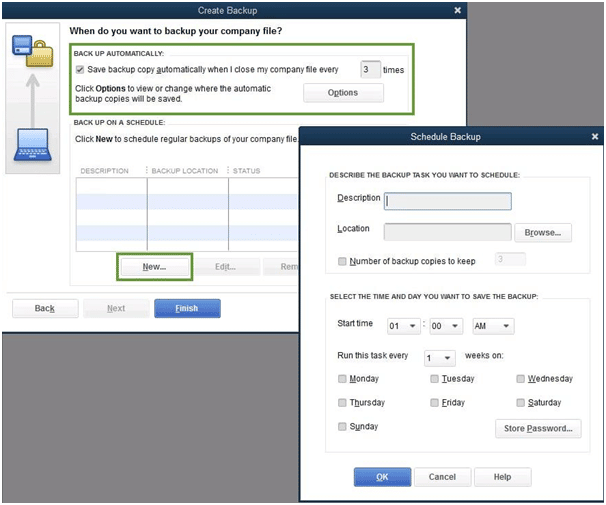
- After setting the schedule, click on OK. Then QuickBooks will ask you to enter your Windows sign-in password. Doing this will permit QuickBooks to run the scheduled backup.
- Select Finish, after your backup is ready.
At the same time, QuickBooks will create a backup and schedule your future backups. You will receive a confirmation message after completing.
Manually Backup of Your Company Files
In case you want to back up your company file, then you can do it yourself anytime you want.
- Go to the File menu and click on Switch to Single-user Mode in QuickBooks.
- Then go to the File menu and then move to Back up Company. Then click on Create Local Backup.
- Select Local Backup in the window and then click on Next.
- In the section of Local Backup, you have to select Browse and then choose the location where you want to save your backup company file.
- Then set the number of backups you want. This will run a test to ensure your backup file is proper or not before saving.
- Click on OK after completing and at last click on Save it now and click on Next.
With the help of QuickBooks, you can create a single backup company file. After completion, you will receive a confirmation message.
Adjust Your Backup Settings
If you want to see when you have last backed up your company file then you have to go to the File menu and then move to back up Company. At the top of the menu, you will see the time and date.
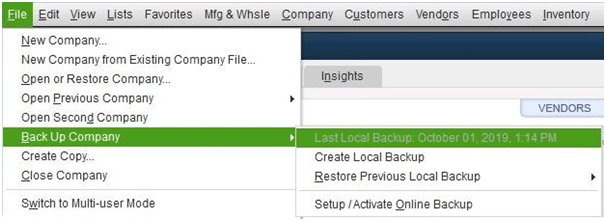
To change the backup preferences you have to:
- Choose the File and move to back up Company. After this, select Create Local Backup.
- Click on Options.
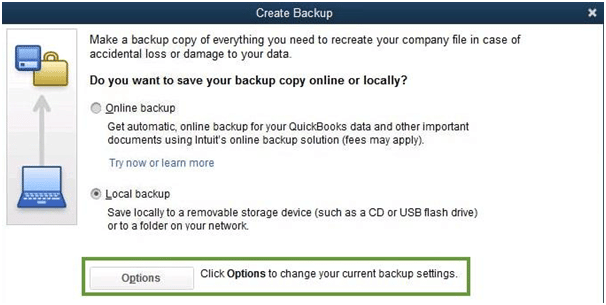
- If you want then make changes and click on OK.
How to Move the File on Your Local Computer?
Follow the below mention steps to move the file on your local computer:
1. Using the File Manager:
- You can use the File Manager for uploading or downloading files on your computer by following the steps mentioned below:
- Download the File Manager and log in. Choose the destination folder from the column on the left.
- Click on the blue Up arrow. Choose the file or files to be uploaded from the file selector.
- Click the Add button and choose the files that you want to upload select the file and click Open.
- Now click on the Upload button.
- Click on the Close button when the upload is complete.
- Downloading the file
- Downloading the File
- Choose the file that you want to download from the left side of the menu.
- After that, click on the blue ‘down’ arrow at the top of the interface.
- Choose the location where the file has to be downloaded.
2. Moving the Company File to Another Computer
- Install QuickBooks Desktop on the computer to which files are being moved.
- Follow the steps mentioned above to create a backup file on the computer you used previously.
- Provide the backup file with an easily identifiable name as it also prevents overwriting of the file accidentally.
- Make sure you save the backup file at a location where it can be easily located.
- Use an external device or a flash drive to move the backup file to the new computer. You can also share the company file if both systems are on the same network.
- Restore the backup file on the new computer.
PRO TIP- It is recommended to download the latest tax table after the file has been moved.
See Also: How to Access Company File Located on a Remote Computer
3. Moving the Company File to a Different Location on the Same Computer
- Create a backup company file using the steps mentioned above.
- Make sure that the backup company file is given a unique name before saving so that it could be identified easily.
- Save the file at a location like the desktop so that it is easier to locate. The backup should be saved on the local hard drive of the computer if the company file is present on the network.
- Now restore the backup file to the newly created folder / location.
4. By Moving the QuickBooks Data Folder Entirely
This alternative is used when the user does not want to create a backup company file.
- In QuickBooks, open the company file that has to be moved.
- Press the F2 button. This will open the Product info window.
- Check the File information section. This tells you the location of the company file on the hard drive.
- Click on the Windows Start button and open the File Explorer.
- Locate the folder in which the company file is present.
- Right click on the company file and choose Copy.
- Now open the external device where the files have to be moved. Open the new location on the hard drive if you have to move the files here.
- Right – click and select the Paste option.
In conclusion, you have learned the various ways you can protect the data of your organization by creating a backup. You have been equipped to enable other computers to become an asset to your daily accounting needs by transferring your files to them.

Looking for a professional expert to get the right assistance for your problems? Here, we have a team of professional and experienced team members to fix your technical, functional, data transfer, installation, update, upgrade, or data migrations errors. We are here at Dancing Numbers available to assist you with all your queries. To fix these queries you can get in touch with us via a toll-free number
+1-800-596-0806 or chat with experts.
Frequently Asked Questions (Faqs)
Will my Data be Affected if the Backup is in the Same Folder as the Company File?
Your data may get overwritten if the backup file and the company file are in the same folder. To prevent that, ensure that the names of both the files are different from each other.
Where Will the File get Downloaded if I do not Choose the File Location?
If you do not choose the file location or the file manager doesn’t prompt you to choose one, the file will get automatically saved to the downloads folder on your system.
If I Move my Company File to Another Computer, Will it Affect my Product License?
No, Your product license remains unaffected when you move your company file to another computer.
How to Move the QuickBooks Company File?
● Firstly, from QuickBooks go to the File menu and select Utilities.
● After that, select Move QuickBooks to another computer.
● Click on I’m Ready and then create the one-time password.
● Then follow the instructions to choose the USB flash drive that you have to use.
● Lastly, wait for the files to be copied.
Can You Transfer QuickBooks from one Computer to Another?
Yes, You can transfer your QuickBooks license from one computer to another. Intuit advises that you must find your QuickBooks license number and product number before starting the transfer process. Then open QuickBooks, choose Help, then choose QuickBooks to find them on the original computer.
How to Install QuickBooks on a Second Computer?
● Firstly, go to your new PC and then install QuickBooks.
● Create a backup copy of your company file on the old one by returning to it after finishing the new one.
● If they are connected, then copy the backup file to your new PC by using a flash drive or other external device or through a network.
● Restore the backup on the new PC after that.


 +1-800-596-0806