Intuit, which created QuickBooks Desktop, provided frequent updates and QuickBooks condense is one such great feature of this accounting software in recent times. In today’s article, we will talk about this particular condense data utility feature in detail, how to access it, and what are the crucial factors to keep in mind when using it.
Dancing Numbers helps small businesses, entrepreneurs, and CPAs to do smart transferring of data to and from QuickBooks Desktop. Utilize import, export, and delete services of Dancing Numbers software.
Let us begin by understanding what QuickBooks Condense Data Utility is.
What is QuickBooks Condense Data Utility?
QuickBooks Condense Data Utility enables you to minimize or decrease the size of a huge company file that may or may not impact the normal working of your QuickBooks application. It assists you by saving an archival copy of your particular company file.
Apart from that, it also deletes and condenses the transactions that are closed and old. It can assist you in importing your particular company file to QuickBooks Online from QuickBooks Desktop. Not to mention, the advantages of condensing your QuickBooks are not limited to this.
There are many other benefits as well. Before you begin with the condensing procedure, there are multiple facts concerning the condense data utility which you must know. In today’s blog, we have covered all such factors for your understanding, so that if you even experience the following notification when trying to import your data from QuickBooks Desktop to QuickBooks Online, you will know what to do.
Your file is too big to export. Export your balances/lists- your chart of accounts, customers, vendors, and more.
Note: You can refer to this article, in case you are deleting all the inactive list entries in your particular Desktop data prior to converting it to QuickBooks Online.
What are the Reminders Related to Importing and Condensing the File?
Here is the list of the reminders about importing and condensing the file:
- In order to convert your particular Desktop Data to QuickBooks Online, the Desktop file should be less than the below-mentioned limits:
- QuickBooks Desktop Premier and Pro 2018, with current releases and the latest 750000 targets.
- QuickBooks Desktop Enterprise 2021, with current releases and the latest 750000 targets.
- QuickBooks Desktop for Mac 350000 targets.
- QuickBooks Desktop Enterprise 2020 and previous 350000 targets.
- QuickBooks Desktop Premier and Pro 2018 and previous 350000 targets.
- Journal Entries issue targets too.
- QuickBooks prepares an archived copy of your company file automatically in the actual folder of your particular file. It is saved with the name “[Your Company File Name] Copy MM/DD/YY.“
- Ensure that you save each of the files in a secure place.
- File size (MB) is not important while importing to QuickBooks Online. Targets are important.
- Whenever a file is condensed:
- QuickBooks 2018 and Previous: Some of the particular transactions are archived and changed into Journal Entries.
- QuickBooks 2019: The total file size is condensed and your important data and details stay with you.
- Reports may differ once a file is condensed.
- You can easily save your actual company file either from the archive copy or the backup.
- In case you are having performance problems, the Condense Data Utility must be your last resort to try to enhance performance.
How to Review Targets in a Particular QuickBooks Company File?
Here are the steps to review targets in a particular QuickBooks Company file:
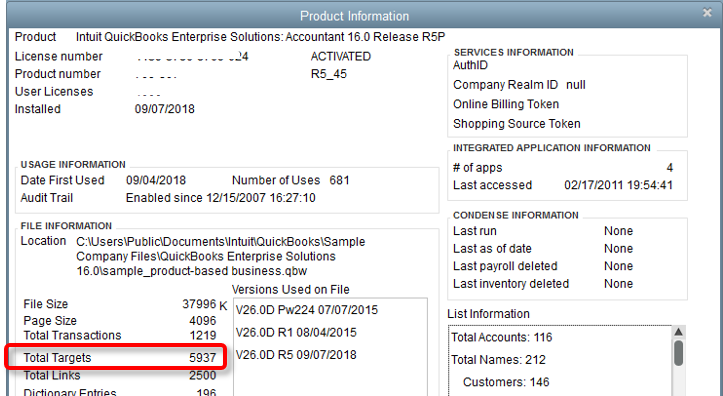
Step 1: Open your QuickBooks Desktop Company file and use Product Details.
- Mac: Click CMD + 1 on your particular keyboard.
- Windows: Click F2 on your particular keyboard.
Step 2: Now Review the Total Targets Number.

How to Condense Your QuickBooks Desktop Data to import to QuickBooks Online?
QuickBooks Enterprise 12.0 and Later or QuickBooks Pro/Premier 2012
- In the QuickBooks File menu, choose Utilities and then click Condense Data.
- Now choose Yes to the notification- Budget Data may be cleared with cleanup. Do you wish to continue?
- Select Transactions before a specific date in the Condense Data window.
- When you select a date in the Date field, QuickBooks will remove closed transactions on or before that date.
Note: If you monitor inventory, It is ideal to make the date the month’s last date. In this way, the average price of items will stay correct.
- Choose Next.
- Choose a method that will help to condense the transactions that you are removing. Now click Next. In case you are not sure, press the option, Help me Choose.
- Choose any of the particular check boxes for the dialog boxes and then click Next.
- Choose Begin Condense.
QuickBooks Enterprise Solution 6.0 to 11.0 or QuickBooks Pro/Premier
- From the particular QuickBooks File menu, Choose Utilities. Now click Clean Up Company Data.
- Choose Yes for the following message:
- Budget data may be moved during cleanup. Do you want to continue anyway?”
- Choose the option, Remove Transactions from a Particular Date.
- Access the Date field to choose a Date. QuickBooks will delete closed transactions on the date you select or before the date you selected.
- Choose Next.
- Choose any of the checkboxes and under the option Choose Additional Criteria for Removing Transactions. Now choose Next.
- This is an optional step. Choose any of the checkboxes in the segment Choose Unused List Items to Remove and then click Next.
- Choose Begin Cleanup.
- Choose OK for the message that says to take a backup prior to cleaning up the data file.
QuickBooks for Mac
- Firstly, you have to close all your QuickBooks windows.
- Then you have to select File, then click on Utilities, and then click on Condense Data.
NOTE: It is recommended to set the date as the final day of the month if you track inventories. Your average cost for things will continue to be accurate in this way.
- Now you have to click. Before condensing the transactions, QuickBooks will create a backup file, according to a notification that shows.
- To create the backup file, you have to click OK.
- With a backup file, you can be sure that any transactions that QuickBooks deletes from your company file will still be recorded in their details.
In case you have condensed the file and now you have fewer targets than the limits mentioned above, keep moving your QuickBooks Desktop to QuickBooks Online.
How to Fix Possible Problems once the Condensed File is Imported?
Creating a Portable Company File
Here are the steps to create a portable company file:
- Choose the File menu. Now select Create Copy.
- Choose Portable Company File. Now select Next.
- Now save that portable company file to your particular desktop. You can also make a new folder on your system.
- Intuit suggests you to save it on a USB flash Drive or a CD or any other kind of removable storage device.
- The portable company file is saved with a .qbm extension.
- It will offer security against any kind of data loss or data corruption in case your computer is compromised.
- When you are notified to close your company file, press OK.
Note: In case you click Cancel, QuickBooks then exists the wizard and does not create the particular portable file.
Restoring the Portable Company File
Once you prepare a portable company file (.qbm), it is possible to restore the file on the particular computer. QuickBooks then decompresses the file and then builds your company file again. This particular procedure may take up some time.
- Choose the File menu. Now select Open or Restore Company.
- Choose Restore a portable file and then select Next.
- Navigate to the particular location where the portable file is saved.
- Choose the portable file and then select Open.
- Choose Next.
- It will open a screen, Save a Company File as.
- In order to avoid any kind of overwriting of your present company file, you need to rename the company file by entering a new name in the field for File Name.
- Once renaming the file is done, choose Save. Now QuickBooks changes the portable file to a normal company file with a .qbw extension.
- You will be notified to take a backup of the new company file. You need to abide by the wizard to finish the backup.
- Review the file size once more. In case the file has more that the targeted limit, then you need to head back and do the process once more and delete as much data as possible. The .qbw file prepared by the portable company file may be smaller compared to your condensed .qbw file and it is quite normal.
How to Condense Your QuickBooks Desktop for Mac Company File?
If you have Mac, you must know how to access the Condense Data utility in QuickBooks Desktop for Mac in order to cut down the company file size.
In case your company file has grown too big, it is possible to condense your file to a small and specific date range. QuickBooks deletes the transactions that are not within the date range you choose and changes it with new summary transactions by month.
Note: Condense Data must be a last resort to enhance performance.
Here are the steps to condense your file for Mac company file?
Choose your QuickBooks version to understand how to condense your file.
Note: The Condense Data Utility will keep a backup of your particular file prior to removing of any data. In case the condense fails, it is possible to restore the backup data to view the original data.
QuickBooks Mac Plus 2023
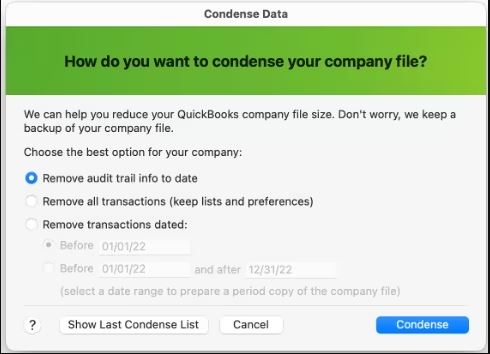
With the help of QuickBooks Mac Plus 2023, you can select from the several options to cut down the company file size and delete or save particular data.

Remove Audit Trail
The update Condense offers an option to delete the audit trail that cuts down your file size, however, it leaves all the transactions that are detailed.
- Navigate to the option for File. Now choose Utilities. Now choose Condense Data.
- Choose Remove Audit Trail info to date.
- Choose Condense.
- Save a backup of the particular file.
- Check the info shown in the screen for Condense Data Completed.
Delete all Transactions
This option will delete all transactions from your particular company file that cuts down your file size, however, leaves the preferences and list entries.
- Navigate to File option. Now choose Utilities. Now choose Condense Data.
- Choose Remove All Transactions. Make sure Preferences and Lists are kept.
- Choose Condense
- Save backup of the particular file.
- Check the info shown in the Condense Data Completed screen.
Delete Transactions Dated
With this option, you will be able to delete all transactions from your company file prior to any particular date and offers extra options for condensing.
- Navigate to the File option. Now choose Utilities. Now choose Condense Data.
- Choose Remove Transactions dated.
- Choose Before and choose a date.
- Choose More Options. Now select the options you require. Choose Help if you require assistance.
- Take a backup of your file.
- Check the information shows in the Condense Data Completed screen.
Period Copy
A period copy is considered as a condensed version of your particular company file that only comprises data for a particular period. This particular tenure copy may not show cash basis reports in the right manner.
Here are the steps to create a period copy:
- Navigate to the File option. Now choose Utilities. Now choose Condense Data.
- Choose Remove Transactions dated.
- Choose Before and After and choose dates.
- Choose More Options. Now select the options you require. Choose Help if you require assistance.
- Take a backup of your file.
- Check the data displayed in Condense Data Completed.
What are the options You are Asked to Select When you Choose Remove Transactions Dated?
Do You wish to Delete the Following Transactions?
- Transactions marked “To be printed“
- All Sales Orders, Pending Invoices, Estimates, and Purchase Orders
- Transactions comprising items and unbilled expenses
- Uncleared credit card and (unreconciled) bank transactions
- Estimates and Invoices marked “To be sent“
- All Mileage and Time activities
How Inventory must be Summarized?
- Keep the transactions of the inventory,
- Summarize the transactions of the inventory.
How the Transactions Should be Summarized?
- Make one summary Journal Entry
- Create a summary journal entry for each month
Do You wish to Delete List Entries that are Unused?
- Accounts
- Vendors
- Customers and Jobs
- Other Names
- To-Do notes marked Done
- Items
- Classes
- Unused items in all other lists
QuickBooks Mac Plus 2022 and Earlier

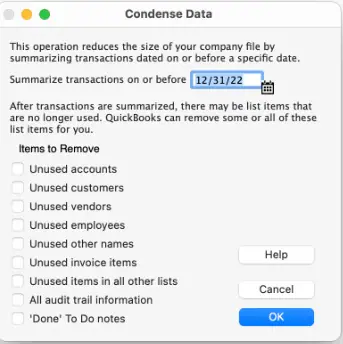
- Navigate to the File option and choose Utilities. Now choose Condense Data.
- Add the date you wish to remove the transactions from,
- Press OK.
- Now press OK to make a backup file.
- Choose OK after the backup is finished.
- Choose OK once and check the details in Condense Data Completed. In case some of the transactions fail to be removed, you can choose Show List to check those transactions.
Final Words
We hope that this article about condensing your QuickBooks has helped you understand about this topic in detail. In this article, we have talked about How to condense your QuickBooks Desktop Data to import to QuickBooks Online and QuickBooks Mac.
We have explained all the steps in a detailed manner. However, if you still get confused, you can reach out to our Dancing Numbers experts.

Looking for a professional expert to get the right assistance for your problems? Here, we have a team of professional and experienced team members to fix your technical, functional, data transfer, installation, update, upgrade, or data migrations errors. We are here at Dancing Numbers available to assist you with all your queries. To fix these queries you can get in touch with us via a toll-free number
+1-800-596-0806 or chat with experts.
Frequently Asked Questions
It is Possible to Undo the Changes Done by QuickBooks Data Utility?
No. It is not possible. This is because the changes done by QuickBooks Condense Data Utility are not reversible. We suggest users take a backup of their company file to enable you to restore it if required.
Is it Possible to Modify the Condensing Data Criteria?
Yes. QuickBooks Desktop enables you to modify the criteria for condensing data depending on specific time periods, like removing transactions older than a particular date by a precise number of years.
What are the Reports that can get Impacted for the Condensed Period Only?
Here is the list of the reports that can be affected due to the condensed period:
- Item-based reports such as Purchase, A/R, Sales, Job costing, A/P aging reports, etc.
- Reports filtered by class
- Purchase and Sales detailed reports
- The audit trail report
- Account-based reports like Balance Sheet, Profit and Loss, Trial Balance, Cash Flow, etc.
- All cash basis outgoing and incoming reports
- Sales tax liability report.
- The receivables collection reports
- Reconciliation reports.


 +1-800-596-0806