Learn how to categorize bank and credit card transactions in QuickBooks Online.
A transaction report where you do not have to dig in to understand what is what, you can just run through it and can get the idea on categories of expenses. Well, it is not impossible, actually, it is very much possible with the help of the categorization feature of the QuickBooks Online. This feature lets you categorize your bank and credit card expenses, once you incur them the first time. And after that, it will automatically categorize the similar nature of expenses with the same details.
Dancing Numbers helps small businesses, entrepreneurs, and CPAs to do smart transferring of data to and from QuickBooks Desktop. Utilize import, export, and delete services of Dancing Numbers software.
The only work you would need to do is review those transactions and add them to the ledger account where you want it to reflect in QuickBooks. The properly categorized transaction helps in efficiently managing the business, it helps in tracking expenses and you can even analyze and apply measures for optimizing the expenses. For using the categorizing transaction feature in QuickBooks online for bank and credit card transactions, you will have to first link your account to the Bank feeds in QuickBooks Online.
After that, your downloaded transactions will appear in for review tab, from there you can go ahead and categorize them into their respective categories. We will discuss the process in detail in the next section.
Steps to Categorizing Bank and Credit Card Transactions in QuickBooks Online
Follow the below mention steps to categorizing bank and credit card transactions in QuickBooks Online.
Process Steps for Categorizing Bank and Credit Transactions
As soon as you connect your bank or credit card account to the QuickBooks bank feed, it will start downloading the transactions on a daily basis automatically. Now the only work left would be to review each transaction and categorizing them into correct accounts in QuickBooks. You can do so by following the below steps in the same order:
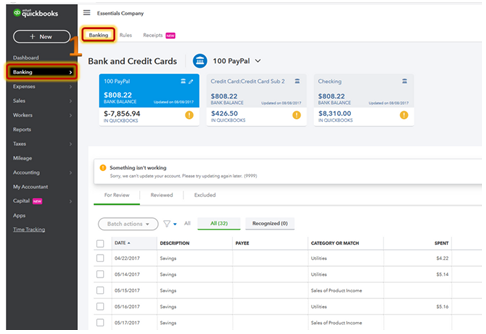
Step 1. At the first step, you need to open QuickBooks and click on Banking from the left menu bar and click Banking again.

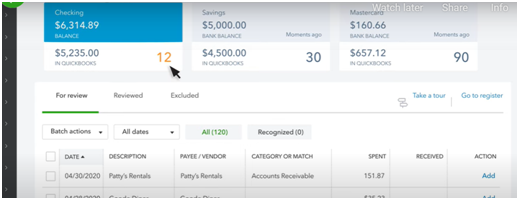
Step 2. Once you click on the Banking you will be directed to the page where all your linked accounts will reflect including your checking account, saving bank account, and credit card account. You need to go to the For Review tab.

Step 3. The transactions that appear on for review page aren’t yet there in QuickBooks. So, you need to first categorize them. For this purpose, you need to click on each expense line incurred through your bank account or credit card account.
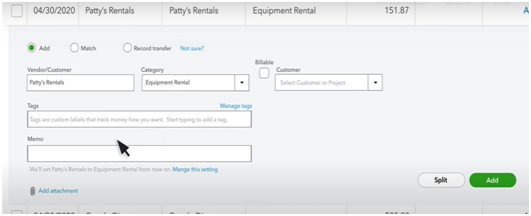
Step 4. After that, you need to fill in the details like Vendor/ customer name, category of expense (existing or new), project name, billable, etc. Also, you can add a custom label in the tag box to track the expenses and memo number.

Step 5. After you have filled in all the relevant details, click on add. After this, QuickBooks will automatically recognize the transaction with similar details and categorize them in the same category.
Step 6. There are some transactions against which you would see Match option instead of Add. These are the transactions that are already there in QuickBooks, you just need to match them by reviewing them.
The process is the same for Bank as well as credit transactions. Let us now also see how can we link the bank or credit card account to QuickBooks online, just in case you need it:
The Process is the Same for Bank as well as Credit Card Account
Step 1. First of all, Click on the Banking menu and click on Add account.
Step 2. Now search your bank and login to your bank’s website by entering your credentials.
Step 3. In this step, select the bank or credit card account you want to connect, type of account and date range from when you want to download the transactions.
Step 4. After that click on connect and follow the onscreen instructions to link the bank/ credit card account.
How to Categorize Online Bank Transactions in QuickBooks Online
QuickBooks automatically downloads the latest transactions when you link your bank and credit card accounts. It then offers categories for these transactions based on how you and other customers have categorized transactions that are similar to these. This explains where your company makes and spends money and helps in identifying tax deductions.
Note: Pending transactions cannot be downloaded from QuickBooks Online. Transactions are only downloaded once they are officially posted on the bank website and are no longer waiting.
Step 1: Download the Latest Bank and Credit Card Transactions
Every 24 hours, we try to update the latest transactions for most banks. Some could require a bit more time. Also, you may always manually update your accounts:
- Firstly, you have to go to Bookkeeping and then you have to select Transactions.
- Now you have to select Bank transitions and then you have to select Update.
All of your bank and credit card accounts are updated as a result.
Tip: To continue the upgrade if you see a message requesting more authentication, do as instructed. While some banks don’t demand it, others do for extra security.
Step 2: Review and Categorize Downloaded Transactions
Note: The Banking window’s Enable suggested categorization setting helps in automatically auto-categorizing transactions with similar bank details.
- Begin by going to Bookkeeping and then you have to select Transactions.
- Click on select Bank transactions
- Choose the tile representing the account you want to review.
- To begin your review, you have to select the For review tab.
The For review tab is where QuickBooks sends downloaded transactions. Review each one separately:
- In case the category field is blank:
- You have to select a category using the dropdown menu.
- Then you have to add a new category to the dropdown.
- If QuickBooks has provided a category for the category field:
- You have to confirm that category
- By choosing another one from the dropdown you have to change that category or adding a new one.
You can create a bank rule that automatically classifies transactions for you to streamline the process.
Instead of categorizing the transaction if it already exists in QuickBooks, you might have the option to match, add, or view multiple matches.
How to Choose the Right Category
- Categorize Income: Categorize your income into categories, such as sales, customer payments, and refunds, to show where the money that was paid to you came from. If you received a bank loan, sold a fixed asset, or made an investment in the business the business might also receive money.
- Categorize Expenses: Expenses, or money given to others, should be broken down into categories to show how money was spent on things like office supplies, meals, payroll, taxes, and fixed assets. This equity transaction is also regarded as an expense for the business if you pay yourself (sometimes referred to as an Owner pay or Owner draw).
Split Transactions between Multiple Categories
For better tracking, transactions can be divided into multiple categories.
- Select the downloaded transaction in the For Review tab to expand the display.
a. Change the Find match to Categorize if the Match option is selected in the Action column. - To launch the Split transaction window, you have to choose Split (Accountant view) or Split transaction next to Category (Business view).
- Choose the categories you want to split the transaction into from Category dropdown menu.
- For each split you have to enter an Amount.
- For each split, you have to choose a vendor or customer name.
Note: Depending on the transaction, the field name may change.
- When finished, you have to choose Apply and accept.
Exclude Duplicate Transactions
While unlikely, duplicate transactions sometimes appear in bank feeds. This generally occurs when there is a problem with your bank connection, causing you to submit the transactions manually before later downloading a second (duplicate) copy from the bank. In this case, you should exclude the duplicates.
- Firstly, you have to go to the For review tab.
- For each transaction that you want to exclude you have to select the checkbox
- Then you have to select Exclude.
- The Excluded tab is where excluded transactions are moved. They won’t be redownloaded or added to QuickBooks.
Categorize Personal Transactions Done with a Business Account
It’s recommended to use personal accounts for personal transactions and business accounts for business transactions, but sometimes you can find yourself needing to account for a personal transaction. You can do this, so you don’t have to get worried.
If you use a business account to make a personal transaction, that is referred to as an owner’s draw because you, the owner, took money out of the company and spent it on a personal transaction. An owner investment is when you make a personal contribution to a business account.
View Images for Check Transactions
For any check transactions that are awaiting approval, QuickBooks has partnered with a number of banks to automatically provide front and back check images. It may be simpler to review, categorize, and match transactions as a result.
The check images load immediately if QuickBooks is already linked to a participating bank; further action is not necessary.
To View the Check Images you have to:
- You have to select a downloaded transaction that shows a number in the Attachment clip column, in the For Review tab.
- To view an image, you have to choose one of the check image attachments from the transaction details.
- You can view the front and back of the check in the image panel that opens and expand it to fill the entire screen.
- As usual, review the transaction. Images can be found later in your Attachments list under Settings if you match or add the transaction. Additionally, they will be instantly joined to the transaction form.
Note: Your bank is not supported if check images are not automatically attached to your connected bank transactions. However, as we seek to work with more financial institutions, it might be supported in the future.
In QuickBooks Online, you can match online bank transactions after categorizing or adding downloaded transactions.

Looking for a professional expert to get the right assistance for your problems? Here, we have a team of professional and experienced team members to fix your technical, functional, data transfer, installation, update, upgrade, or data migrations errors. We are here at Dancing Numbers available to assist you with all your queries. To fix these queries you can get in touch with us via a toll-free number
+1-800-596-0806 or chat with experts.
Frequently Asked Questions (Faqs)
Can You let me know the Process of Classifying Credit Card Payment in QuickBooks?
First, Open QuickBooks and go to the ‘New‘ button (with + icon). After clicking on new click on Expense or check. Now you need to enter the details required like payment account, amount, interest amount (if any). You will be able to easily track the payment once you classify the payment. Once you have entered relevant details for classification, click on save and close.
Can You Please List down the Steps to Reconcile the Credit Card Account in QuickBooks?
You can start the process by selecting your credit card and then choosing the credit card you wish to reconcile. Now choose the statement date and enter your ending balance and finance charges (if any). After entering the details and matching the transactions click on reconcile your Account and then click on save. Once you are done you can write a check.
How can I Categorize and re-Categorize the Transactions by Batch in QuickBooks Desktop and QuickBooks Online?
Open QuickBooks and select the new transactions from the drop-down list. Now choose enter bills and then go to the item tabs. Now select the type from the drop-down menu. You need to enter all the relevant details as required and press save and close.
How can I Create Categories and Sub-Categories for Grouping Items in QuickBooks Online?
You need to first open QuickBooks and click on classes menu. After that, you need to go to the sales menu and choose Product and services. Now click on More from the drop-down menu and then click on Manage categories. After that, you can select a new category and enter its name and save it. In case you want to create sub-category, you can click on ‘Is sub-category’ check box under the main category.


 +1-800-596-0806