Know how to connect your Amazon Business account to track your purchases in QuickBooks Online.
Do you own a business account with Amazon? With the Amazon Business Purchases app, you can link it to QuickBooks. It is a fantastic way to save time and maintain the accuracy of your books. The app imports all the information about your Amazon Business purchases into QuickBooks, allowing QuickBooks to categorize and link them with your bank or credit card data. You simply need to review and approve the work.
Dancing Numbers helps small businesses, entrepreneurs, and CPAs to do smart transferring of data to and from QuickBooks Online. Utilize import, export, and delete services of Dancing Numbers software.
Note: Only Amazon Business accounts can use the Amazon Business Purchases app. Your personal Amazon.com account or an Amazon Seller account cannot be linked to QuickBooks.
Step 1: Set Up the Connection
Make sure you are the primary administrator for the Amazon Business account as well as the primary administrator or a company administrator for your QuickBooks company before you attempt to connect your Amazon Business and QuickBooks accounts.
Below are the mentioned points of how to connect the accounts:
- Firstly, you must Sign in to your QuickBooks Accounts as an admin.
- Visit the app page for Amazon Business Purchases.
- Now you have to select the Get app now.
- Sign in to your Amazon Business account as the primary administrator when required.
- The import start date can be chosen. After that date, all your Amazon Business purchases will sync with QuickBooks for your review.
- At last, click on Finish.
Your purchases from Amazon Business will then start to be imported into QuickBooks by the app. You might not immediately see all of them if there is a lot to import. No need to worry; the app remains working until the task is completed.
After the first import, the app checks your Amazon Business account once a day and updates QuickBooks with the most recent transactions. QuickBooks cannot currently be updated more frequently or on demand by the app.
If You Previously Used the QuickBooks Labs Plug-in
You can now import your transactions using the Amazon Business Purchases app if you previously used the QuickBooks Labs plug-in. Here is how to configure the app so that duplicated transactions are avoided:
- Take note of the time the Labs plug-in entered the last Amazon Business transaction imported into QuickBooks.
- Then disconnect the Labs connection.
- Use the instructions above to set up the Amazon Business Purchases app. Choose the latest transaction date from your Labs connection as the import start date.
Step 2: Review Your Amazon Business Purchases
You are ready to review and add your Amazon Business purchases to your books once they appear in QuickBooks.
- Click on Bookkeeping, then choose Transactions.
- Then click the For Review tab after selecting App transactions. The list includes information on your Amazon Business purchases and returns, including the product description, quantity, purchase price, and fee breakdowns.
- Select an action you can perform for each transaction depending on its status:
- Add or Match: You can add this purchase to your books right away. You can match the purchase to an existing transaction in your books if QuickBooks is connected to the bank or credit card account you used to make the purchase.
- Review: The bank or credit card account you used to make the purchase isn’t yet recognized by QuickBooks. You have two options: either check to see if the account already exists in QuickBooks, or add a new account to your Chart of Accounts.
How to Handle Returns: Your Amazon Business returns go into QuickBooks for you to review and to add to your books, like your purchase. Just be sure that the return has the same category as the original purchase so that your accounting stays correct.
Confirm or Add an Account for a Payment Method
The app offers information about the payment methods you used when importing your Amazon Business purchases. These details are used by QuickBooks to find a bank or credit card account you’ve already created in your Chart of Accounts. In this manner, it can properly maintain your books and register expenses in the appropriate account. QuickBooks also tries to match purchases to specific transactions it downloaded from your bank if you’ve connected a bank or credit card.
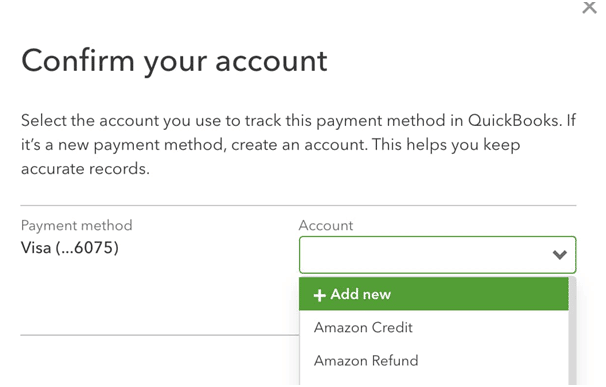
QuickBooks will ask you to confirm that it correctly found the bank or credit card account the first time a payment method occurs in an import. You can immediately add a new account if it is unable to find one.
Know what to do:
- Choose Confirm accounts in the notification you see from the App transactions tab.
- If the account is already in QuickBooks, select the account from the dropdown as the payment method shown. Select +Add New if you want to create a new account in QuickBooks.

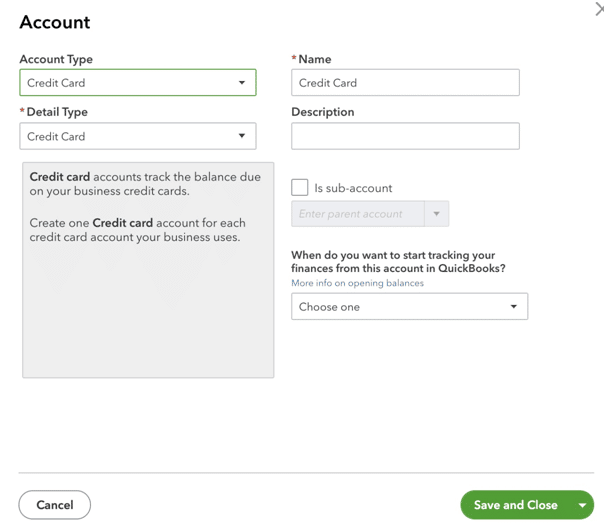
- Fill in the details for a new account. Select the Bank Account Type, then the Checking Details Type, for a debit card.

Choose the Credit Card Account Type, followed by the Credit Card Detail Type, for a credit card.

After that for the account enter a name and description (optional) as well.
- Select Save and Close when you are ready. From now on, QuickBooks will use this associated payment method’s bank or credit card account.
Changing the QuickBooks account associated with a payment method is simple and can be done later:
- Select Transactions under Bookkeeping, then App Transactions.
- In the top right corner, above the transactions list, choose App Settings.
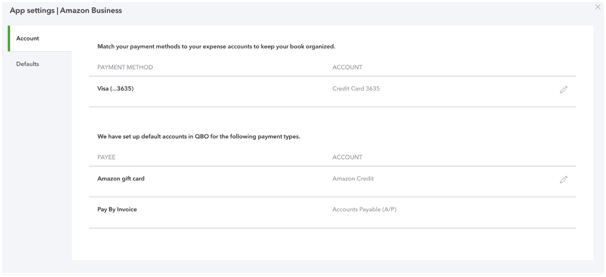
- Then you have to select Account.

- For the payment method, you want to update you have to select the pencil icon.
- You can select another existing account in QuickBooks or you can add a new one.
Change the Default Settings
Change the Default Category
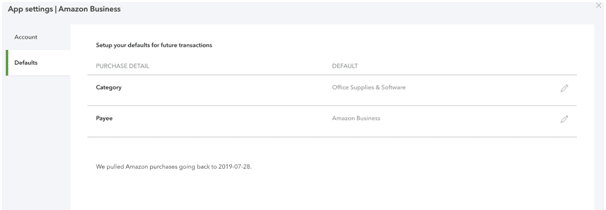
Your Amazon Business purchases are by default classified by QuickBooks as “Office Supplies & Software.” To change the default purchase category:
- Select Transactions under Bookkeeping, then App Transactions.
- In the top right corner, above the transactions list, choose App Settings.
- Then choose Defaults.

- Choose the purchase category you want QuickBooks to use by clicking the pencil icon.
- At last click Save and Close.
Choose the Default Payee
Amazon Business is the payee’s default classification according to QuickBooks. To change the default payee mentioned below:
- Select Transactions under Bookkeeping, then App Transactions.
- In the top right corner, above the transactions list, choose App Settings.
- Then you have to select Defaults.
- Select the payee you want QuickBooks to use by clicking the pencil icon.
- At last select Save and Close.
In case You want to Change the Import Start Date
You cannot change the start date of the app once you have configured it and it has started importing your Amazon Business transactions. Older transactions can still be entered manually, though. You will still have the option to review and exclude any imported transactions that you decide not to upload to QuickBooks.
Disconnect the App
You can disconnect the Amazon Business Purchases app from either your Amazon or QuickBooks accounts if you decide to stop using it with QuickBooks. Your QuickBooks will continue to contain every Amazon Business transaction that you have reviewed and added.
From Your QuickBooks Account.
- After going to Bookkeeping, you have to select Transactions, and then select App Transactions.
- Then you have to select App Settings.
- After that select Disconnect Amazon.
Using Your Amazon.com Account:
- First, you have to go to Your Account.
- Then you have to select Log in with Amazon.
- Select Remove after finding the Intuit QuickBooks connection.
More and more small businesses are seeking ways to run their operations more successfully and efficiently. Businesses and the accountants who serve them can better manage a business owner’s purchases and overall books thanks to this Amazon QuickBooks Integration.
Businesses can grow their business by using Amazon Business. The Amazon QuickBooks Integration will simplify life for small business owners and the accounting professionals who support them by automating the data entry and reconciliation tasks that small businesses must complete keeping their books up to date.
After reading the above article your doubts will be cleared regarding how you can connect your Amazon Business Account to QuickBooks Online. In case you still face any issue regarding QuickBooks Amazon integration then you can connect with Dancing Numbers experts as they are available round the clock.

Looking for a professional expert to get the right assistance for your problems? Here, we have a team of professional and experienced team members to fix your technical, functional, data transfer, installation, update, upgrade, or data migrations errors. We are here at Dancing Numbers available to assist you with all your queries. To fix these queries you can get in touch with us via a toll-free number
+1-800-596-0806 or chat with experts.
Frequently Asked Questions (Faqs)
Can You use QuickBooks with Your Personal Amazon.com Account?
No, You can’t use it as this app only works with Amazon Business at this time.
What’s the difference Between the Online Labs Amazon Connection and the New Amazon Business App Integration?
• A previous integration with Amazon is QuickBooks Online Labs Amazon Connection. It is no longer supported and lacks a direct API with Amazon.
• A direct API connection is used to integrate the Amazon Business Purchases app, which is a new and improved integration made possible by a partnership with Amazon Business.
What is an Amazon Business Account?
You can access hundreds of thousands of sellers on Amazon Business who can provide you access to a business-only selection, quantity discounts, and time-saving features that can improve the way you manage your company. You can get the finest of Amazon Business with Business Prime.
How to Find Your MWS information and Amazon Seller ID?
• Go to Amazon Seller Central and sign in.
• To authorize a developer, go to Manage Your Apps and then select Settings – User Permissions.
• Then enter the developer ID and relevant developer name. Then you have to click on the Platform
• Click the Next button and the checkbox.
• You will see your seller ID and MWS authorization token.
What if Your QuickBooks is Not Syncing?
• If you want to solve this issue then you will need to rename the ‘Intuit Sync Manager folder.
• Then you have open QuickBooks and then Open Intuit Sync Manager.
• After that Sync Manager will be created.
• Then you have to Select Sync which wills all your company data.


 +1-800-596-0806