Importing vehicle mileages into QuickBooks Desktop (QBDT) helps businesses maintain accurate travel records, employee reimbursements, tax deductions, and job costing data without manual entry. Many users search for this process when they need to move mileage logs from Excel, CSV, third-party tracking apps, or legacy accounting systems into QBDT. It is especially useful for companies that manage delivery fleets, sales travel, service technicians, or regular business trips and want organized mileage reporting inside QuickBooks.
This article covers the key reasons to import vehicle mileages, required prerequisites such as properly formatted files and mapped fields, and the available import methods. It explains manual options, spreadsheet-based preparation, and automated solutions like Dancing Numbers for faster bulk uploads with fewer errors.
Prerequisites for Importing Vehicle Mileage Data
Before starting the data transfer process, ensuring your environment and files are correctly configured is essential for a seamless integration. Proper preparation prevents common upload errors and ensures that your mileage records align perfectly with your existing financial data.
1. Supported QuickBooks Desktop Versions (Pro, Premier, Enterprise)
The ability to manage and import mileage data is available across the primary QBDT ecosystem.
- QuickBooks Pro: Supports standard mileage tracking and basic reporting for small businesses.
- QuickBooks Premier: Provides industry-specific mileage tracking features and more robust reporting options.
- QuickBooks Enterprise: Offers advanced inventory and job costing tools that integrate with high-volume mileage data.
Note: Always use the latest release of your version to ensure compatibility with third-party import tools.
2. Setting Up Your Vehicle List in the QuickBooks Centers
For an import to be successful, QuickBooks must recognize the vehicles mentioned in your source file before the data is moved.
- Exact Matching: Vehicle names in your spreadsheet must match the names in the QuickBooks Vehicle List letter-for-letter.
- List Creation: Access the “Vehicle List” via the “Lists” menu to add or edit your company vehicles.
- Vehicle Profiles: Ensure each profile includes the make and model to differentiate between various fleet assets.
- Active Status: Only active vehicles can receive imported data, so verify that no vehicles are marked as “Inactive.“
3. Critical Data Formatting for CSV and Excel Files
Data integrity depends heavily on how your spreadsheet is structured to prevent mapping errors during the upload.
- Single Header Row: Use a single row for column titles like “Date,” “Vehicle,” and “Distance” to guide the import tool.
- Date Consistency: Apply a uniform date format (e.g., MM/DD/YYYY) across the entire spreadsheet.
- No Special Characters: Remove symbols, currency signs, or merged cells that can disrupt the software’s data reading process.
- Numeric Accuracy: Ensure distance columns contain only numbers to allow for automatic tax calculations.
4. Essential Import Fields: Date, Trip Purpose, and Odometer Readings
To maintain audit-ready records, your import file must include specific mandatory fields that provide context for every trip.
- Date: Records exactly when the trip occurred to categorize expenses into the correct tax period.
- Trip Purpose: Provides a description of the business activity to justify tax-deductible mileage.
- Odometer Readings: Captures the starting and ending values to provide a verifiable trail of the total distance traveled.
- Total Miles: Serves as an alternative or supplement to odometer readings for calculating total reimbursement values.
Once done with the prerequisites, follow any of the methods to import Vehicle Mileage as mentioned below.
Method 1: Manual Entry Using the Internal Mileage Tracker
For businesses with a low volume of trips, using the built-in tracking feature in QBDT is a reliable way to log business travel expenses manually. This method ensures that each trip is recorded directly within the company file, making it immediately available for tax reporting and reimbursements.
- Open your QuickBooks Desktop account and navigate to the main dashboard.
- Click on the Company tab located in the top-left navigation bar.
- Select Track Vehicle Mileage from the dropdown menu to open the mileage module.
- Click the Get Started button to activate the tracking center if this is your first time using the feature.
- Select the Add Trip button to open a new data entry window.
- Input the trip start and end dates, define the business purpose, and mark the trip as billable or reimbursable.
- Fill in the starting and ending locations, total distance, and precise odometer readings to satisfy IRS documentation requirements.
- Choose the specific vehicle used from your pre-populated list and add any relevant notes for your records.
- Click Save to finalize the entry.
- Review your manually entered trip under the Approved Tab to confirm it is ready for reporting.
After your mileage data is imported, combine it with accurate QuickBooks gas expense tracking if your bookkeeping method requires actual fuel and vehicle operating costs.
Method 2: Direct Entry via the QuickBooks Mobile App
The QuickBooks mobile app offers a convenient way to capture business trips in real-time, allowing drivers to log distances directly from the field. This method automates distance calculations and syncs the data with the desktop version for final administrative review.
- Download and install the QuickBooks Desktop companion app from the Google Play Store or Apple App Store.
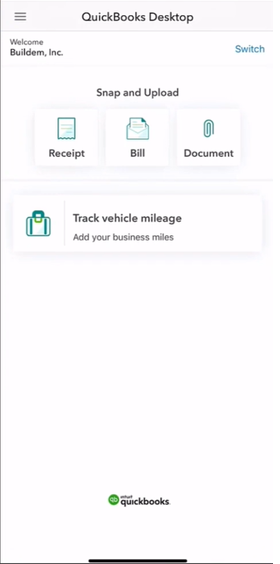
- Select the Track Vehicle Mileage option from the main mobile dashboard.
- Tap the (+) icon to initiate the trip entry process.
- Enter the starting location and the final destination to allow the app to calculate the distance.
- Provide a clear description of the travel in the Purpose of Trip field.
- Switch the Billable toggle to the “On” position if the mileage needs to be charged to a specific client.
- Use the Notes field to include additional information such as the specific vehicle name or project details.
- Tap the Save button to upload the travel data to the cloud.
- Verify that the distance is automatically recorded and queued for administrative approval.
- Open the Company menu in the QuickBooks Desktop software on your computer to manage incoming data.
- Navigate to the Track Vehicle Mileage section to view mobile submissions.
- Locate the trip under the Pending Approval tab and select the entry.
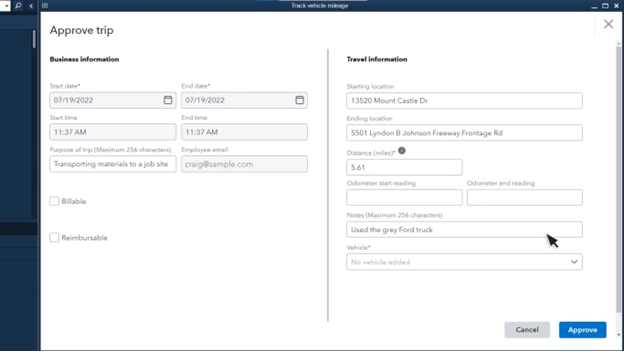
- Review all captured details for accuracy and click the Approve button in the bottom right corner to finalize the record.
Method 3: Bulk Uploading Using the IIF File Format
Intuit Interchange Format (IIF) files allow for the cross-platform transfer of data lists and transactions into QuickBooks Desktop. While this method is highly technical and requires precise formatting, it is a reliable way to move large batches of mileage data without using third-party software.
- Open your QuickBooks Desktop company file and navigate to the File menu.
- Select Utilities from the dropdown menu, then hover over Import and click on IIF Files.
- Choose the option to import the file directly or use the “Import for me” tool if your version supports it.
- Locate your prepared .IIF file on your local drive and select it for upload.
- Ensure your IIF file is structured with the correct headers, such as “VCTRANS” for vehicle transactions, to avoid data rejection.
- Review the data mapping to ensure that dates, mileage, and vehicle names correspond with your internal lists.
- Click Open or Import to start the data migration process.
- Monitor the progress bar and wait for the “Your data has been imported” confirmation message to appear.
- Check the Import Summary for any failed rows or formatting errors that may require manual adjustment.
- Verify the newly added logs by running a Mileage Resource Report within the QuickBooks Reports center.
Method 4: Automating Imports with the Dancing Numbers Tool
For high-volume data migration, using a dedicated automation tool like Dancing Numbers is the most efficient way to move extensive mileage logs into QuickBooks Desktop. This method eliminates manual entry by allowing you to bulk upload spreadsheets directly into your accounting software.
- Launch the tool and select the Import option from the main service dashboard.
- Navigate to the Transactions tab and review the available categories within the Company section.
- c to facilitate the mileage import process.
- Drag and drop your prepared Excel, CSV, or Google Sheets file into the upload area.
- Map the specific QuickBooks data fields to the corresponding columns in your source spreadsheet to ensure accuracy.
- Set the appropriate date range for the travel logs and confirm the selection to proceed.
- Review the File Preview screen to verify that all trip details and distances are correctly aligned.
- Click the final Import button to transfer all mileage tracking details into your QuickBooks Desktop company file automatically.
Common Mileage Import Errors in QuickBooks Desktop
Here are a few errors that you will encounter when you are manually importing the vehicle mileages into QuickBooks Desktop. In case you have encountered any of these errors, check our its causes and solutions in the table given below:
| Error Name | Causes | Solution |
| Error Code 30159: Data Mapping Discrepancies | Spreadsheet headers do not match QuickBooks internal field names. | Use the “Mapping” screen to manually align columns or use a standardized template. |
| Invalid Name/Vehicle Reference Errors | The vehicle name in the file does not exist in the QuickBooks Vehicle List. | Ensure vehicle names are identical in both systems or add new vehicles before importing. |
| Duplicate Entry and Odometer Overlap Conflicts | Importing a trip with an odometer reading or date that already exists in the file. | Enable “Overwrite” settings or delete duplicate rows from the source file before the process. |
| File Format Compatibility and “Read-Only” Restrictions | The CSV/Excel file is open in another program or saved in an unsupported version. | Close the file in Excel and ensure it is saved as a .CSV (Comma Delimited) or .XLSX file. |
Preventive Tips to Avoid Errors During the Process
Implementing these best practices before you start the import process can save hours of cleanup and ensure your mileage data remains accurate and audit-ready.
- Log in as the QuickBooks Administrator to ensure the software has the necessary permissions to write new data
- Switch the company file to Single User Mode to prevent data collisions with other active users
- Use the Clear Formatting tool in Excel to remove bolding or hidden fonts that disrupt the upload
- Run a Find and Replace search to delete special characters like commas and currency symbols from mileage cells
- Verify that your third-party utility is authorized within the Integrated Applications section of your preferences
- Create a manual backup of your company file to allow for a quick recovery if the data imports incorrectly
- Perform a trial upload with a small file of five rows to verify that your field mapping is accurate
- Review the results of your test import in the Approved Tab before proceeding with the full dataset
Why Use Dancing Numbers for Mileage Imports?
Dancing Numbers streamlines the bulk migration of travel logs by acting as a powerful bridge between Excel and QuickBooks Desktop. It eliminates the tedious task of manual data entry, significantly reducing human error while ensuring precise field mapping for dates, vehicles, and distances. This automation allows accounting professionals to import hundreds of trips in seconds, maintaining audit-ready records and freeing up valuable time for more strategic financial tasks.
Accurately importing vehicle mileage into QuickBooks Desktop is essential for precise expense tracking. While manual entry and native IIF imports are prone to data formatting errors and odometer overlaps, following strict data validation and mapping protocols ensures a successful transfer. By verifying your vehicle list and utilizing standardized CSV templates, you can eliminate entry risks and maintain an audit-ready mileage log for reporting and reimbursements.
Accounting Professionals, CPA, Enterprises, Owners
Looking for a professional expert to get the right assistance for your problems? Here, we have a team of professional and experienced team members to fix your technical, functional, data transfer, installation, update, upgrade, or data migrations errors. We are here at Dancing Numbers available to assist you with all your queries. To fix these queries you can get in touch with us via a toll-free number
+1-800-596-0806 or chat with experts.
Frequently Asked Questions
Can I Import Mileage Data directly from third-party Tracking Apps?
No, You can’t. Third-party apps do not sync directly with the Desktop version of QuickBooks, but you can export their data into a CSV or Excel file and use that file to import in QBDT.
What is the Maximum Number of Mileage Entries I can import at once?
While QuickBooks can handle thousands of entries, it is recommended to import in batches of 500 to 1,000 trips at a time to maintain system performance and make it easier to verify data accuracy.
How do I undo a Bulk Mileage import if the data is incorrect?
QuickBooks does not have a “Global Undo” for imports, so the best practice is to create a manual backup of your company file (.QBB) immediately before starting the process. If the data is wrong, you can simply restore the backup.
Is Billable Mileage Handled differently during a Bulk Import?
Yes, If you want the mileage to be charged to a client, you must ensure your import file includes a Customer/Job column and that the Billable field is marked as “Yes” or “True” during the mapping process.

