Are you wondering how to set up your company information in QuickBooks online? Then you can get a deep inside about setting up your company details in QuickBooks online and learn how to change your company name, contact information address, type, and other items. Here are some of the steps that can help you set up the company details.
Dancing Numbers helps small businesses, entrepreneurs, and CPAs to do smart transferring of data to and from QuickBooks Online. Utilize import, export, and delete services of Dancing Numbers software.
How to Set up Company Information in QuickBooks Online?
Follow the below mentioned steps to set up company information in QuickBooks Online.
Step 1: Collect Company Details and Sign in to QuickBooks
Before you start setting up the company information in QuickBooks online you need to compile the basic information. You need to collect information on as many items as possible since you can make changes later on.
- Business Name
- Address
- Website
- Digital copy of your company logo
- Type of business like sole proprietor or partnership
- EIN or Federal Employer Identification Number
- Accounting method- Cash or Accrual
Once you have collected all the information you need to login to your QuickBooks account and you will find the company’s dashboard. Now click on the gear icon and select account and settings. Then click on the company tab under the accounting and setting option.
Step 2: Edit the Company Name
Once you complete the first step you need to click on the pencil icon or on the company name section for editing the information. Now click Save.

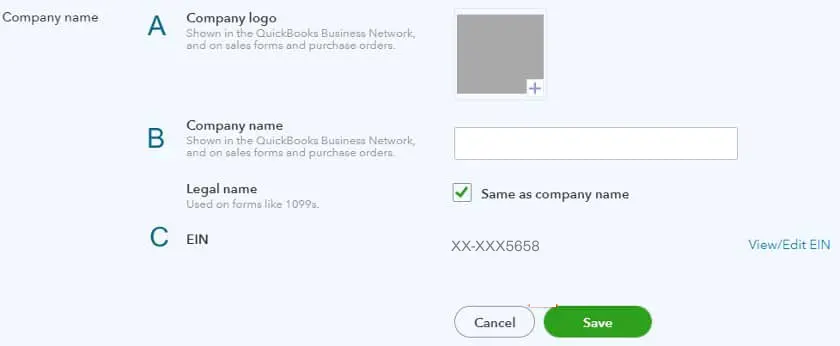
In the company name section you will find 3 items like the following:
A. Company Logo: You need to import the company logo to add it on the customized forms. Moreover you need to save the logo as an image file on your computer. Now follow the steps to import the logo into QuickBooks online:
- You need to click on the Greece square which is on the right of the company logo.
- You will see the logos which you have previously uploaded in QuickBooks on the next screen. You need to check if your logo is already present then choose it and add it to the company information. If you cannot find your logo on the screen you need to click on the blue sign+.
- QuickBooks offers a window where you can browse your computer and choose the image file of your logo. Once you have selected the image file you need to click on the open option to go back to the prior skin where you can find a thumbnail of the new logo. Now the logo is saved in your QuickBooks online account and you don’t have to reload it as it will be available for customization of forms.
- You need to ensure that the logo you desire to include is highlighted and then you need to click on the save option.
B. Company and Legal Name: now you have to include the company name like you wanted to appear on the invoices in other forms. Moreover the legal company name mast with the exact same name mentioned in the IRS. The legal name is displayed on the tax forms like form 1099 and payroll tax returns. Always remember if both names are different if you wish to have a different name on the invoices then you need to uncheck the box and include the legal name.
C. EIN: you need to ensure that the number which is assigned by the IRS matches with EIN. If you are self-employed then you need to use the Social Security number. EINs are sensitive in nature so QuickBooks can ask you to authenticate your logging before you change or view the EIN.
Now click on the save button when you have completed including all the details like company name, logo and EIN.
Step 3: Choose the Company Type
Do you need to click on the company type section to include or change the company type information? Now there is a drop down menu beside the tax form field which you need to click and choose your taxable entity type. Below are some of the company types;
- Sole Proprietor: A sole proprietor is the one who is running the company by themselves. If you want to report income and loss you need to use schedule C which is form 1040.
- Partnership: you need to choose the business type if you are operating your business along with 2 or more partners. Those who have a business in the partnership need to use form 1065 if they have to report business income or loss.
- S Corporation: this type of corporation passes corporate loss, income, and taxes through their shareholders and to report income loss they use form 1120S.
- C Corporation: this type of corporation have to pay taxes separately from its owner instead of passing it through downloads. C corporation users have to report using form 1120.
- Non Cooperation Organizations: those running nonprofits organizations do not have to pay taxes as they emphasize social causes rather than generating income. These companies use form 990 to report their annual activities.
- Land Limited Liability Company or LLC: if you are confused about whether to file taxes as an s corporation or partnership for a sole proprietor then choose this option.
If you are still confused you can leave the field blank.
Now start entering the company name in the industry field and QuickBooks will offer suggestions. You must choose a sector from the QuickBooks list or if unsure you can leave it blank. Now click on the safe option once you have completed it.
Step 4: Update Your Contact Information
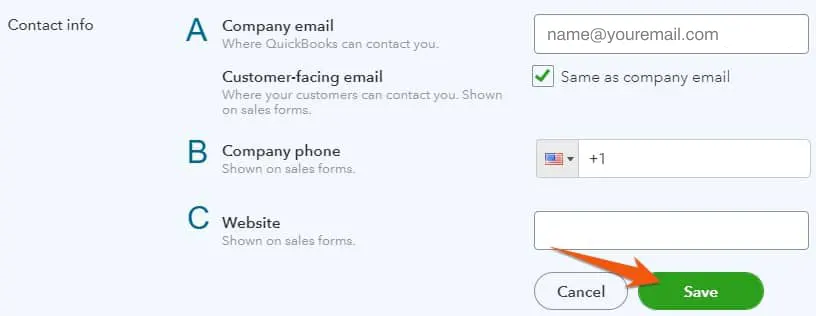
You need to click on the contact info section or the pencil icon 2 include the contact information for your customers as well as QuickBooks.

- Email: You need to include your email address in QuickBooks so that you can contact the QuickBooks administrator. Moreover the customers can see the email address on the sales form when you send it to them like invoices. You need to make sure that the QuickBooks administrators email address and the ones that is used in the invoice is same if they are different you need to uncheck the box and include the correct address.
- Company Phone: Include the phone number that should appear on the display forms that you will send to the customers.
- Website: Next is entering the website address that you want to appear on all the sales forms.
Now click on the safe option once you have completed entering the information.
Step 5: Edit Your Company Address
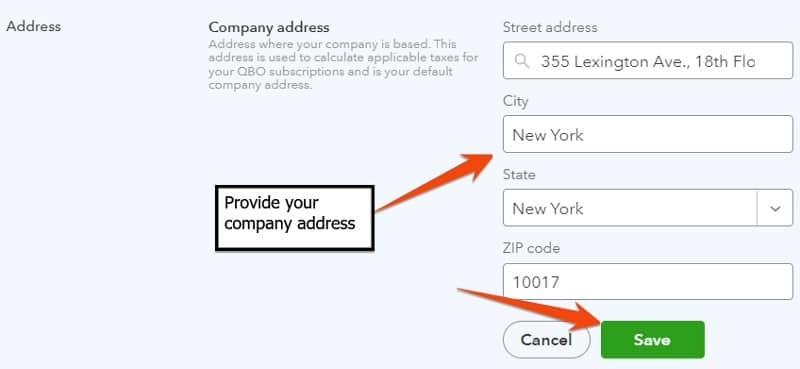
To edit your company address you need to click on the address section or anywhere ready to change the information. In the latest version of QuickBooks online version there are separate sections for company address, customer-facing address, and legal address.
- Company Address: Here you need to include the company actress which will be the physical location of the business which will also be used for payments in QuickBooks after entering the information you need to click on the save option.

- Customer-facing Address: This one will be displayed on invoices in other cells found and it will also with displayed to the customers where they can make the payment. You need to check if the company address and the customer-facing address are different if it is so you need to uncheck the box and enter the correct address and click on the save option.
- Legal Address: This address is required for filing the taxes and it needs to match the address which you have filed with the IRS. Like the other ones you need to again check if the address matches with the company address if it doesn’t you need to change it by unchecking the box and then clicking on the save option.

How to Update Additional Information about the Company in QuickBooks Online?
If you want to update more information about your company in QuickBooks online then you need to follow the below steps:
Step 1: Click on the accounting option to edit the settings.
Step 2: Now select the first month of the fiscal year.
Step 3: Now choose the close the books option.
Step 4: Fill in the closing date. QuickBooks permits you to choose to allow changes with a warning or a warning with a password. Select the option that suits your company.
Step 5: Fill in the password if necessary.
Step 6: Click on the save option.
Step 7: Click on done to update the company’s settings.
How to Edit Company Setting in QuickBooks Online?
If you are wondering how to edit the company setting in QuickBooks online and personalize it then you need to follow the below steps:
Step 1: Click on setting.
Step 2: Choose accounting and setting.
Step 3: Choose a tab.
Step 4: Click on edit on any of the section.
Step 5: Choose an item that you want to update. You can see that the fields will be displayed when you choose an area and the question mark will suggest what it is for. Once you have completed editing click on save.
Step 6: Click on the done option to close your settings.
The article discusses how to set up your company information in QuickBooks online.
You get to know about the steps that you have to follow to carry out the process successfully.
However, If you are unable to understand the process, you should get in touch with a professional QuickBooks specialist.
If you have further queries related to the filing of self-employment taxes in QuickBooks, you can connect with Dancing Numbers team via LIVE CHAT.

Looking for a professional expert to get the right assistance for your problems? Here, we have a team of professional and experienced team members to fix your technical, functional, data transfer, installation, update, upgrade, or data migrations errors. We are here at Dancing Numbers available to assist you with all your queries. To fix these queries you can get in touch with us via a toll-free number
+1-800-596-0806 or chat with experts.


 +1-800-596-0806