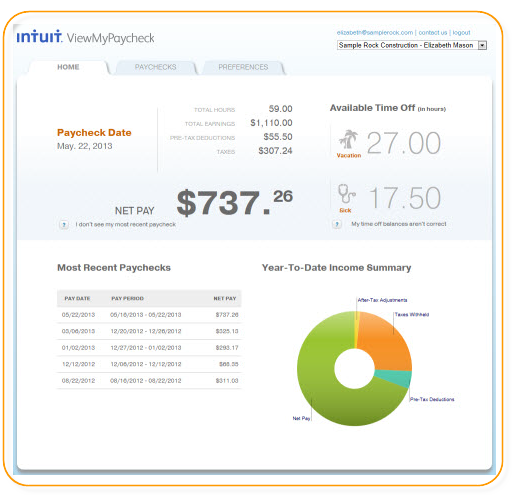
Intuit’s ViewMyPaycheck (paychecks.intuit.com) lets you view your pay stubs and other payroll information online. With the help of the option, ViewMyPaycheck, the employer’s job to allow employees to see their paycheck details has become easy. The employees can access the paycheck information 24/7 with the help of the correct credentials. Rather than employers enduring the pain of sending a particular payroll data, employees can not avail self-service and can see their paycheck online in the portal.
Dancing Numbers helps small businesses, entrepreneurs, and CPAs to do smart transferring of data to and from QuickBooks Desktop. Utilize import, export, and delete services of Dancing Numbers software.
Furthermore, by Activating the ViewMyPaycheck option, Employees can use their Pay Stubs and tax details.
Let’s learn in detail how to activate ViewMyPaycheck for QuickBooks Workforce.
Information about ViewMyPaycheck
You can get ViewMyPayCheck free as ViewMyPaycheck is available free of cost and all you want is a Web Browser and QuickBooks 2009 or later Intuit® account to get to it. Your employees can log in and examine their finance data whenever at any place and can use the View My Paycheck webpage as an entryway to get simple and secure online access to their paycheck information.
A Couple of Features of ViewMyPaycheck are mentioned below:
- View My Paycheck organizes your current and year-to-date profit and deductions. In this way, you generally know how your paycheck was determined and where your cash is going.
- Want a printed copy of your pay stub? Don’t sweat it. Click Save as PDF to save a PDF copy of it to your PC and afterward print it for your records.
- Go to Preferences and put a mark at the Send me an email when new pay stubs are available checkbox. This gets you informed about the time another pay stub is transferred to ViewMyPaycheck.
How to Activate ViewMyPaycheck in QuickBooks
Follow the below mention steps to activate View My Paycheck in the QuickBooks:
- Open your QuickBooks Online and then navigate to the Employees option.
- Press on Manage Payroll Cloud Services option. Now checkmark the option, ViewMyPaycheck.
- Now make a payroll service PIN where it is asked. The PIN will be used to deliver pay stub details. Now enter the PIN as a confirmation.
Send the Payroll Data to ViewMyPaycheck
- In the same way as before, paychecks are created.
- Do as per the guidelines provided on the window. When a window comes up to check printing confirmation, press Send to Intuit®.
- Lastly, Press on the option for Send in Send/Receive Data.
Started with ViewMyPaycheck as an Employee
In order to begin with the option, View My Paycheck, certain things need to be followed as mentioned.
- You must have An Intuit® Account. You need to login with your credentials. The next option is to make anew account after you sign up for View My Paycheck.
- The Social Security Number and the particular net pay from the previous paycheck. The ViewMyPaycheck option will authenticate your details provided.

Follow through the instructions given below to start using ViewMyPaycheck
- Open your intuit.com (Intuit Account) in web browser.
- Press on Sign up.
- Add the email address. If you have an Intuit account already, press on Sign In link and then move ahead as per the guidelines.
Note: Make sure that you run a minimum of one payroll so that the View Pay Paycheck is officially set up for your employees.
- Make and authenticate a password that you will use when you login to View My Paycheck.
- Choose a security question that will be needed if you do not remember your user ID and the password.
- Press on Sign Up.
- Now add your SSN and the Net Pay from your previous paycheck.
- Press All Done.
Set up QuickBooks Workforce for Your QuickBooks Desktop 2024
- In QuickBooks Desktop 2024, go to the Employees option and press the option Manage Payroll Cloud Services.
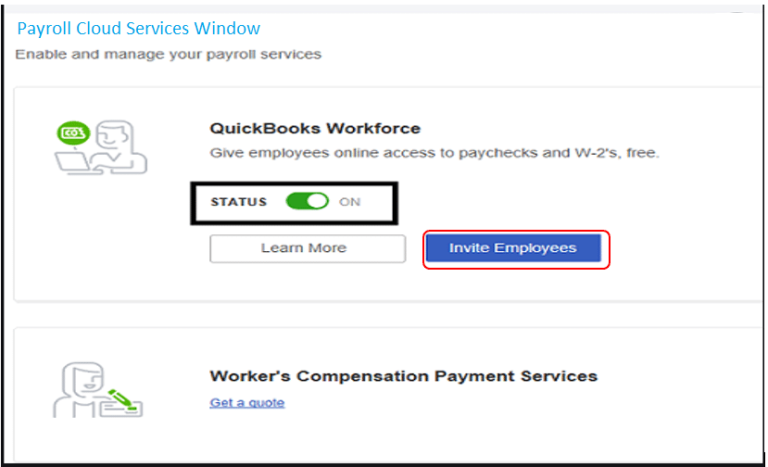
- When the Payroll Cloud Services screen will appear, click the ON option for the status of the Workforce.
- When prompted, make the PIN and then choose Save Changes.
- In the confirmation screen, press Return to QuickBooks.
To upload Paycheck Information Post Every Payroll, Please adhere to the steps below:
- In your QuickBooks Desktop company file, Create paychecks like you usually do.
- Together with printing checks, ensure to choose Send to Intuit®.
- On the screen Send/Receive Data, choose Send. When notified, add your Payroll Service PIN.

Sending Your Employees an Invitation for QuickBooks Workforce
Here is how you send an invite for QuickBooks Workforce to your employees:
- In your QuickBooks Desktop, go to the Employees option and press Manage Payroll Cloud Services to the employees.
- In the Payroll Cloud Services Window, under the section QuickBooks Workforce Status click on Invite Employees.
- The particular Employee List opens up. Choose the employees you wish to give access and then enter their email address.
- Press on the option, Send Invite.
View My Paycheck and then the QuickBooks Workforce have provided flexibility to QuickBooks Users. The employees will be able to access the data they need concerning the payroll. As a result, it saves the employers job who had to print the details previously.
With the updates, it is quite obvious that errors can arise too. To resolve any such technical issues or to get help to perform these steps, we highly recommend that you get in connect with Dancing Numbers team of experts via LIVE CHAT.

Looking for a professional expert to get the right assistance for your problems? Here, we have a team of professional and experienced team members to fix your technical, functional, data transfer, installation, update, upgrade, or data migrations errors. We are here at Dancing Numbers available to assist you with all your queries. To fix these queries you can get in touch with us via a toll-free number
+1-800-596-0806 or chat with experts.
Frequently Asked Questions (Faqs)
Can I use ViewMyPaycheck to see my paychecks?
If your employer has set up ViewMyPaycheck for your company, then you can sign up and get online access to your paychecks in ViewMyPaycheck. You should check with your employer to see if you can access your paychecks online through ViewMyPaycheck.
What is the difference between ViewMyPaycheck and QuickBooks Workforce?
No, The setup process for both QuickBooks Workforce and ViewMyPaycheck is the same.
Should I be aware of any browser or system requirements?
Yes. ViewMyPaycheck works best in the following browsers:
- Microsoft Internet Explorer (IE) 10 or later
- Google Chrome
- Mozilla FireFox
- Safari
Is it Possible for me to Access my W-2 online through ViewMyPaycheck?
Confirm with your employer if your W-2 is accessible through ViewMyPaycheck.
What is the Meaning of QuickBooks Workforce?
QuickBooks Workforce, in simple terms, provides easy access to the employees of your company. It helps the employees to view and then print the W-2 and Paystubs. Not to mention, every time when your employees are set up on the particular QuickBooks workforce, they will get an email to see their paystubs online.


 +1-800-596-0806