New usage restrictions for QuickBooks Online (QBO) software were added in April 2019 by Intuit Inc., the company behind QuickBooks accounting software. These restrictions affected the number of users, chart of accounts, and class or location elements that platform users could add.
Dancing Numbers helps small businesses, entrepreneurs, and CPAs to do smart transferring of data to and from QuickBooks Online. Utilize import, export, and delete services of Dancing Numbers software.
For the first six months, users were able to continue making entries that were higher than the caps. The program has stopped supporting proposals that go over the updated limits as of last October. Users of QuickBooks Online vented their annoyance on social media and the QuickBooks community forum as a result.
You have been impacted by this change if you were one of the people who used QuickBooks’ online accounting platform. This article will help you in understanding Limitation of QuickBooks in better way:
Usage Limits by Subscription in QuickBooks Online
In order to count towards the limit in each category, only active (or invited) people, accounts, classes, places, and tags are considered.
The user restriction does not apply to some user kinds, such as reports only and time tracking only. Ensure that each QuickBooks user has the access that is appropriate for them. This article will explain how to set up custom roles if you have QuickBooks Online Advanced.
Here are the usage restrictions for each level of subscription:
QuickBooks Online Simple Start
- Number of Billable Users: 1 user
- Number of Non-billable Users: There are 2 accountant firm users, they are Reports-only and time tracking-only users. They are not available for this subscription.
- Classes and Locations: They are also not available for this subscription.
- Chart of Accounts: 250 accounts max.
- Groups Tag: 40 groups max.
- Tags: 300 of max
- QuickBooks Commerce Accounting: One Sales Channel Connected Max.
QuickBooks Online Essentials
- Number of Billable users: 3 users
- Number of Non-billable Users: There are 2 accountant firm users. Unlimited time tracking only users and Reports-only users are not available for this subscription.
- Classes and Locations: Not available for this subscription.
- Chart of Accounts: 250 accounts max.
- Groups Tag: 40 groups max.
- Tags: 300 max.
- QuickBooks Commerce Accounting: 3 Sales Channels Connected Max
QuickBooks Online Plus
- Number of Billable Users: 5 users.
- Number of Non-billable Users: There are 2 accountant firm users. Unlimited time tracking-only and reports-only users.
- Classes and Locations: There are 40 combined Classes and Locations.
- Chart of Accounts: 250 Accounts max.
- Groups Tag: 40 Groups max.
- Tags: 300 max.
- QuickBooks Commerce Accounting: Connect Unlimited Sales Channels.
QuickBooks Online Advanced
- Number of Billable Users: 25 users
- Number of Non-billable Users: 3 Accountant Firm Users. Unlimited time tracking-only, and reports-only users.
- Classes and Locations: Unlimited Classes and Locations.
- Chart of Accounts: Unlimited Accounts
- Group of Tag: There can be unlimited groups, but with the standard tag 300 max.
- Tags: Maximum of 300.
- QuickBooks Commerce Accounting: You can Connect Unlimited Sales Channels
QuickBooks Online Payroll Core, Premium, and Elite
If you have a subscription to QuickBooks Online in addition to a payroll subscription, your QuickBooks Online subscription will control any usage restrictions.
You get access to 5 billable users if you only have a payroll subscription with QuickBooks Online.
How to Check Usage Limits in QuickBooks Online
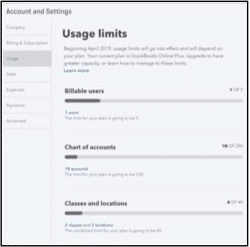
You can see how many things you have for each usage limit on your usage limits dashboard. If you are an accountant, log into your client’s account directly to view the most recent usage restrictions.
- First You have to sign in to your QuickBooks Online account as an admin by using credentials.
- Navigate to the Settings tab and then select Account and settings option from it.
- In settings list of option, you have to select the Usage tab.
List of Limits
The option to view list item limits is available in list view.
Note: In QuickBooks Online Advanced, list items have unlimited usage.
- First Navigate to the settings and click on the tab.
- From setting there is an option named as All Lists, select it.
- From the list of items, select the list item which you want to view.
Note: You are not able to see users in the list view. For that you have to select the arrow down icon which is available next to the Filter by name field. So, now you can select Counts toward limits.
How to Help Clients Clean up QBO and Stay Under Limits
This Outstanding Entrepreneur Comes in two types:
Delegator
- Business Complex Needs.
- Needs in order to Simplify Workflows.
- Delegate Work.
- Number of Users are more than the Average Business.
- Need of max Granular user Permissions.
- Number of Employees will be between 10 – 100.
Centre of Operations
- Maximum time spent in QuickBooks Online in comparison to the average user.
- Twice of the data i.e. transaction lines in QuickBooks Online then the average business.
- The number of users is more in comparison to the average business.
- Need of granular user permissions.
- Number of employees will be between 10-100 employees.
Four Steps to Keeping Clients Below Usage Limits
There are four steps to keep clients below usage limits:
Checking of Usage
The new Usage tab should be checked frequently by you or your client. Monitoring consumption could, incidentally, be a wonderful value-add for your current tax or accounting clients.

- First you have to start by navigating to the new Usage tab:
- Now, Select the Gear icon by navigation to the Toolbar.
- Select the usage option by clicking Account & Settings tab.
From here, you can examine the current status of your client’s Billable User, Chart of Accounts, and Classes and Locations limitations.

Managing of Billable Users
The User list will probably be one of the first restrictions that our clients encounter. The use cap only applies to billable users. This list is extremely manageable because QuickBooks Online Plus has a five-user maximum.
You must first be an Accountant user, Master administrator, or Company administrator in order to add, delete, or modify a user’s access.
Note: Under QuickBooks Online, a master administrator is a chargeable user. It’s not advised to switch out users in QuickBooks Online for instance, when an employee quits and is replaced by a new one by changing user access.
For the integrity of the audit log, it is best to remove the departing user before adding a new user in the manner described below.
- First you have to Start by navigating to the manage user section and then click on it.
- Now select the Gear icon from the drop-down menu of Toolbar.
- Under your company option you have to select manage users tab by selecting it.
Adding or Deleting of Users.

To Delete a User, Follow the following steps:
- First step is to find the name of the user whom you want to delete.
- Now, Navigate to the action tab and from the drop-down menu choose delete option.
Adding a New User, Follow the Following Steps:
- Navigate to the upper right of your system and then select add user.
The User list will probably be one of the first restrictions that your clients encounter. The use cap only applies to billable users. This list is extremely manageable because QuickBooks Online Plus has a five-user maximum.
- First you have to start by navigating to the Manage Users and click on it.
- Now, Select the Gear icon on the Toolbar.
- Go to the Your Company tab and select Manage Users.
Adding or Deleting of users

Managing of the Chart of Accounts
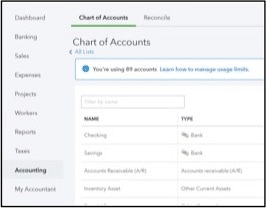
When an account isn’t being used, you can hide or make inactive it. It’s advantageous that an inactive account does not count towards use restrictions. An excellent approach is to check the Chart of Accounts to make sure there aren’t any duplicate or unused categories. You can combine two identical categories into one if you find them.
- First you have to navigate to the Chart of Accounts of clients.
- Now select the Gear icon from the Toolbar.
- Navigate and select the Chart of Accounts from the list of options.
Now you can make accounts inactive and merge duplicate accounts.
To make an Account Inactive Follow the Following Steps:
- First you have to find the account which you wish to delete.
- Navigate to the action column and then select the drop-down menu in order to Make inactive.
- Select yes if you are sure to delete it in order to confirm.

To Merge Duplicate Accounts, Follow the Following Steps:
- First you have to search for the account which you want to merge.
- In the Action column, select the drop-down menu and then hit the Edit button.
- Navigate to the Account Type field and then select the type that is a match to the account which you want to merge.
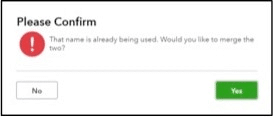
- In the name field you have to change the text for matching the account which you want to merge with.
- Verify that the type of details is identical to the account which you want to merge with.
- If you are done with the above steps, select save and close buttons.
- In last confirm that you want to merge the two accounts.
Managing of Classes and Locations
You need to have the proper Custom User access or be an Accountant User, Master Administrator, Company Administrator, or to add, delete, or change classes or locations. It’s simple to manage these lists.
- Navigate to the gear icon.
- Then select Lists
- In last you have to select all Lists, if you need to make modifications.
Start by going to the section of Classes or Locations:
- Navigate and select the gear icon from the toolbar.
- In Lists option you have to select all lists.
- Search and select Classes or Locations
Now you can easily edit or merge duplicate classes and locations. You can also make classes and locations inactive if you need to.
Merge Duplicate Classes or Locations:
- Navigate to the action column and from the drop-down menu of Action column, choose edit option.
- In the name field you can change the name to the name which you want to merge into and then choose save button.
- The location or class will be removed and the activity merged to the remaining name.
Make a Class or Location Inactive:
- You can select make inactive option from the list of option of action column.
Limitation of QuickBooks Online Inventory
For smaller businesses or those who don’t absolutely want the complete functions of the QuickBooks Desktop package, Intuit developed the extremely well-liked web-based application known as QuickBooks Online. Even though QuickBooks Online does provide a number of essential capabilities, there are certain limitations to what can be done in terms of inventory and business administration without switching to desktop or utilizing a third-party tool to fill the gaps.
With the aid of the right third-party inventory software, QuickBooks Online inventory limits might be resolved if you’re thinking about using or already use the product without switching to a desktop.
QuickBooks Online Inventory Limitations: The Cons of Online vs Desktop
If you are reading this blog, you have undoubtedly already done extensive study on QuickBooks Online many advantages. Let’s start this essay by concentrating on the differences between QuickBooks Desktop and QuickBooks Online inventory restrictions.
- Industry-specific editions are not available in QuickBooks Online like they are in QuickBooks Desktop. Industry-specific tools and reporting are also available through QuickBooks Desktop.
- The robust reporting options offered by QuickBooks Desktop are absent from QuickBooks Online.
- Strong features present in QuickBooks Desktop, such as extensive inventory management, job costing capabilities, and discounts by client name, are absent from QuickBooks Online.
- There is much less personalization available with QuickBooks Online.
- In contrast to QuickBooks Desktop, which supports a maximum of 40 users, QuickBooks Online (Advanced) is intended for 25 users or less.
QuickBooks Online Inventory Limitations: You Need a 3rd Party Inventory Software
Even QuickBooks Desktops hit their limits when it comes to sophisticated inventory management, despite the fact that it does offer a few more robust tools than QuickBooks Online.
It is critical to note that QuickBooks online does not include the following advanced inventory, business, and operational management features.
- Order Entry
- Order Management
- Multi-Warehouse
- Bin Locations
- Lot and Serial Number Control
- Landed Cost
- Customer Specific-Pricing
- Direct eCommerce integrations without 3rd party
It is still necessary to use a third-party inventory software like Activate if you want to expand your inventory-based firm while still using QuickBooks Online. This is also true for organizations expanding with QuickBooks desktop.
Straightforward sync between QuickBooks Online and more complete third-party inventory software has been developed to safely continue maintaining accounting within QuickBooks Online, while granting access to more users and gaining the tools of inventory which you need to manage and can handle growth with ease.
QuickBooks Online Inventory Limitations: Reason for QuickBooks Online
QuickBooks Online is a good fit for your business model if you already use it or plan to do so. You’ve chosen wisely in light of your circumstances. Online QuickBooks is quite economical and useful in terms of cost. Without having to switch your entire operation to QuickBooks Desktop or totally start over with a more expensive ERP solution, the utilization of a 3rd party connection like Activate gives QuickBooks Online the power of an ERP. Despite the inventory restrictions in QuickBooks Online, this gap can be quickly filled by using inventory management software. Without the added stress of spreadsheets, workarounds, and band-aid fixes, this combination enables small businesses to optimize, flourish, and develop, increasing sales and profitability.
We hope that we are successful in giving you complete detail information about QuickBooks Online but still if any problem occur than you can contact us for solving your issue, for the smooth work.

Looking for a professional expert to get the right assistance for your problems? Here, we have a team of professional and experienced team members to fix your technical, functional, data transfer, installation, update, upgrade, or data migrations errors. We are here at Dancing Numbers available to assist you with all your queries. To fix these queries you can get in touch with us via a toll-free number
+1-800-596-0806 or chat with experts.
Frequently Asked Questions
What cannot QuickBooks Online Accomplish?
The absence of such functionality is understandable given that it is general accounting software. Users of QuickBooks Online cannot roll back their books to a prior edition. If you’re not on the top pricing plan, for instance, you won’t be able to return to a point when the most recent transaction data is available.
Can I use QuickBooks Online with more than 5 users?
If you require many people to have concurrent access to a QuickBooks Desktop company file, licenses are available. Five users can collaborate on the same corporate file using QuickBooks Desktop Premier. In the same company file, three people can collaborate with QuickBooks Desktop Pro.
Is QuickBooks Online Supports up to Two Companies?
The same QuickBooks Online account can be used by many enterprises. You use the same sign-in information to view each company file, even though each one requires a separate paid subscription. In order to manage things more effectively, this enables you to swiftly switch between organizations.


 +1-800-596-0806