With the help of this article, you will know how to manage QuickBooks Online bank feeds. You can add imported bank transactions to the QuickBooks Check Register as a new transaction or match them to an existing transaction by using the QuickBooks Online Banking Center. In this, you will know how to set up bank rules so that you can reduce the amount of time to classify transactions in the Banking Center.
Dancing Numbers helps small businesses, entrepreneurs, and CPAs to do smart transferring of data to and from QuickBooks Online. Utilize import, export, and delete services of Dancing Numbers software.
Follow the step-by-step instructions which will encourage you to follow along in your account.
- You can automatically track and manage revenue and expenses with the bank feed feature in QuickBooks Online.
- The bank feed for QuickBooks Online supports the import of all banking transactions.
- You can save time and money by eliminating manual entry.
- This article is for accountants and business owners who use QuickBooks Online and want to understand the bank feed feature.
By connecting your bank account to QuickBooks Online, you may access and log credit card and banking transactions in QuickBooks check register feature. You no longer need to manually enter each transaction into your accounting software. Your banking and credit card transactions can be reconciled and reported more quickly with the help of bank feeds.
What is the QuickBooks Online Bank Feed?
You may track and manage your receipts and expenses with the help of the QuickBooks Online bank feed without having to manually enter every bank transaction.
Your banking transactions can be synced with QuickBooks Online using the bank feed feature. Records in QuickBooks Online won’t be exported to your bank or credit card processing company by this one-way channel of communication. All banking transactions, including cash deposits and withdrawals, online payments, debit card charges, transfers, and loan payments, can be imported into QuickBooks Online by the bank feed.
QuickBooks Online bank feed enables you to record, report, and analyze the same transactions without manual entry when you access your online bank statement transactions and online credit card transactions. Because bank feeds are automated, this option saves time and money.
A version of QuickBooks must be connected to all of your bank accounts, including your merchant accounts, and for the Banking feature to be useful for record keeping and reporting.
What is the Importance of Managing Bank Feeds?
Bank reconciliation is now quicker as now it consumes less time all thanks to bank feeds, which make it possible to download and import inflow and outflow transactions from your bank directly into accounting software. An important step in accounting is bank reconciliation, which allows transactions to be checked for accuracy and recorded at the appropriate accounting period. Bank feeds allow business owners to quickly reconcile their bank and credit card transactions, leaving them more time for other business duties and responsibilities. It’s important to manage bank feeds to ensure the accuracy of your transactions. Try to ensure the financial integrity of your business.
How to Manage QuickBooks Online Bank Feeds?
Financial management for your business is made simple with the help of QuickBooks Online bank feeds. By reading below you will know how simple it is to manage bank feeds in QuickBooks Online.
Access and select your connected bank or credit card once you’re in QuickBooks Online’s Banking tab. When you’re finished, your page should look similar to the example shown below.
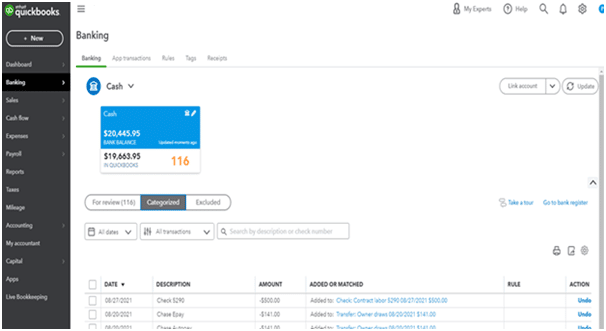
A list of transactions that require your attention can be found at the bottom of the banking page. To manage your bank feeds, follow the following steps mentioned below:
1. Access the For Review Tab
Transactions from your bank feed that have not yet been matched, added, or excluded with QuickBooks transactions have been imported into the For Review feature. Review all transactions for accuracy, checking dates, amounts, and vendors. Then, follow the instructions in step 2 to Match, Add, or Exclude each transaction.
2. Match, Add, or Exclude all Transactions
When you match a transaction, QuickBooks will already have that transaction’s record. Just match your QuickBooks register to the import from your bank or credit card. Suggested matches are populated by QuickBooks Online. Double-check the information once again, then click Match if the data is accurate.
By adding a transaction, you indicate that QuickBooks has not created a record of the transaction. To add the new transaction to the QuickBooks Online check register, you have to click Add. In case you want to add a new transaction, all you need to do is choose the appropriate category from your existing chart of accounts.
When you exclude a transaction from QuickBooks, it simply means that the information won’t be recorded in your check register. In general, if you keep your personal and commercial transactions separate, you won’t usually need to exclude a transaction. However, if you have a transaction that corrects a previous error, you might use the Exclude function.
How to Create Bank Rules for QuickBooks Feeds?
As you all know that QuickBooks is the best accounting software. With QuickBooks Online you can make accounting and financial management easier for small business owners and accountants. An advanced feature of bank feeds streamlines the process of recording or excluding expenses. Whether or not a recurring transaction has the same amount, you can categorize it according to bank rules.
Below are the points mentioned that can help in creating bank rules in QuickBooks Online:
1. Firstly, Click on the Tab of Banking.

2. Select Rules once you’re in Banking.
3. On the top right-hand side of the page, you have to select New Rule.
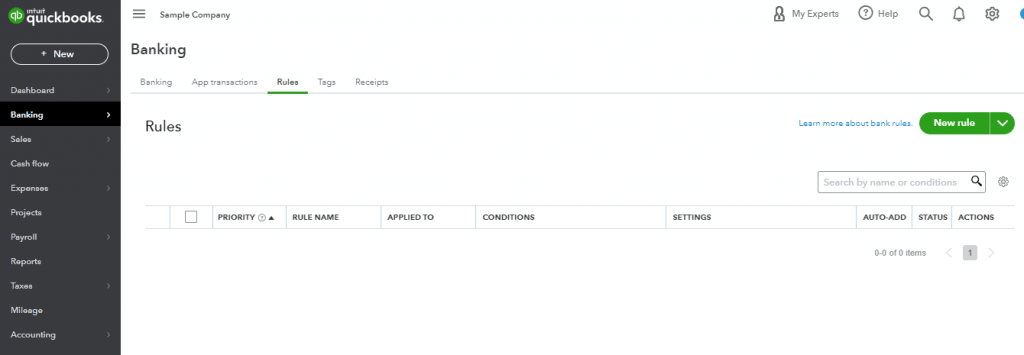
4. In the field of “What do you want to call this rule?” it includes a description, such as a Cell Phone Bill.
5. Apply this to transactions that are Next. You can select either Money out or Money in from the dropdown menu. If it relates to an expense, choose Money out; if it relates to income, choose Money in.
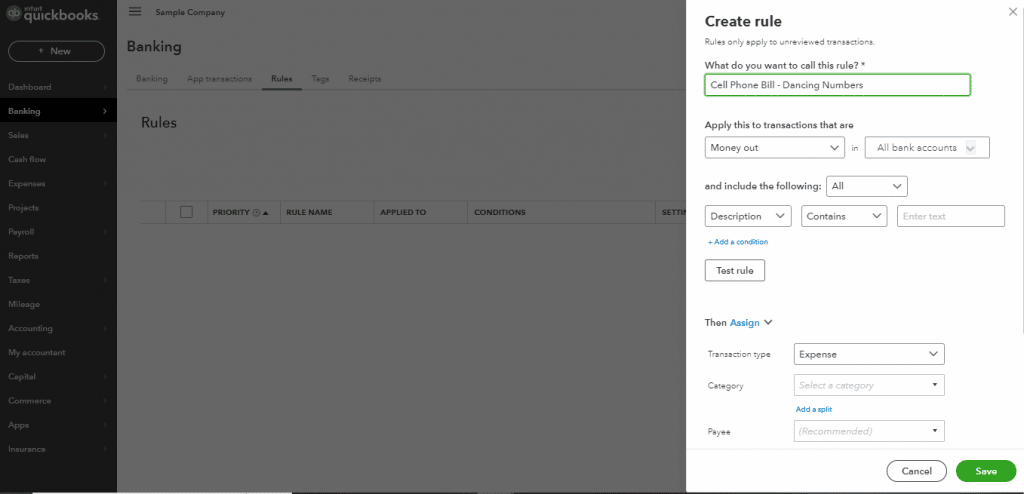
6. The next selection will ask you to select All bank accounts, Checking, Saving or Cash to which you will apply the rule after you have selected Money out or Money in.
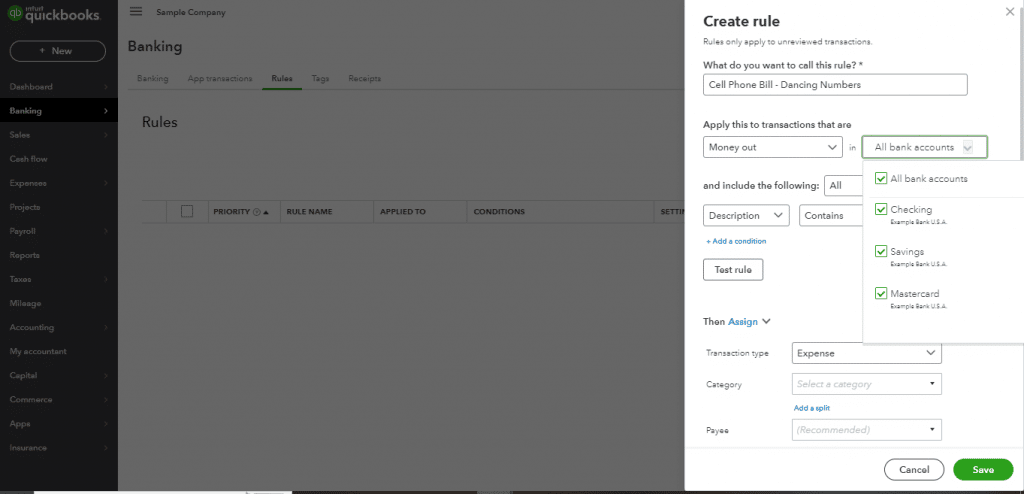
7. Select whether the transaction meets all, some, or none of the next field’s three requirements. If you select all, every item in the following functions must match all in the transaction. If you choose Any, one of the three things in the following functions must match the transaction.
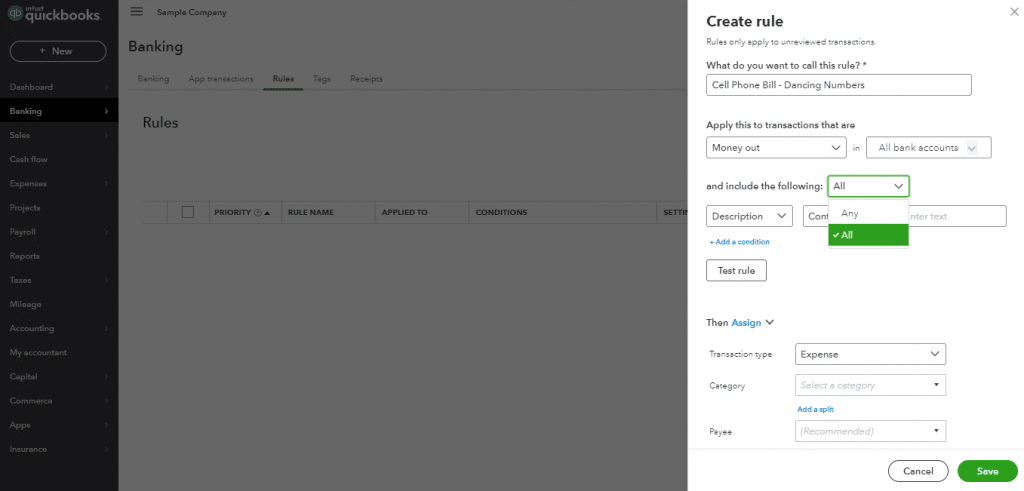
8. Create a rule that is based on the amount, bank text, or description. Choose one of the three options. Generally, the description is the payee’s name. QuickBooks Online is able to identify every piece of information from a transaction and can identify a particular name, like Amazon.
In QuickBooks Online, the bank text outlines details that are used to describe the transaction’s specifics. The vendor’s phone number, store demographics like city, state, and phone number, and acronyms or cryptic abbreviations the bank employs are some examples of details. To see bank texts, expand your bank transactions in your bank feed.
The transaction’s numerical details are represented by the amount. If you have a recurring monthly payment, it might be simplest to choose the Amount option.
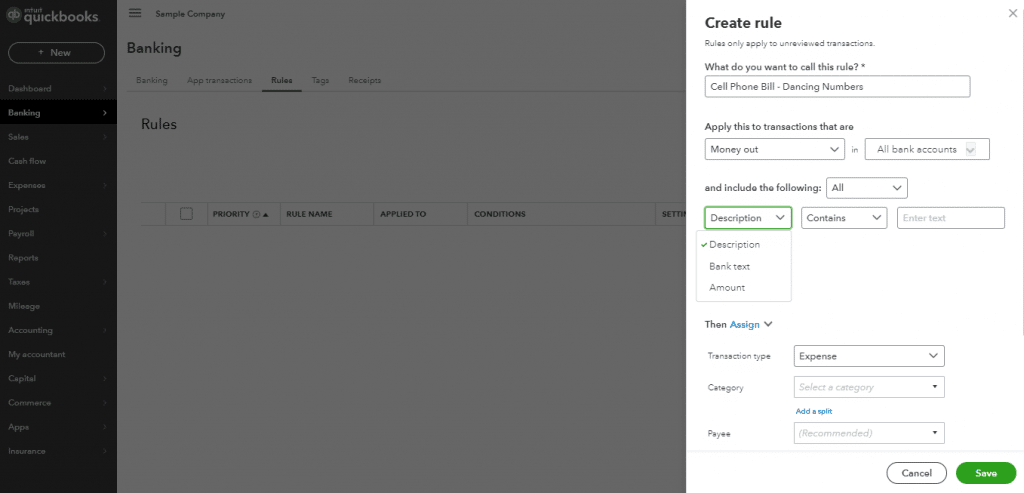
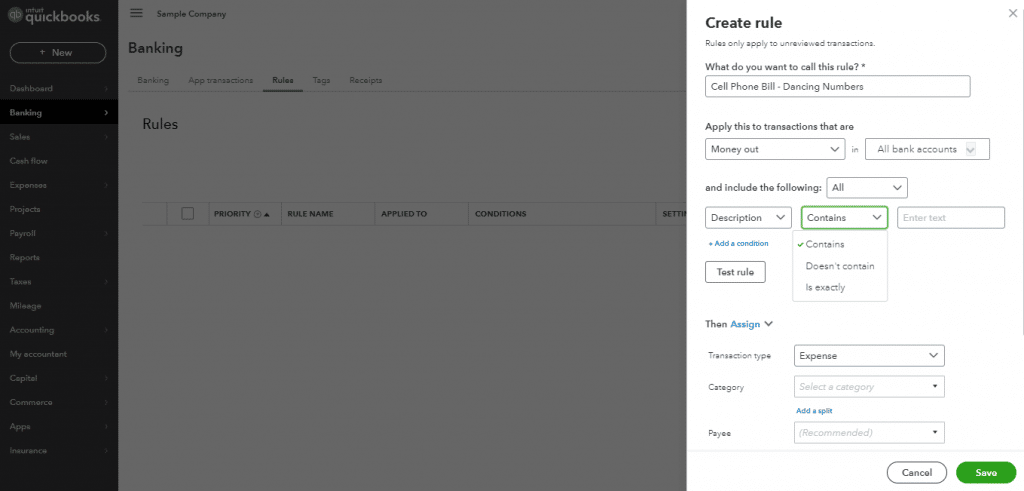
9. Selecting Contains, Doesn’t Contain, or Is Exactly is the next function.
You can filter your Bank Rules in any way you see suitable between steps 8 and 9. Description and Contains are included in filter options. If you choose these options, the bank rule will be applied to each and every description that contains whatever information you entered in the Enter text field. The rule would apply to every Amazon transaction if you typed in Amazon.
Other than this you can choose between steps 8 and 9 as Amount and is exactly. Create a rule for a $100 monthly recurring expense by choosing Amount and Exactly and entering “100.00” in the Enter text box.
10. Nextly, you can Assign or Exclude. In case you are creating a rule then you will assign the rule for particular transactions. Additionally, you might move forward with automatically excluding specific transactions from your bank feeds.
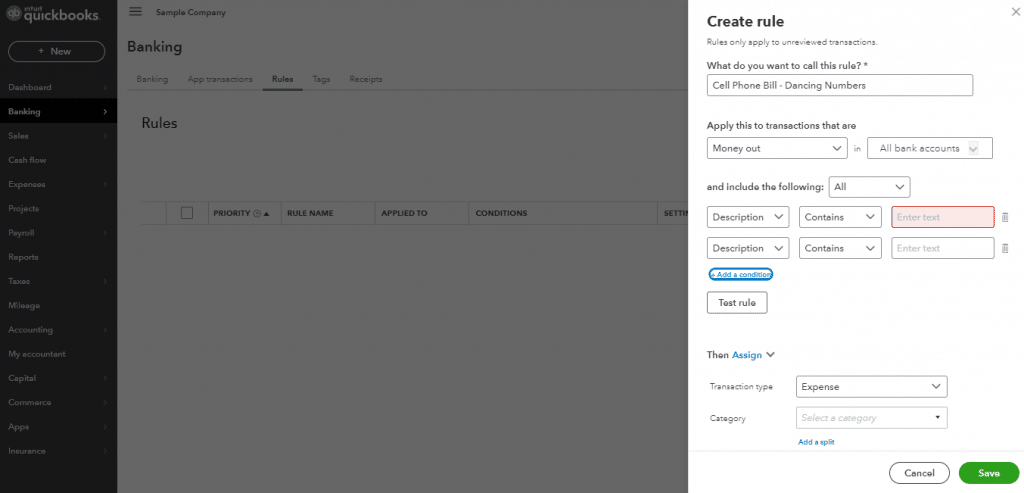
11. The transaction type should then be chosen from expense, transfer, or check.
Select the Expense option if your bank rule to classify expenses, especially those that are paid online or digitally. Choose Transfer if you want money to be transferred from one source to another.
Note: If they are already transferred then skip 12 and 13 steps and select the account.
Choose the Check option if this kind of transaction will be printed as a check and your checks through QuickBooks.
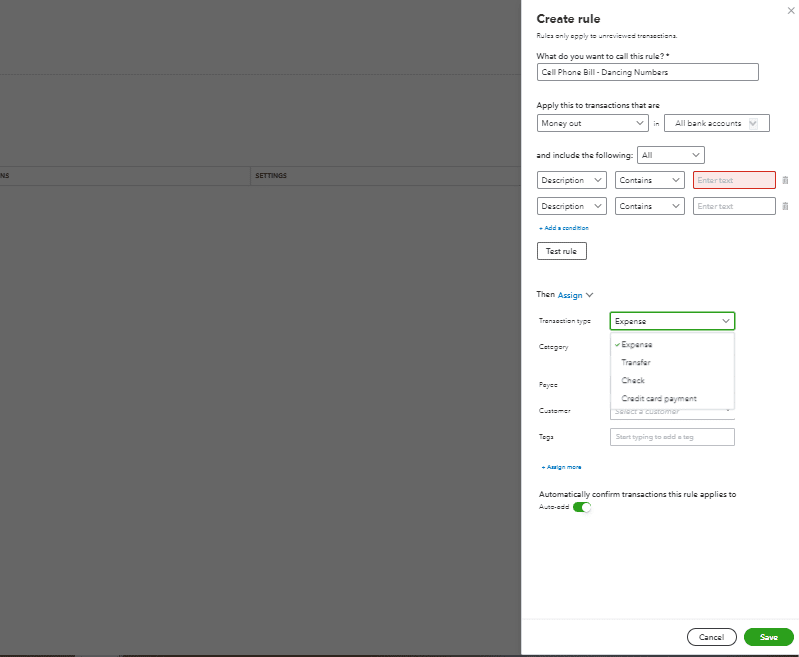
12. Choose a category. There are numerous well-known business options under the Category dropdown menu. If the populated list does not have the option you’re looking for, you can always add one.
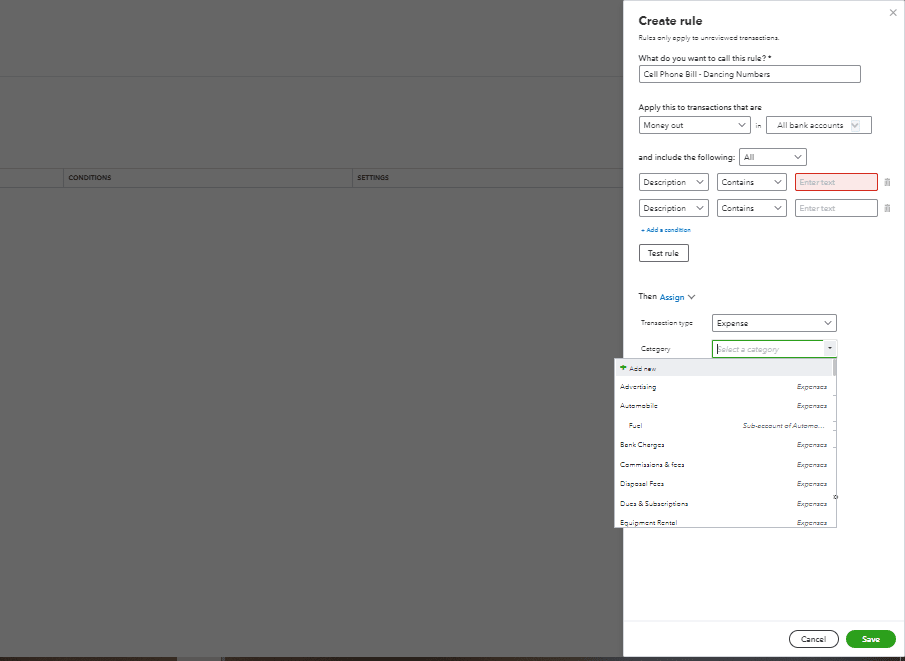
13. If your payee is not currently showing on the list, add them. You can add any tags to the transactions in the final prompt if you want to.
Prioritizing Multiple QuickBooks Online Bank Rules
Prioritize them once you are comfortable creating bank rules in QuickBooks Online. You can find a list of the bank rules you made under Banking and Rules. You must prioritize your bank rules by moving the most important rule to the top, then the second most important rule, as QuickBooks Online can only apply one rule per transaction.
In this article, you have learned how to classify transactions imported from your connected bank accounts and to create the rules that will classify transactions in QuickBooks Online automatically. With the help of this article, you will cleared about the bank feeds for QuickBooks Online. If you still get any issues related to this then you can connect with Dancing Numbers experts via LIVE CHAT any time as they are available round the clock.

Looking for a professional expert to get the right assistance for your problems? Here, we have a team of professional and experienced team members to fix your technical, functional, data transfer, installation, update, upgrade, or data migrations errors. We are here at Dancing Numbers available to assist you with all your queries. To fix these queries you can get in touch with us via a toll-free number
+1-800-596-0806 or chat with experts.
Frequently Asked Questions (Faqs)
How do Bank Feeds Work in QuickBooks Online?
Bank feeds take the place of manual entry into accounting software, improving the efficiency of reporting and reconciling transactions. You can automatically track and manage revenue and expenses with the bank feed feature in QuickBooks Online. The bank feed for QuickBooks Online supports the import of all banking transactions.
Why It’s Important to Manage QuickBooks Online Bank Feeds?
Check register entries are not made automatically when bank transactions from connected bank accounts are loaded into QuickBooks Online. To add or exclude a transaction from the check register, you must first analyze each transaction in the Banking Center and compare it to any other transactions that are existing in QuickBooks Online.
What to Do with Bank Feeds in QuickBooks?
Your bank and credit card accounts can be connected to online banking in QuickBooks Desktop using Bank Feeds. Download bank transactions so you don’t have to record them manually.
• Go to Bank Feeds from Banking.
• Choose Configure Bank Feeds for Account.
• Lastly, enter your Bank’s name field, enter, and then select your bank.


 +1-800-596-0806