Entering transactions is one of the most popular and crucial jobs in QuickBooks. When you enter a transaction, QuickBooks ought to instantly record it in your register. You will have to manually enter it into your register if this doesn’t happen. Either the “Input Transactions” box or the menu bar may be used to manually enter a transaction.
Dancing Numbers helps small businesses, entrepreneurs, and CPAs to do smart transferring of data to and from QuickBooks Online. Utilize import, export, and delete services of Dancing Numbers software.
All other sorts of transactions can be entered manually into QuickBooks using the same procedure. Find the transaction you want to enter, and then click on its name in the left-hand margin. By doing this, a table will appear where you may enter the required information.
It seems simple to import bank transactions into QuickBooks Online at first glance. It’s often as easy as logging into your bank or credit card accounts using QuickBooks Online for many users. However, while importing transactions into QuickBooks Online, there can occasionally be restrictions and difficulties.
In this article, we will define how to manually enter bank transactions in QuickBooks Online. You’ll discover how to enter bank transactions straight into the check register and how to edit any data you’ve already entered.
Features of QuickBooks Online Banking
The Banking feature of QuickBooks Online is used to import bank transactions. These features facilitate data entry and serves as a reconciliation tool.
Reconciliation:
The Banking function gives you a way to instantly reconcile the financial records of your bank with those of your company. It updates frequently, take 24 hours or longer to appear, depending on how your bank interacts with QuickBooks Online. Even with this delay, utilizing the Banking feature to reconcile daily or in every few days, it is still quicker than the conventional reconciliation technique where you wait for the arrival of your bank or credit card statement in the mail.
The Banking feature enables you to compare your daily bookkeeping with your bank’s records; this quick reconciliation does not take the place of the customary monthly reconciliation of your accounts with the statements generated by your financial institutions. It’s still crucial to perform a thorough reconciliation of your accounts each month; even if your bank balance and QuickBooks amounts match then also they accept or match transactions.
Data Entry:
The Banking tool is the only one that many QuickBooks Online users utilize for bookkeeping. Your books could contain important mistakes as a result of this.
You may speed up your bookkeeping by removing some data entry by importing bank transactions into QuickBooks Online using the Banking tool, especially for recurring automatic transactions.
Numerous solutions, including Receipt Bank and Bill.com, can connect to and push these “lagging” transactions into QuickBooks Online on your behalf. The banking tool is used to assist you with some data entry but to fight the urge to only use imported bank transactions for bookkeeping.
Enter Bank Transactions Manually in QuickBooks Desktop
Before entering the bank transactions manually in QuickBooks, you must first set up a bank account. QuickBooks Desktop can be manually updated with bank transactions. There are different ways which you can use to achieve this:
Step 1: Open Your QuickBooks Account
- First, You have to open your QuickBooks Account on your system by Log in your account.
- Now, Navigate and select the settings in the list of options.
- On the left side of your company name, there is a gear icon, click on it.
- From the list of options of gear icon, Select chart of accounts.
Step 2: Fill & Check all the Information
- Hit the new button, the online application form will appear in front of you on the screen.
- Fill all the details in the form as asked, like:
- Type of the category.
- Type of Detail.
- Description.
- Balance.
- Name and so on.
- Now, Go through and check all the information you have filled in fields.
- If all the information provided by you is correct then hit the save button and then exit from the screen.
Step 3: Review Your Account
- The account you just created will show up on the account list’s chart.
- Now, Review your account and check if there is any mistake.
Step 4: Select the Check Register Option
You can edit any of the parts in the list that appears when you select the Check Register option, which includes the following areas:
- Deposit Books.
- Final Balance
- Reconcile.
- Date.
- No. / Type.
- Payee Account.
- Memo.
- Payment.
- Deposit.
- Balance.
Step 5: Select Preferred Transaction
- For the register’s click on the drop arrow.
- You can select your preferred transaction type here in your register.
How To Enter Bank Transactions in QuickBooks Online Manually
In case, if you are not able to importing data online then you have to use importing or transferring data manually. You have to follow the following steps for transferring your Bank Transaction in QuickBooks Online Manually:
Step 1: Go to the QuickBooks Online Check Register
- First, You have to Navigate to the Check Register in QuickBooks Online.
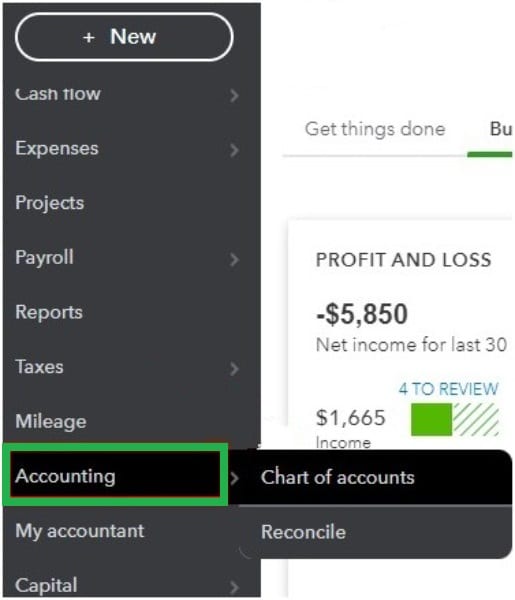
- In the left menu bar of your QuickBooks Online Dashboard, You have to navigate and select accounting option from the menu.
- From the drop down menu of the Accounting, You have to click on the Chart of Accounts option.

Step 2: Opening of Check Register in QuickBooks Online
- Now, Check register will open in front of you on the screen.
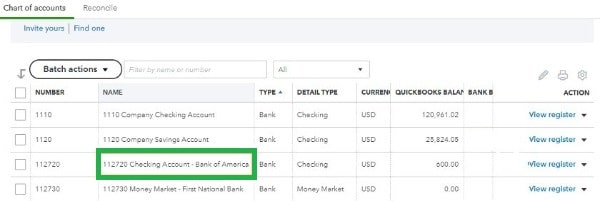
- Search for your bank account in the chart of all accounts.
- Once you find your bank account, you have to click on the view register tab.
- Now, You can input transaction in your account register.

Step 3: Now You have to Review Your QuickBooks Check Register
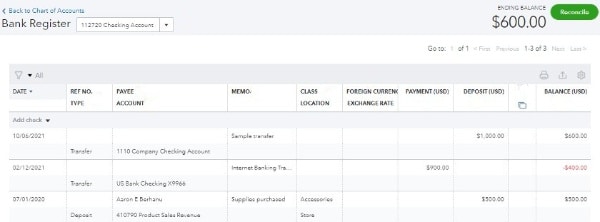
Whether you entered the transaction directly into the register, using the relevant input screen, or accepted it from your list of accepted bank transactions imported, all transactions affecting your bank balance will be shown in the check register. The only fields that must be filled out for each transaction are Date, Amount, Type, and Account, however we strongly advise you to do so.

- Bank Register: This field indicates that the bank account register you are currently reading. By selecting a different bank account using the drop-down arrow, you can change bank accounts.
- Payee: Choose the vendor or employee for payments in this area. Choose the client while making deposits.
- Date: Declare the transaction’s date in the text you are entering.
- Ref. Number or Type: You can use the transaction number and the check number which is used as the reference number. When you create a new transaction, the transaction type is a choice that will show up here.
- Class or Location: Assign the transaction to the classes and locations that you define for yourself. You must activate Track Classes and/or Locations.
- Memo: Give the detail of the transactions in a concise manner (in proper explanation).
- Account: Select the account from the Chart of Accounts that the payment or deposit should be classified under. For instance, if you are submitting a check to pay monthly rent, select the rent expense.
- Reconciled: When you specify that the transaction has cleared your bank during the bank reconciliation, a checkmark will show up in the corresponding column. Never manually tack on or take off a checkmark. We advise you to reconcile your bank account every month to ensure your records are accurate.
- Deposit: If it’s a check, leave it blank or enter the deposit amount.
- Payment: If making a deposit, enter the deposit amount or leave it blank.
- Exchange Rate of Foreign Currency: You have the option to choose your own currency exchange rate for foreign currency transactions or allow QuickBooks Online do it for you.
- Balance: Following each transaction, this is the account balance.
Step 4: Enter Bank Transactions Into the QuickBooks Check Register
Select either a check or a deposit from the drop-down menu that appears just below the column headers in the check register to add a new transaction. There are numerous additional bank transaction types that can be entered through input screens, but everything entered directly into the check register can only be classified as a check or a deposit.
The register will now present a line for you to enter the fields as previously mentioned. Once you’re done, make sure to click the green save button.
How To Modify Bank Transactions in QuickBooks Online
The transaction you want to change should be highlighted in the bank register. Any information you enter into the register can be changed due to this. Clicking Edit, as displayed below, will take you to the input area where you can add or modify additional information.

Check Registers Should Not Be Used to Enter Bank Transactions
The use of simple-to-navigate panels for entering transactions is one of QuickBooks online strengths. These entry screens offer fields for each piece of data that QuickBooks need to accurately account for the transactions and give comprehensive reporting. There aren’t all the required fields in the check register. For instance, there are no fields for in the check register.
- Multiple Accounts: A single account must be given ownership of the entire bank transaction listed in the check register. Amounts entered into the correct input forms can be attributed to any number of different accounts and items.
- Markup / Billable: It is not possible to identify a charge as billable or to give a markup percentage for an expense that is recorded in the check register. It’s critical to designate expenses that will be charged to a customer as “billable” so that the expense can be added to the customer invoice.
- Items: You cannot assign transactions in the check register to items on your list of goods and services. Only sums specifically assigned to an account, also known as a category in QuickBooks Online, are permitted using the register. For QuickBooks Online to manage your inventory amount and cost, any purchase or sale of inventory must be attributed to the appropriate Inventory Item. Any service sale should be allocated to the appropriate service item so that QuickBooks Online can offer a useful breakdown of your revenue per service.
- Projects / Customer: QuickBooks Online is unable to accurately generate profit and loss reports by customer or project because amounts entered in the check register cannot be attributed to a customer or project.
Additionally, Manually entered checks in the register cannot be used to pay the vendor’s outstanding invoices. Similar to consumer payments, deposits made into the check register cannot be used to offset a customer’s invoice.
The check register will automatically receive transactions entered in the input screens. If you’ve previously entered a transaction in the check register, you can access the appropriate input screen by choosing the transaction in the register and clicking Edit.
Conclusion
We really hope that you are able to enter the bank transactions in QuickBooks manually after reading this article. Bank transactions can be manually entered in QuickBooks Desktop easily. We are always here to help you if you are still having problems with a particular issue. Our team of expertise is available for 24×7 for resolving your issue, In case you are facing trouble in QuickBooks. Additionally, you can have a LIVE CHAT with one of our specialists, in case you want it.

Looking for a professional expert to get the right assistance for your problems? Here, we have a team of professional and experienced team members to fix your technical, functional, data transfer, installation, update, upgrade, or data migrations errors. We are here at Dancing Numbers available to assist you with all your queries. To fix these queries you can get in touch with us via a toll-free number
+1-800-596-0806 or chat with experts.
Frequently Asked Questions
How can I Enter Transaction of Bank Manually in QuickBooks?
Follow the following steps in case you want to enter the transaction manually in QuickBooks:
- Firstly, You need to press the Plus icon.
- Now, Select for the transaction which you want to make.
- Select the statement of your choice as per your requirement.
- Select the assertions you want to formulate.
- Once done with all the above steps you can hit the save button in order to save all changes and the exit from the screen by clicking on exit button.
What are the Steps You have to Follow in Order to Create the Transaction for Customers and Vendors?
To conduct transactions for your clients and vendors, kindly follow the instructions below:
- First, You have to choose add i.e. plus icon.
- In order to create customer transactions, You have to select the appropriate transaction type from the Customers section.
- In case if you want to create a vendor transaction, Then you have to select the appropriate transaction type under Vendor.
- Once you enter the transactional information, Hit the save button in order to save the changes which you made in above steps.
- Hit the exit button for exiting from the current screen.
Before Manually Entering the Bank Transactions in the QuickBooks Account, How do I Open the Account Register in QuickBooks?
In order to open the account register in QuickBooks, follow the following procedures:
- Open QuickBooks and select the Accounting option.
- Now, You have to click on Chart of Accounts.
- Go through the account register and search for your account.
- In case if QuickBooks is a new program for you, review your Chart of Accounts.
- Now, Choose View Register from the Actions column.
- You have now finished opening your Account Register.
What Are QuickBooks Three Modes, and How Do They Affect QuickBooks Failure To Display The Quick Add Option When Manually Entering Bank Transactions?
There are three modes, Which are:
Classic: In this mode, transactions are matched or added using the Transaction List pane. Create rules for automatically identifying or matching transactions to books, or update the transactions as soon as possible for future matches.
Advanced: To match or add transactions, it makes use of the Transactions List pane.
Express: To match or add the transactions, it makes use of the Account Register.
In the event that you are unable to see the Quick Add, Match to Existing transaction or Add More Details options. Afterward, you are operating in Classic Mode.
Following are the Steps to Changing Your Modes:
- Activate the Edit button.
- Choose the Preferences option.
- Next, Choose “Checking“.
- Choose Company Preferences.
- Select “Bank Feeds” from the section.
- Select the mode you wish to switch to from Advanced, Express, or Classic by clicking on it.


 +1-800-596-0806