A QuickBooks error 1911 occurs when the user tries to install the QuickBooks application on a particular Windows server due to glitches in registering library files, which must be resolved immediately. So, let’s examine this issue in greater detail and figure out how to resolve it.
Dancing Numbers helps small businesses, entrepreneurs, and CPAs to do smart transferring of data to and from QuickBooks Desktop. Utilize import, export, and delete services of Dancing Numbers software.
Register QuickBooks Library Files Failed Error occurs because of QuickBooks registration failure during the installation. The error appears with the following message “Error 1904: [file path / name / extension] failed to register.”
In QuickBooks, all the company files are categorized with the kind of library in order to keep all the data and files in order. These file types are most likely to receive errors such as Error 1911 which restricts the process to record the file type that is allocated to QuickBooks.
What is QuickBooks Error Code 1911 (Register QuickBooks Library Files Failed)?
While installing QuickBooks, users generally get the message error code 1911. This message notifies the user that he/she failed to register type library for.
“Error 1911. Could not register type library for file C:\Program Files (x86) CommonFiles\Intuit\QBPOSXMLRPLib.dll. Contact your support personnel.”
Here is the notification pop-up that you witness when this error appears on your screen:
- We are Sorry! Something is wrong with the installation
- Error 1911: Failed to record the type library for file C:\program files(x86)\Common
Recommended To Read – Fix QuickBooks Subscription has Lapsed Error
What is the Primary Reason of QuickBooks Error Code 1911?
QuickBooks 2024 error 1911 emerges due to the following reasons:
- It is possible that QuickBooks was not installed properly.
- It is possible that the program’s registry files are corrupt.
- QuickBooks library files cannot be registered because the admin settings do not have exclusive rights.
- The PsExec directory may be corrupt.
What are the Symptoms of QuickBooks Error Code 1911?
The symptoms of different accounting errors vary based on updates, company files, and installation. For QuickBooks 1911, Here are the symptoms:
- The QuickBooks Desktop failed to work
- The input provided for the Keyboard and mouse are low
- The Windows Operating system stopped functioning
- The Windows Operating system becomes non-responsive
- The QuickBooks Program became non-responsive
Methods to Resolve Error Registering QuickBooks Library Files
Here are the different solutions to fix and repair the QuickBooks Error Code 1911:
Soltuion 1: Download & Install QuickBooks Diagnostic Tool
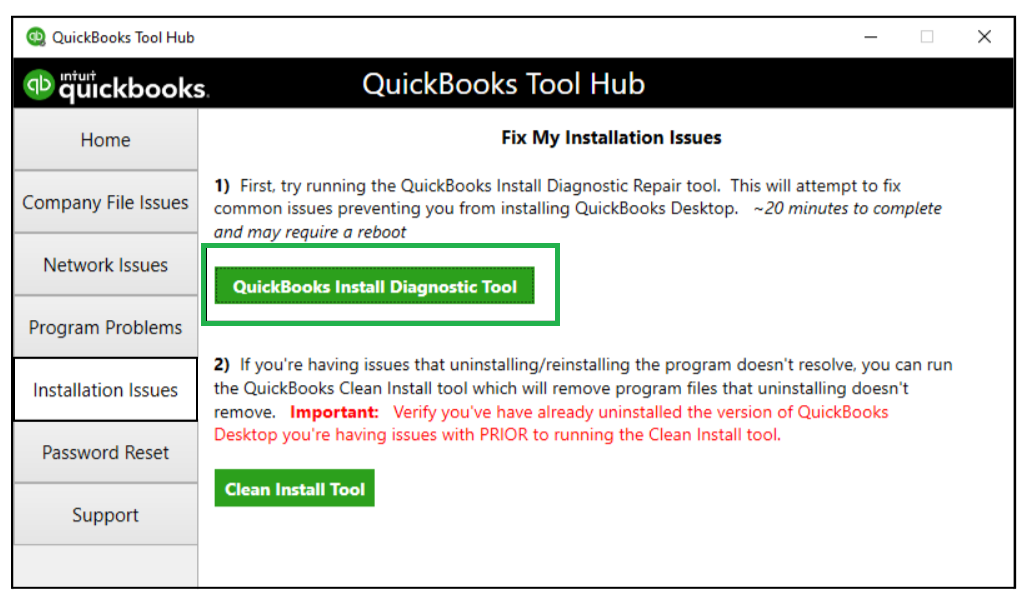
To fix any QB installation problem, use the QuickBooks Install Diagnostic Tool to Register QuickBooks Library Files. The following steps will guide you through installing this utility from the tool hub:
- You can download QuickBooks Tools Hub here.
- Follow the instructions on the screen to install QuickBooksToolsHub.exe.
- You can open QuickBooks Tools Hub by double clicking on its icon on your desktop.

- Click on QuickBooks Install Diagnostic Tool under Installation Issues.
- The user should download and then install the particular QuickBooks Diagnostic Tool
- Now, the user must uninstall the particular Adobe Flash Player
- Now click Windows + R keys and then the Run window will show up below on the corner left-side screen
- Press Control Panel and click OK. Now choose uninstall a program
- Press on the Adobe Flash Player mentioned on the software list
- Choose Uninstall and then do as per the instructions given to uninstall the software
- Users must do as per the instruction given. Now Start the Computer and then uninstall the Adobe Flash player.
Solution 2: Change the Windows Account Settings
Activate the Particular Built-in Admin
- Click the Windows + R keys. The particular RUN window will be displayed on the left side of the screen below.
- Enter CMD in the search box and click the OK button.
- Press right-click on CMD exe and choose Run as an Admin.
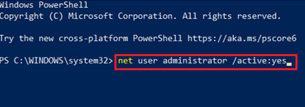
- Now open the window that has been prompted and add “net user administrator /active: yes” tab.

- Press the Enter key.
- Now open your particular computer in Safe Mode.
Steps to Change the Built-in Admin account
- Click the Ctrl + Alt+ Del keys together.
- Now choose the second option, which is Switch User.
- In case you are using Windows 8, press the Windows Key.
- Press on the upper right corner of the window to choose the user icon.
- Click Ctrl+Alt+Del keys together and choose the particular default Admin account.
Steps to Hide the Built-in Administrator account as it was initially
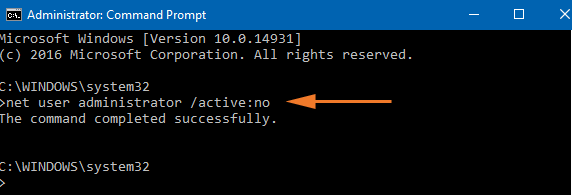
It is possible to built-in admin account. Here are the steps:
- Click the Windows +R keys. Then the RUN window will show on the left side of the screen.
- Press the command prompt-CMD.
- Press on the cmd.exe.
- Now choose the option Run as an Admin.
- Type “net user administrator /active: no” and press Enter in the given command screen.

Steps to Change the Security Settings of the Installation Directory
- Follow the route (C:) > Program Files > Common Files.
- Locate the Common Files Folders and press right-click.
- Select Properties in the drop-down.
- Press Edit in the Security tab.
- Select the Users in the given Group Names.
- Open the Permissions and tap on the permission.
- Press Apply and click the OK button.
Solution 3: Edit the Setup Editor Settings
If the above solutions do not work for you, you can change and setup the particular editor settings. Here are steps to modify:
- Choose the Tables when you are not required to Register Your Library File type.
- Now, Press on the Lib table Type.
- Add the row along with the file mentioned specifically in the error notification.
- Delete the Particular Row.
- See if the error 1911 has been solved or not.
Read Also – What is QuickBooks Data Migration Service
Solving QuickBooks Register Library Files Error for Special Cases
Let’s understand the definition of QuickBooks library before moving on to the specific situations that result in the QuickBooks Register Library Files issue.
We need to understand error 1911 since it results from issues with QuickBooks library files. The QuickBooks Software Development Kit contains application development, interacts with the request processor, and connects with QuickBooks through the use of libraries, utilities, samples, and documentation. For the installation request processors and operation of the application are the QuickBooks Desktop dll files. When these files are corrupted, the error 1911 appears.
For the Users Who are using Bit Defender
The following files need to be added to the bit-defender exclusion list if QuickBooks is to be installed on a desktop computer with bit defender:
- C:\Program Files\Common Files (for 32-bit machines)
- C:\Program Files\Intuit (C:\Program Files(x86)\Intuit (for 64-bit machines)
During Adobe Flash Player Installation QuickBooks Error 1904
- Firstly, you have to run the QuickBooks Install Diagnostic Tool.
- Next, you have to select the Control Panel option from the Windows Start menu.
- Then you have to select Uninstall a program.
- From the list, choose Adobe Flash Player ActiveX, and then click Uninstall.
- To uninstall you have to follow the on-screen directions.
- Lastly, get Adobe Flash Player again and download it.
QBversionTool.dll Error Refers to QuickBooks Registry Library Files
- By pressing the Windows+R keys on your keyboard you have to open the Run window.
- Then, in the search field, you have to type in Notepad and then you have to hit enter.
- Now you have to type in QBTEST in the notepad file and then you have to go to the File menu that is on the upper-left corner of the screen.
- You have to select Save As and then you have to save the file in the installation directory.
- 32-bit C:\Program Files\Common Files.
- 64-bit C:\Program Files(x86)\Common Files.
Installation of QuickBooks as an Administrator
- Using the Start menu you have to sign out from the windows.
- Then, by using the Administrator sign-in you have to log in to the local machine. It should open without a password.
- Now you have to follow the QuickBooks installation process as the Administrator.
Alter the Setup Editor Settings
As follows to fix error 1911 you will need to configure the setup editor settings:
- Start choosing the tables for your library file type once you are not required to register it.
- Select the lib table menu item.
- Now you have to enter the entry containing the particular file that was specified in the error 1911 notification.
- It is necessary to remove that specific row.
- Check to see in case the error is fixed now.
To make sure you don’t risk your data files, follow the instructions according to format and order.
Review the PsExec file
Error 1911 in QuickBooks Desktop might be caused by PsExec file issues, as was previously discussed in the causes. You must verify the following settings:
- Open Internet Explorer or Google Chrome, then download the PsExec file.
- Then you have to extract it from the location where you see it later.
- The QuickBooks installation files must now be placed in the same folder as PsExec. For these files, you can create a new folder.
- Press Windows + R to open the Command Prompt window from the Run window. In the Run Window, type cmd.
- From the command prompt window, launch PsExec. It works similarly to an installer file to make installing QuickBooks on the computer easier.
- Install QuickBooks by using the PsExec file on the computer.
- Launch the QuickBooks Install Diagnostic Tool after that.
- Lastly, open the installer in the same manner as before.
Install QuickBooks in Selective Startup Mode
To avoid other background programs interfering with the installation process, you might try installing the QB application in selective startup mode. Following are the steps to do the same:
Switch to Selective Startup
- To enable selective startup, you have to open the Run window by pressing the Windows + R keys.
- In the search field of the run window, type msconfig. Press Enter.
- Selective Startup and Load System Services is an option under the General tab.
- Select the Hide all Microsoft Services option located under the services section.
- After that, Select Disable All and then Uncheck Show all Microsoft services.
- Choose Windows Installer from the list of available services, then click OK.
- Press the restart button on the window of the system configuration now.
Uninstall and Reinstall QuickBooks Desktop
- It’s time to uninstall the QuickBooks software at this point.
- So, from any accessible location, you have to to the Control Panel.
- Select Uninstall a Program after selecting the Programs and Features section.
- From the list of installed applications on the computer, select QuickBooks Desktop.
- Start the uninstalling process by adhering to the on-screen instructions.
- After that, proceed with the clean installation.
- Reinstalling QuickBooks Desktop from the official Intuit website is now necessary.
- Save the installation package to a convenient location by downloading it.
- To start the installation, select the executable file from the downloaded directory.
- As instructed, enter the product and licensing details, accept the terms and conditions, and follow any other prompts.
- After the reinstallation and setup are complete, QuickBooks can be used without any problems.
Return to Normal Mode
- You have to launch the Run window by pressing Windows+R after installing is done.
- Then you have to type the command msconfig and then you have to click ENter.
- You have to opt for Normal Startup mode which is under the general tab.
- From the system configuration window, you have to restart the system.
Please stick to the solutions given above in the format mentioned. Only then you will be able to solve the QuickBooks Error code 1911 could not Register Type Library for file.
If the issue still occurs and you are still having the problem, then we highly recommend you to connect with our team of experts for the best assistance.

Looking for a professional expert to get the right assistance for your problems? Here, we have a team of professional and experienced team members to fix your technical, functional, data transfer, installation, update, upgrade, or data migrations errors. We are here at Dancing Numbers available to assist you with all your queries. To fix these queries you can get in touch with us via a toll-free number
+1-800-596-0806 or chat with experts.
Frequently Asked Questions
Do the Install Diagnostic tool will Support you in Solving the QuickBooks Error Code 1911?
Yes. It can support you if there are any problems with the QuickBooks installation. You need to download and after that, you need to install the QuickBooks diagnostic tool. You need to follow certain rules and regulations for it. Then only the problem will be fixed.
DO we need to take a Backup of the Company Files Before Fixing QuickBooks Error Code 1911?
Yes. You need to take a backup often weekly, monthly, or fortnightly. Since it assists in restoring the data, whenever you get any problem in your particular QuickBooks account such as the error 1911. You can try to fix the data with the current last backup. Post that, you try to do the task minutely that you wish to do.


 +1-800-596-0806