Looking for a step-by-step guide on how to setup, install, and update Intuit data protect? You’ve come to the right place if that’s the case. Here, we will provide you with an understanding of Intuit data protect, including its setup, its installation, and its updates. QuickBooks and Intuit Data Protect work together to provide backup services. It can be programmed to back up your data every day.
Dancing Numbers helps small businesses, entrepreneurs, and CPAs to do smart transferring of data to and from QuickBooks Desktop. Utilize import, export, and delete services of Dancing Numbers software.
What is Intuit Data Protect?

To learn a few things about Intuit Data Protect before we start the processes of setting it up, installing it, and updating, it’s important. Basically, Intuit Data Protect is a subscription-based backup solution offered by Intuit. This tool enables you to make backups of the data files and folders kept in QuickBooks. Data is protected by Intuit Data Protect from causes such as file corruption, data loss, and theft.
The QuickBooks data files and system must be kept secure if the security of the data is to be guaranteed. With this service, you can choose to either create a backup of your company file for the complete system backup. It is compatible with QuickBooks 2011 and the later versions of the software.
System configuration for installing Intuit Data protect
Before installing the Intuit Data Protect Tool, you need to be aware of a few system requirements.
- You have to make sure that your operating system is Windows 10 or higher than that.
- Windows users installing Intuit Data Protect need local admin rights to the computer. They require unrestricted access to all folders.
- You should set up QuickBooks Desktop on the server or the computer where you set up Intuit Data Protect.
- On your local area network, you must keep files (Support Box, google sheets, and OneDrive are not supported).
- Use a local file path on the PC if you want. We do not assist you in mapping network drives.
- Make sure to update the Norton Life lock certificate every six months for security reasons. You just log back into Intuit Data Protect after logging out.
- You have to add access to Intuit Data Protect secure sites in Internet Explorer.
- You have to type Internet Options into Windows Start.
- Trusted sites can be found by choosing the Security tab.
- Then you have to choose sites.
- Now you have to select Close after adding all safe websites that mention Intuit Data Protect.
How to Install Intuit Data Protect in QuickBooks?
The procedures listed below must be followed in order to install Intuit Data Protect.
- You must first launch the QuickBooks software.
- Then you have to navigate to File and select Backup Company after that.
- You must now enable the features of Online Backup active.
- After that, Log into the IDP using your Intuit Log in credentials.
- Select the option to continue after that.
- You must now select your QuickBooks file and press continue again.
- Then you have to select the documents you want to backup locally, then click continue.
- Select the backup files or folders that you have created, then click Proceed.
- Create a schedule for a daily backup and then select the next option.
- Then, you must change your notification settings.
- Launch the QuickBooks software first.
- Open your IDP by clicking on the button in the bottom right corner.
- Now click the Change Backup Settings button and then click Continue until you reach the Notification Email Settings page.
- Finally, Choose the option from the list that appears based on how you wish to receive mail notifications.
Why it is important to Update Intuit Data Protect?
You must upgrade your application protection if you want to protect yourself from a variety of online risks. Additionally, It provides improved performance, information security, and higher security.
- First, keep your Intuit data safe by Download the Latest Version, which offers better security to secure and prevent data theft.
- You might also benefit from faster online applications and tool speed.
- Improved stability across different operating systems is another possibility.
- Additionally, Completing data security and data loss prevention is another benefit.
Steps to Set up Intuit data protect
Updates are very important to experience the latest features of any tool, as you already know. Therefore, you should update your downloaded tool if it has an update. When you enable automatic updates in QuickBooks, the IDP has been updated. The update can be downloaded manually.
The user can also look for updates manually at any point in time. Here is how you do it:
- Within the help menu, Select the option Update QBs.
- Download the latest update for Intuit Data Protect by choosing Update QuickBooks seen on the Help menu.
- Now, choose the Update Now tab.
- Make sure that you have opted for Data Protect from the particular list and then select the Get Updates option.
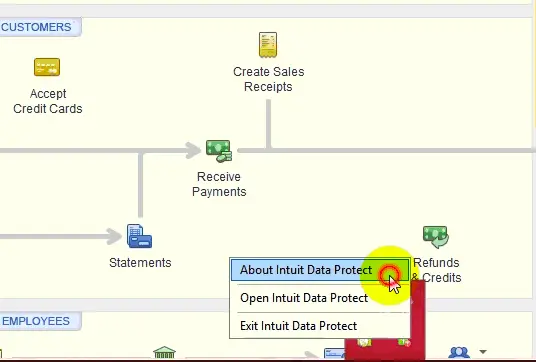
- Once the Install Update is done, choose the Up Arrow from the desktop toolbar.
- Then right-click the Intuit Data Protect icon and select About Intuit Data Protect.
- Now choose the Update option.
- Now choose the OK once it is completed.
Process to make a backup with Intuit data protect
Once you are aware of the steps to set up and update Intuit Data Protect, strive for a backup. It backs up the required files and folders once in an entire day, automatically. Users are also allowed to backup manually at any time.
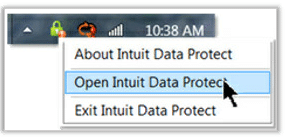
- Press right-click on the Intuit Data Protect icon and then select the Open Intuit Data Protect.

- Now, Select the Backup Now option.
- Choose the files and folders which you wish to back up and choose Continue.
- Now select the Backup Now. The user will get a message which will say that the backup is successful now.
- In the end, Click OK button.
Steps to View the Backup Status

Follow the steps that are mentioned below to see the status of the backup.
- Start by searching for the Intuit Data Protect icon, which resembles a green padlock.
- Then you have to right-click on it.
- Select the Open Intuit Data Protect option after that.
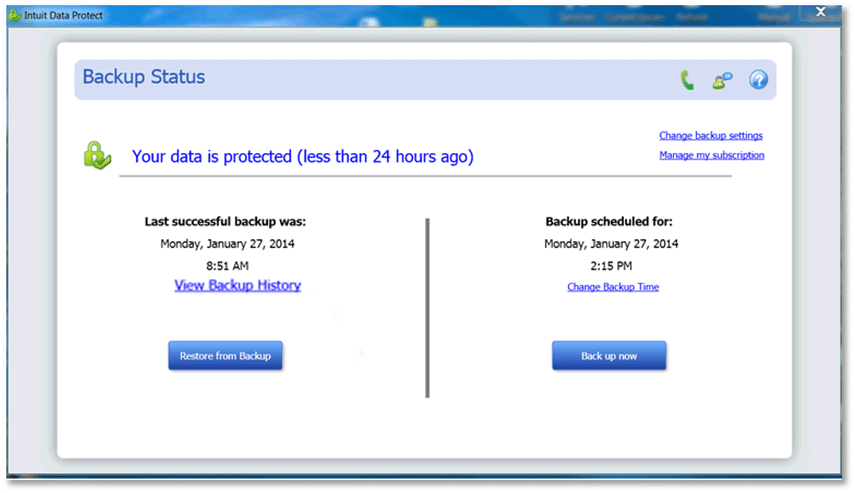
- Go ahead and select View Backup History.
You may view all the details regarding backup attempts and successfully completed backups after clicking on it. The reason behind the unsuccessful backup is also visible.
Steps to Restore the Backup
- You must first open the IDP icon, which looks like a green padlock.
- Select the Restore from Backup option next.
- The next step is to choose the file you want to restore.
- Select Continue & restore from the menu.
- The restoration process will begin, overwriting your old data.
- You must select the overwrite option in order to disregard it.
Intuit Data Protect is a great asset for your business, if it is set up, installed, and updated in the right manner. If you are not aware of the right procedure of backing up QuickBooks files becomes an issue.
Hence, for a better outcome, it is always recommended to hire the services of a certified professional who have the required expertise in setting up and installing the update for Intuit Data Protect to backup QuickBooks files.

Looking for a professional expert to get the right assistance for your problems? Here, we have a team of professional and experienced team members to fix your technical, functional, data transfer, installation, update, upgrade, or data migrations errors. We are here at Dancing Numbers available to assist you with all your queries. To fix these queries you can get in touch with us via a toll-free number
+1-800-596-0806 or chat with experts.
Frequently Asked Questions
Can I Disable Intuit Data Protect?
A subscription-based service called Intuit Data Protect (IDP) helps to protect your data in the case of a system failure or other emergency. Even though the service can be very useful, you can always end your subscription. OS Windows 7
- Click on the Windows logo.
- Open the Startup Folder.
Intuit Data Protect should be right-tapped, then deleted. Windows 8, 10, and 8.1
- The following path should be followed: C:\ProgramData\Microsoft\Windows\Start Menu\Programs\StartUp
- You have to right-click Intuit Data Protect and select Delete from the menu.
Is there a Fee for Intuit data Protect?
The subscription-based service Intuit Data Protect backs up your QuickBooks files. The subscription is $4.95 per month or $49.95 per year. With Intuit Data Protect, features like automatic backup and file restoration are available. With automatic backup, your QuickBooks files are automatically backed up on a schedule that you select. You can manually initiate a backup whenever you want. You may quickly and simply use file restoration to restore your lost or corrupted QuickBooks files from a backup.
What is the Configuration needed to Install Intuit Data Protect?
Here is the configuration required to download Intuit Data Protect. These are essential to update Intuit Data protect:
- Windows 7
- Windows 10
- Windows Server 2011
- Windows Server 2016
- Windows 8.1
- Windows Server 2008 R2 SP1
- Windows Server 2012 R2
What is the System Hardware required to Install and Update Intuit Data Protect to Backup QuickBooks Files?
Here is the system hardware required to install and update Intuit Data Protect to backup QuickBooks files:
- 4GHz Processor
- 4X DVD ROM Drive
- 4GB RAM
- 1280 X 1024 Screen Resolution
- 5GB of Free Disc Space


 +1-800-596-0806