Most of the small, medium, and large businesses have switched to QuickBooks for efficient storage and retrieval of accounting data. The software helps organizations maintain data in an organized way. However, sudden instances of the loss of data trouble users to a great extent. Know how to recover lost QuickBooks Data File from a Hard Drive.
Dancing Numbers helps small businesses, entrepreneurs, and CPAs to do smart transferring of data to and from QuickBooks Desktop. Utilize import, export, and delete services of Dancing Numbers software.
The users never forget to keep the data up-to-date. But what they forget is to take a backup of the same regularly. They keep postponing things and then, suddenly one day, they lose it all. Thus, it is recommended to users to be particular about taking the backup regularly without delaying it.
Being an accounting software, however, QuickBooks offers an inbuilt feature to ensure the data is easily recovered in case the businesses lose them due to any whatsoever reasons. Apart from using the inbuilt feature, you can also apply other methods of recovery for the lost QuickBooks Data.
What are the Main Causes of Data Loss in QuickBooks?
Before browsing through the methods of recovering QuickBooks data when lost, it is essential to know the causes of such loss. Here are a few of them discussed:
- Upgrading Company Files to a Higher Version of QuickBooks Software
- Issues While Upgrading the Software
- Troubles or Malfunctioning of the Applications while Using the Software
- Abrupt Power Shortage or Sudden System Crash
- Failure to take Regular Backups
- If Files are Corrupt or Broken
- If Files are Deleted Unintentionally
- Viral Attacks on the System
Recovering Lost/Deleted QuickBooks Data Files from a Hard Drive
Follow the below steps to restore QuickBooks Lost Company Data Files in the easiest way:
- Open your Search Dialog Box First, then Enter *.QBW into it by Typing it in the Box and then Pressing Enter key on Your Keyboard.
- Let’s now Search for all Duplicates as Indicated by the List of Company Data Files that were Shown.
- Keep in Mind that all Files can be Accessed by Right-clicking on a File or Folder and Selecting the Properties Tab.
- Check Whether the File is Listed as a QuickBooks Company File on the General Tab; If not, then you should Move on to the Next Step.
- Use the Date-Modified Features to do this, and you will Find that it’s the most Updated File you have ever seen.
- Copy the Most Recent File into a CD ROM When you Find it.
- Remove all Leftover Files Immediately after Copying a File or a Folder.
- Finally, Use the Shortcut Ctrl + V to Paste the Copied File Back into its Original Location.
The above method helps you if your hard drive contains various company files and you are missing QuickBooks data files. However, if you are a Pro or Premier user and have lost or deleted any of your important QuickBooks files, such as a company file, backup file, account copy, etc., the QuickBooks Auto Recovery (ADR) Tool will come in handy.
Points to Remember
- For Windows, only QuickBooks Pro, Premier, and Enterprise Solutions have the Auto Data Recovery (ADR) Feature.
- In the Accountant Editions of QuickBooks, the ADR feature is not available.
- Mainly ADR Files are limited to 1.5 Gigabytes in size. Therefore, Your system won’t build an Auto Data Recovery File if Your Data Backup is Larger than 1.5 Gigabytes.
- Ensure that you’re QuickBooks Desktop Software always has the most recent QuickBooks Updates, including QuickBooks 2018, in Order to use the QuickBooks ADR Feature.
How to Recover Deleted QuickBooks License/Files/Data from Hard Drive?
A hard drive can save your life if you need to save data, but it also carries risks that could result in you losing all of your data. But if you know how to retrieve QuickBooks data from your hard disk, things will go more smoothly.
By calling the QuickBooks data recovery service number, you can get in touch with the company’s technical support staff if you’re experiencing problems recovering your data. But if you want to solve this problem on your own without seeking the advice of a technical expert, the D-Back Hard Disk Recovery Expert is here to alleviate your concerns.
1. Using Company Files
Using the most recent Transaction Log File (.TLG) and a duplicate of your company log file, you can locate the lost transaction (.QBW.adr). You must first copy a few files into a new folder. To do so, take the actions listed below:
Step 1: Copying Your TLG. and .QBW.adr. File into a New Folder
- On Your Desktop, Make a New Folder called QBTest.
- Next, You need to Find the Company’s Location that was saved to Your Computer. The company File may be Found on many Company Screens as Well as the Product Information Screen.
- Next, you have to Copy and Paste the TLG File into the Newly Formed QBtest Folder.
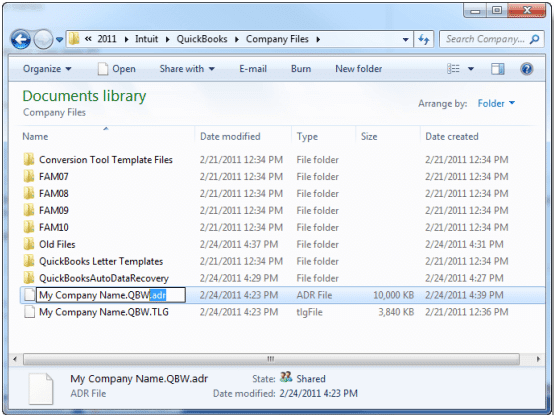
- Locate the QBW.adr Folder When you have done Copying Your TLG. File. The QBW.adr. the File is Located in the Same Place as the Corporate File.
- Once you have Located the QuickBooks Auto Data Recovery File, Then you have to Please Copy and Paste it into Your QBtest Folder. Remember to Rename the QBW.adr File to QBW.
Step 2: Recovery through QuickBooks
- After Copying Your TLG. and QBW Files then you have to Open QuickBooks.
- Then you have to go to the QBtest Folder and then you have to Open the .TLG File
- To double-check that all Transactions that have been Recorded you have to use the Account Register.
- After that, With the Verify Utility option you have to Verify the Integrity of the Company File.
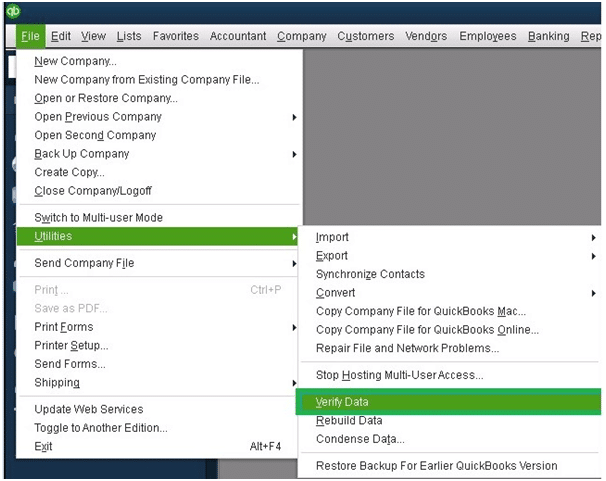
- After Verifying, Move the Damaged File to any other Location in Case the Company File is in Good Condition.
- Then, You have to Move the Company File Copy from the QBtest Folder to the Original Location.
2. Using QuickBooks Data Recovery File
Using the QuickBooks Data Recovery File you can also Recover your Data, but you have to use both now .TLG and .QBW Files.
- You will need to Create a New Folder that is Named QBtest, to Proceed Further.
- On your Computer Find the QuickBooks Auto Data Recovery File and then you have to Copy Both the .TLG and .QBW.adr. Extension Files.
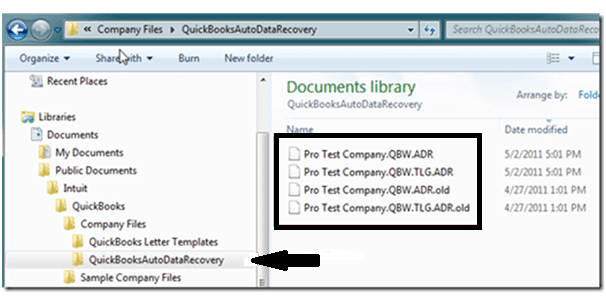
- Now, in the QBtest folder, you have to fix them.
What causes QuickBooks to Lose Data?
A variety of factors could be to blame for lost data in QuickBooks. Some of the causes of data loss from accounting software include the following:
- It is advised to have a backup because you can lose your data if you update your QuickBooks version.
- The issue might have emerged as a result of malware or virus attacks.
- Data corruption may occur as a result of the disruption of several critical functions.
- Improper storage and access to several company files on the same system might potentially result in data loss.
- System breakdowns or power outages can corrupt files.
- Unintentional data deletion.
Tips to Backup and Restore a QuickBooks Files/Data Desktop
Below are the mentioned tips that you can use to backup and restore QuickBooks files:
1. Backup QuickBooks Data Desktop
If you want to keep your data safe, make sure your QuickBooks Company File receives regular backups. The automatic backup feature in QuickBooks can help you stay up with your data and ensure that you won’t lose any files as a result of particular problems. To get a QuickBooks desktop with automated backup, simply follow the procedures listed below.
- Backup your files on QuickBooks
- Open up the QuickBooks dashboard.
- Select File from the menu in the upper left corner. From the drop-down menu, choose the backup provider, then click Create Local Backup.
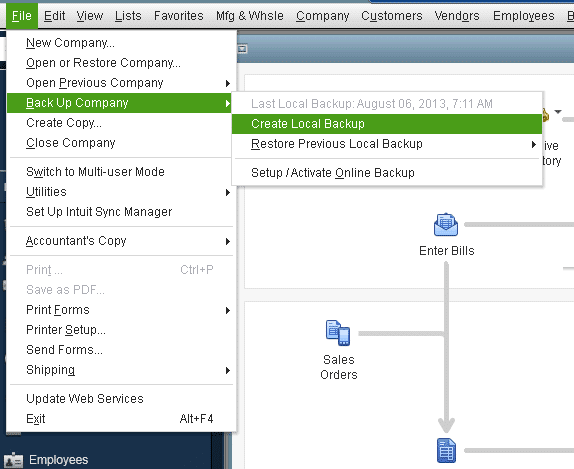
- Then you have to click next.
- Go to the folder or place you want to find after selecting it.
- Then you have to set your preferences.
- Decide whether to include the date and time of the backup file.
- After that, you have to set a limit on how many backups you want to keep at any particular time (recommended 4-8)
- Make a note in your calendar to back up a company file at a specific time.
- When you save, select the option to verify that the business data is correct.
- It’s best to verify everything twice.
- When prompted to confirm that you wish to save the file to your local machine, choose yes and continue.
When do you wish to save the file? Now or Now with planned later backups. It is suggested that you use the second option, immediately and schedule future backups.
2. Restore QuickBooks Data Desktop
Follow the easy steps below to restore your quick book data desktop:
- QuickBooks should be opened, then the open or restore company option should be selected.
- After choosing the Restore Backup Copy, then you have to click next.
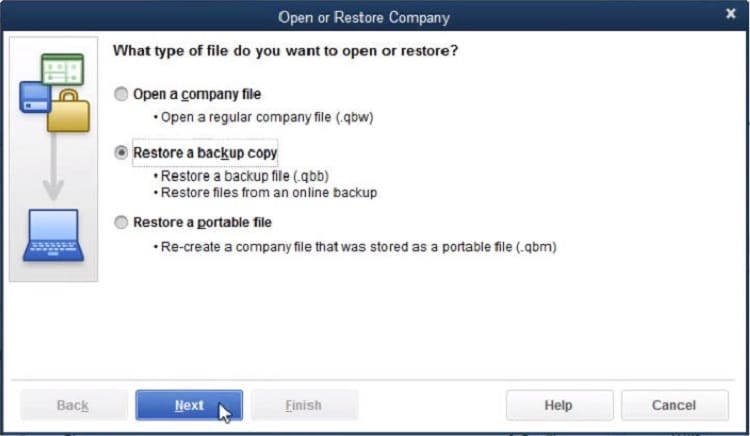
- Then you have to click on local backup and then you have to click Next.
- On your computer, look for your backup business file. Here’s how it ought to appear: [Your business name]. qbb.
- Select a folder as the location for your recovered corporate file. then you have to select Open.
- When finished, you have to choose Save. If you ever get a notice that your data might be overwritten, pick the solution that works best for you.
I hope the above mentioned information will help you to Recovering Lost/Deleted QuickBooks Data Files from a Hard Drive. If you are still have any issue then you can connect with Dancing Numbers team via LIVE CHAT.

Looking for a professional expert to get the right assistance for your problems? Here, we have a team of professional and experienced team members to fix your technical, functional, data transfer, installation, update, upgrade, or data migrations errors. We are here at Dancing Numbers available to assist you with all your queries. To fix these queries you can get in touch with us via a toll-free number
+1-800-596-0806 or chat with experts.
Frequently Asked Questions
How to Recover QuickBooks Files from a Hard Drive?
Using the techniques we’ve already stated above, you can recover QuickBooks files from the hard disk. Using the Hard Drive Recovery Expert is one of the best and easiest solutions.
How Can I Backup QuickBooks to an External Hard Drive?
Transfer your data to a hard drive by copying the QuickBooks AutoData Recovery folder directly to the hard drive by making a new QuickBooks Test folder if you want to back up your data to an external hard disk.
How can I Find the QuickBooks License Number on the Hard Drive?
• Begin by going to the Company tab.
• Then you have to choose My Company from the dropdown option.
• After that, on the right side, under Manage your account. You will find your license number along with the product key.
What if I don’t Find the File with .TLG.ADR or the .QBW.ADR Extensions?
While copying and pasting the file with .TLG.ADR or the particular .QBW.ADR extension, if you do not find the required file in the original folder, here are the steps you can follow to search for the same:
 Navigate to the Product Information screen
 Look for the No Company Open Window
 Search for the files. These files are named after the particular company files.
 If you still cannot identify them, you can:
 Press Windows+E and open File Explorer
 Choose the Organize option
 Select the particular option, Folder & Search [If you are using Windows 10, Windows 8.1 & 8, go to View and choose the particular File name extension]
 Click on Hide extensions. This will be for the identified file types
 Click on Apply
 Select OK
What is an ADR? How does it Help in Recovering the Lost Data in QuickBooks?
ADR stands for Auto Data Recovery, which is an inbuilt feature in QuickBooks to ensure users do not lose their data from the hard drive because of sudden outages or problems.
ADR can help users recover the files by either/or:
 Restoring the transactions through the current transaction log file and a backup for company file already on the system
 Restoring all lost transactions but only if they have been lost within the last 12 hours of transactions.
What do I Need to Remember While using ADR for Data Recovery in QuickBooks?
 ADR is only available in QuickBooks Pro, Premier, and Enterprise Solutions for Windows. You will not find it in Accountant Editions.
 Keep updating the software to maximize the utility of this feature of QuickBooks.


 +1-800-596-0806