QuickBooks cannot connect with the company file issue is a normal server communication problem that arises when the Windows Firewall restricts the connection of the user with the company file. Usually, when QuickBooks is fixed to run in the multi-user mode, the company file is saved on the particular Server Computer which is also called the Host computer where users require access from their particular workstations.
Dancing Numbers helps small businesses, entrepreneurs, and CPAs to do smart transferring of data to and from QuickBooks Desktop. Utilize import, export, and delete services of Dancing Numbers software.
The server has high configurations and stores some significant data about the company. In order to keep the data safe and secure, stringent rules are implemented by the firewall on the particular server that often restricts QuickBooks to use the company file that is saved on the particular server.
This is the reasons why QuickBooks shows the QuickBooks cannot connect to the company file message appears:
Error: Cannot communicate with the Company file because of a firewall
Problem: It seems that the QuickBooks accounting software on your system OWNER-PC is setup to enable shared access to the particular company file, however, the QuickBooks software on your system cannot communicate with it.
Solution: The communication issue can be because of a firewall problem. If a firewall is fixed on your particular network, you may require to configure the firewall software. To get additional details, press the Help button.
Kindly look at the firewall settings. We suggest you download the QuickBooks Connection Diagnostic Tool that can determine and also fix the issue.
What Causes the QuickBooks Company File Connection Issues?
Other than the firewall application that is safeguarding the network and limiting QuickBooks Desktop services, the server which is responsible to host the company often leads to this connection error in QuickBooks.
Here are some of the most renowned reasons that lead QuickBooks to display the connection error:
- QuickBooks needs Data Server Manager to link with the company file. In case the process is not working on the particular workstation, then such kind of QuickBooks displays a connectivity problem.
- The company file folder is not sharing the particular company file due to wrong folder permissions.
- QBDBMgrN is not working on the background of your system.
- The error occurs when there are issues in the server configuration or in case the server is witnessing connectivity problems with other workstations in the particular network.
- Old QuickBooks Desktop application not only activates company file connection issues but is also accountable for many other errors like payroll errors, printing errors, update errors, banking errors, etc.
- Wring hosting settings on server and workstation computers.
How to Fix the QuickBooks Error: Cannot Communicate with the Company File Because of Firewall?
In case QuickBooks does not open the company file or fails to connect with the server, adhering to the solutions given below in the given format can help you get rid of this error with minimal effort and time.
Method 1: Use QuickBooks File Doctor Tool to Repair Company File and Network Problems
QuickBooks File Doctor is a kind of tool that was created by Intuit to repair general network connectivity problems between the workstation and the server and is also helpful in fixing damage in the company file.
Here are the steps to download and run QuickBooks File Doctor:
Step 1: Download the QuickBooks Tool Hub.
Step 2: Navigate to download of your system and click Ctrl+J and then open the downloads folder right from within the browser.
Step 3: Press right-click the QuickBooks Tool Hub.exe file and then press Open.

Step 4: Give consent to the Terms and Conditions and then move with the steps to finish the installation.
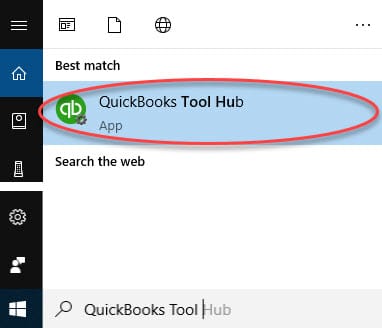
Step 5: When the installation is finished, run the QuickBooks Tool Hub with the help of the Desktop icon.
Step 6: In case you cannot locate the QuickBooks Tool Hub icon on your particular Desktop, then look for it from the given Start option.
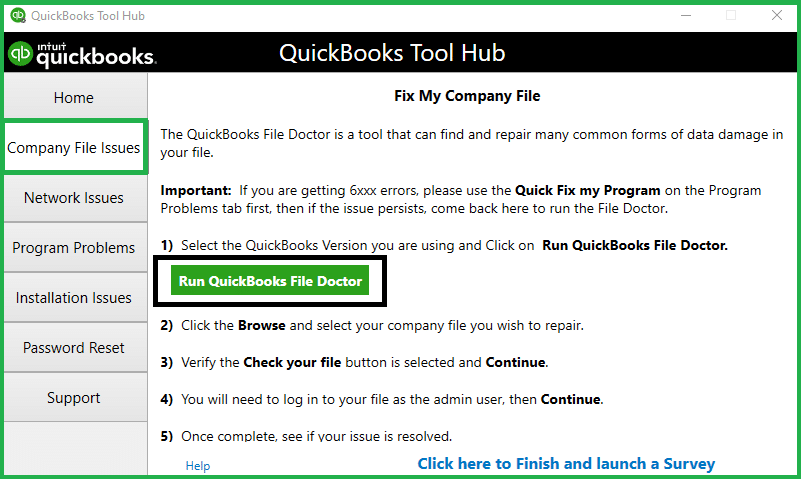
Step 7: Navigate to the Company File issues tab and press QuickFixMyProgram.

Step 8: Once the repair is over, press OK and try to Access the Company File in the QuickBooks Desktop once again.
Step 9: In case the last step is of no use, then Navigate to the Company File Issues tab and press Run QuickBooks File Doctor.
Step 10: Choose the options to fix both the corrupted company files and network and allow the tool to solve the identified problems automatically.
In case QuickBooks is still not able to connect with the company file then follow the next solution.
Method 2: Configuring the Firewall
Here are the steps to configure the firewall port manually:
Step 1: The first step is to find the Start Option.
Step 2: Add Windows Firewall in the Search field.
Step 3: It will show the Firewall screen.
Step 4: Now you require to select the Advanced Settings button.
Step 5: Post this, the User must Press right-click on the Inbound Rules and then select the New Rule.
Step 6: Find the port option and then press the Next button.
Step 7: Once completed, the user is required to ensure TCP is selected.
Step 8: Now enter the particular ports that are required for the QuickBooks Year Version in the field for local ports.
Step 9: Once the Port Number is entered, now press the Next button.
Step 10: Make sure the enable the connection and then click the Next button.
Step 11: Authenticate that all the profiles are marked if notified.
Step 12: Once completed, press the Next button.
Step 13: Post this, make a rule and then Add a Name to it.
Step 14: Press the Finish option.
Method 3: Add Exceptions to the Particular Windows Firewall Ports
Step 1: With the help of the Windows search option, search and open the Windows firewall.
Step 2: Now, in the Advanced Settings segment, press right-click Inbound Rules.
Step 3: Press Port and then click Next.
Step 4: Choose TCP from the particular option, Does this rule apply to TCP or UDP.
Step 5: Now add the port-specific to your given QuickBooks Desktop Version.
Step 6: For QuickBooks 2018 add 8019, 55378-55382, 56728 as the port.
Step 7: For QuickBooks 2019, add 8019.
Step 8: For QuickBooks 2020, the same application should be done. Run the QuickBooks Database Server Manager and then assign a specific port.
Step 9: Press Next after adding the post details and select the option Allow the Connection.
Step 10: Press Next and make sure All the Profiles are checked.
Step 11: Press Next once more and Add a Name for the fresh rule.
Step 12: Once the new rule has been generated, press Finish.
Method 4: Upgrade QuickBooks Desktop to the Current Released Version
Step 1: Open the particular QuickBooks Desktop. Now click F2 and then the Product Information screen will be displayed.
Step 2: Check if the current version of QuickBooks Desktop is installed or not. Check if your system has QuickBooks Desktop 2020, QuickBooks Desktop 2019, QuickBooks Desktop 2018, etc.
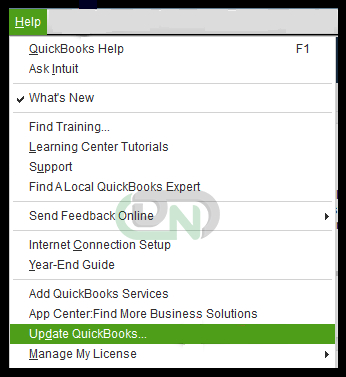
Step 3: In case you lack the Current Version of QuickBooks installed, then open QuickBooks and press the option Update QuickBooks Desktop from the Help tab.

Step 4: Go to the Update Now tab and press Get Updates.
Step 5: Once QuickBooks gets all the updates, restart it and then install the current QuickBooks Application Updates.
Step 6: When QuickBooks Download all the required updates, then restart it and then install the current QuickBooks application updates.
Note: In case your workstation cannot communicate with the company file, then do as prompted in the next steps and then reconfigure the Firewall to enable QuickBooks to use the company file.
Method 5: Enable the QuickBooks Desktop Program to Go via the Firewall
There are a few QuickBooks components that you require to add to your Windows Firewall exception to fully enable QuickBooks to go via the firewall.
Here are the steps mentioned below to add the following files to Windows Firewall Exception to solve the QuickBooks cannot communicate with the company file issue:
- QBUpdate.exe,
- QBLaunch.exe,
- QBCFMonitorService.exe,
- QuickBooksMessaging.exe,
- OnlineBackup.exe,
- IntuitSyncManager.exe,
- QBServerUtilityMgr.exe,
- QBDBMgrN.exe,
- QBW32.exe,
- FileManagement.exe,
- FileMovementExe.exe,
- AutoBackupExe.exe,
- DBManagerExe.exe,
- Dbmlsync.exe
Step 1: Navigate to the Windows Firewall Advanced Settings and press right-click on the option Inbound Rules.
Step 2: Select Programs and press Next.
Step 3: Select the option that says, This Program Path and then move ahead to go through the file.
Step 4: Find every file that is listed above and press Next.
Step 5: Press the option Allow the Connection and press Next.
Step 6: Ensure that none of the profiles are left and all are chosen and then press Next.
Step 7: Enter a Name for the rule just made and complete the task.
Note: You will need to adhere to some of the guidelines mentioned above to make the outbound rules for the particular QuickBooks program. All you require is to press right-click the Outbound Rules and choose the option, New Rule.
When QuickBooks is all ready to go via the Windows Firewall, see if the error still comes or not. If not, then do as per the instructions in the next solution.
Method 6: Use QuickBooks Database Server Manager to Solve this Issue
Step 1: Open the QuickBooks Tool Hub from the given icon for Desktop.
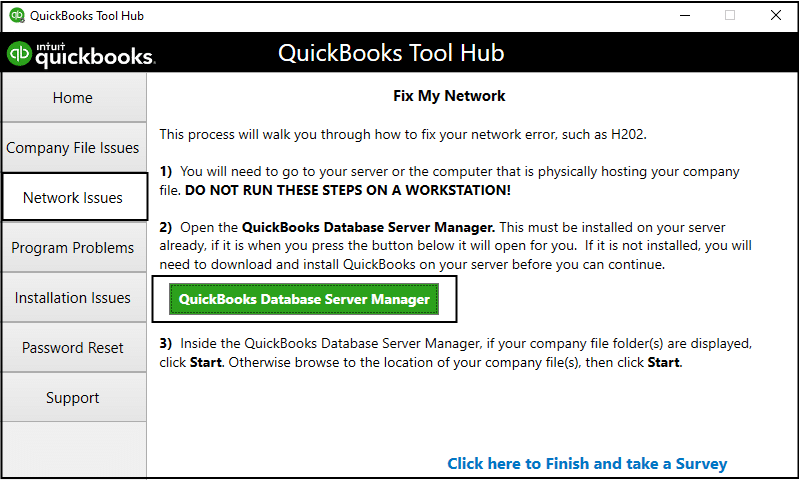
Step 2: Press QuickBooks Database Server Manager in the Network Issues tab.

Step 3: Now select the option that can Start Scan. If the option is not there, then search the company file to ensure the Start Scan option is there.
Step 4: When QuickBooks Database Server Manager fixes the problem with the Windows Firewall, attempt to create a link with the company file.
Note: If, QuickBooks wants to access the company file, however, fails to reach the database server, you must set up the hosting settings on both workstation and server computers.
Method 7: Check the Hosting Settings on Workstations and Server
Step 1: First, you need to open the QuickBooks Accounting Software on your system and press the File tab.
Step 2: The mouse cursor must be on the Utility option. Now, check the Hosting Setup.
Step 3: In case the Stop Hosting Multi-user Access option appears, then it shows the server is in the right configuration state and you can shift other workstations for advanced solutions.
Step 4: In case the settings show the message, Host Multi-user access, then you will require to choose the option and edit it to Stop Hosting Multi-user Access.
Step 5: Now navigate to every workstation and ensure that no system is displaying, Stop Multi-user Access.
Step 6: Once all the changes have been done on the hosting setup, attempt to access the company file again from the particular workstation that faced the problem, QuickBooks cannot communicate with the company file issue.
Method 8: Edit the Network Settings in Windows 10
Editing the network settings will enable Windows to share the QuickBooks Company file over a network with the help of the following steps:
Step 1: Press the Windows Start menu.
Step 2: In the search area, enter Sharing and choose Manage Advanced Sharing Settings.
Step 3: Now press the option, Turn off password protected sharing.
Step 4: Open QuickBooks Software and then Attempt Opening the Company File once more.
In case the error message appears again, then go to the next solution.
Method 9: Authenticate QBDBMgrn.exe Process is Functioning
Step 1: First press on the keys Ctrl + Alt + Del together in order to open the particular Task Manager.
Step 2: Locate the QBDBMrgn in the Process option.
Step 3: If you cannot find it, provide QBDataServiceUser the admin rights like this as given below:
- Close QuickBooks and then open the Control Panel.
- Now choose the User Accounts option.
- Now press on the option QBDataServiceUser twice.
- Now, select Change Account Type and then choose Administrator.
- Save the changes Done and then Close the Control Panel.
Method 10: Prepare QuickBooks Network Data File
Step 1: Press the Start menu.
Step 2: In the search field, enter QuickBooks Database Server Manager.
Step 3: Choose the particular QuickBooks Database Server Manager.
Step 4: On the particular QuickBooks Database Server Manager page, press Add Folder.
Step 5: Now, find the Company File folder.
Step 6: Choose the Folder that has the company file and select Scan.
Step 7: The scan will have all the company files in the QuickBooks Company Files Found list.
Step 8: Now, look for the Network Data File in the same particular Folder.
We hope that you have been able to solve the QuickBooks cannot communicate with the Company file issue that causes the QuickBooks company file not to open. We understand that fixing this error is quite a difficult and huge task and you may feel confused with the solutions provided.
In case all the solutions have been tried that are mentioned in this article and the issue still exists, or if you are seeking some professional aid in such a scenario, then you can reach out to us.

Looking for a professional expert to get the right assistance for your problems? Here, we have a team of professional and experienced team members to fix your technical, functional, data transfer, installation, update, upgrade, or data migrations errors. We are here at Dancing Numbers available to assist you with all your queries. To fix these queries you can get in touch with us via a toll-free number
+1-800-596-0806 or chat with experts.
Frequently Asked Questions (Faqs)
How to Start the Database Server Manager on Your Computer Again?
Here are the steps to restart the Database Server Manager on your computer:
Step 1: First, you need to locate the Control Panel from the given Start button.
Step 2: Now press on it.
Step 3: Find the Administrative Tool button.
Step 4: Choose Services from the given items that are listed.
Step 5: Locate QuickBooks DBXX service and press right-click on it.
Step 6: Now select the Restart button.
Step 7: Press right-click the QuickBooks DBXX service and then click Restart.
What Needs to be done if the Network Data File Extensions are not getting displayed in Windows 10?
Here are the steps to perform if the Network Data file Extensions are not getting displayed in Windows 10:
Step 1: Find Options.
Step 2: Now press the Change Folder.
Step 3: Press a click on the Search button.
Step 4: Press on the View option.
Step 5: Deselect the extensions that are hidden for the preferred file types.
Step 6: Once completed, click the OK button.
How to Show the Hidden Folders in Windows 7?
Here are steps to find the hidden folders in Windows 7:
Step 1: First find the Start button and then type Control Panel in the box.
Step 2: It will show a prompt.
Step 3: Press on the option twice that says personalization and appearance.
Step 4: A screen will appear.
Step 5: Locate the Folders options and double-click it.
Step 6: Click on Show Hidden folders and Folder.
Step 7: Now choose the suitable folder.
Step 8: Press the OK button.
How can I Restart the QuickBooks Server Manager When the Server Manager and QuickBooks Desktop Both are Installed on the Server?
Here are the steps to restart the QuickBooks Server Manager when the Server Manager and QuickBooks Desktop both are installed on the server:
Step 1: The first step is to open the QuickBooks Desktop on the host computer.
Step 2: Now find the file option and then select the Open Company.
Step 3: The company file will appear on the window.
Step 4: Press the Next option and then add a mark in the multi-user mode in the open file.
Step 5: Select Open and then log into the company file.
Step 6: Press on the Log off option to select the company file.
Step 7: Once completed, you need to add the Database in the start option.
Step 8: Press on Run QuickBooks Database Server Manager.


 +1-800-596-0806